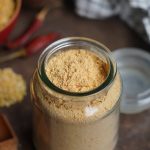
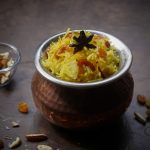
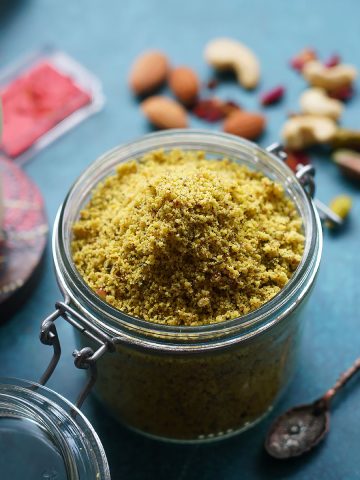
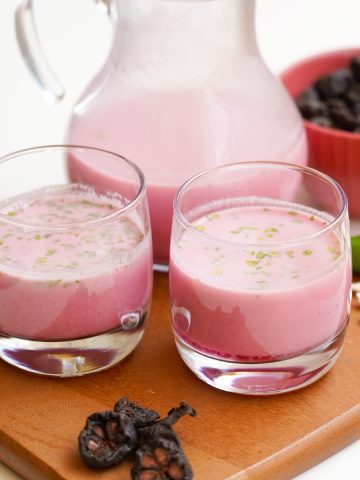
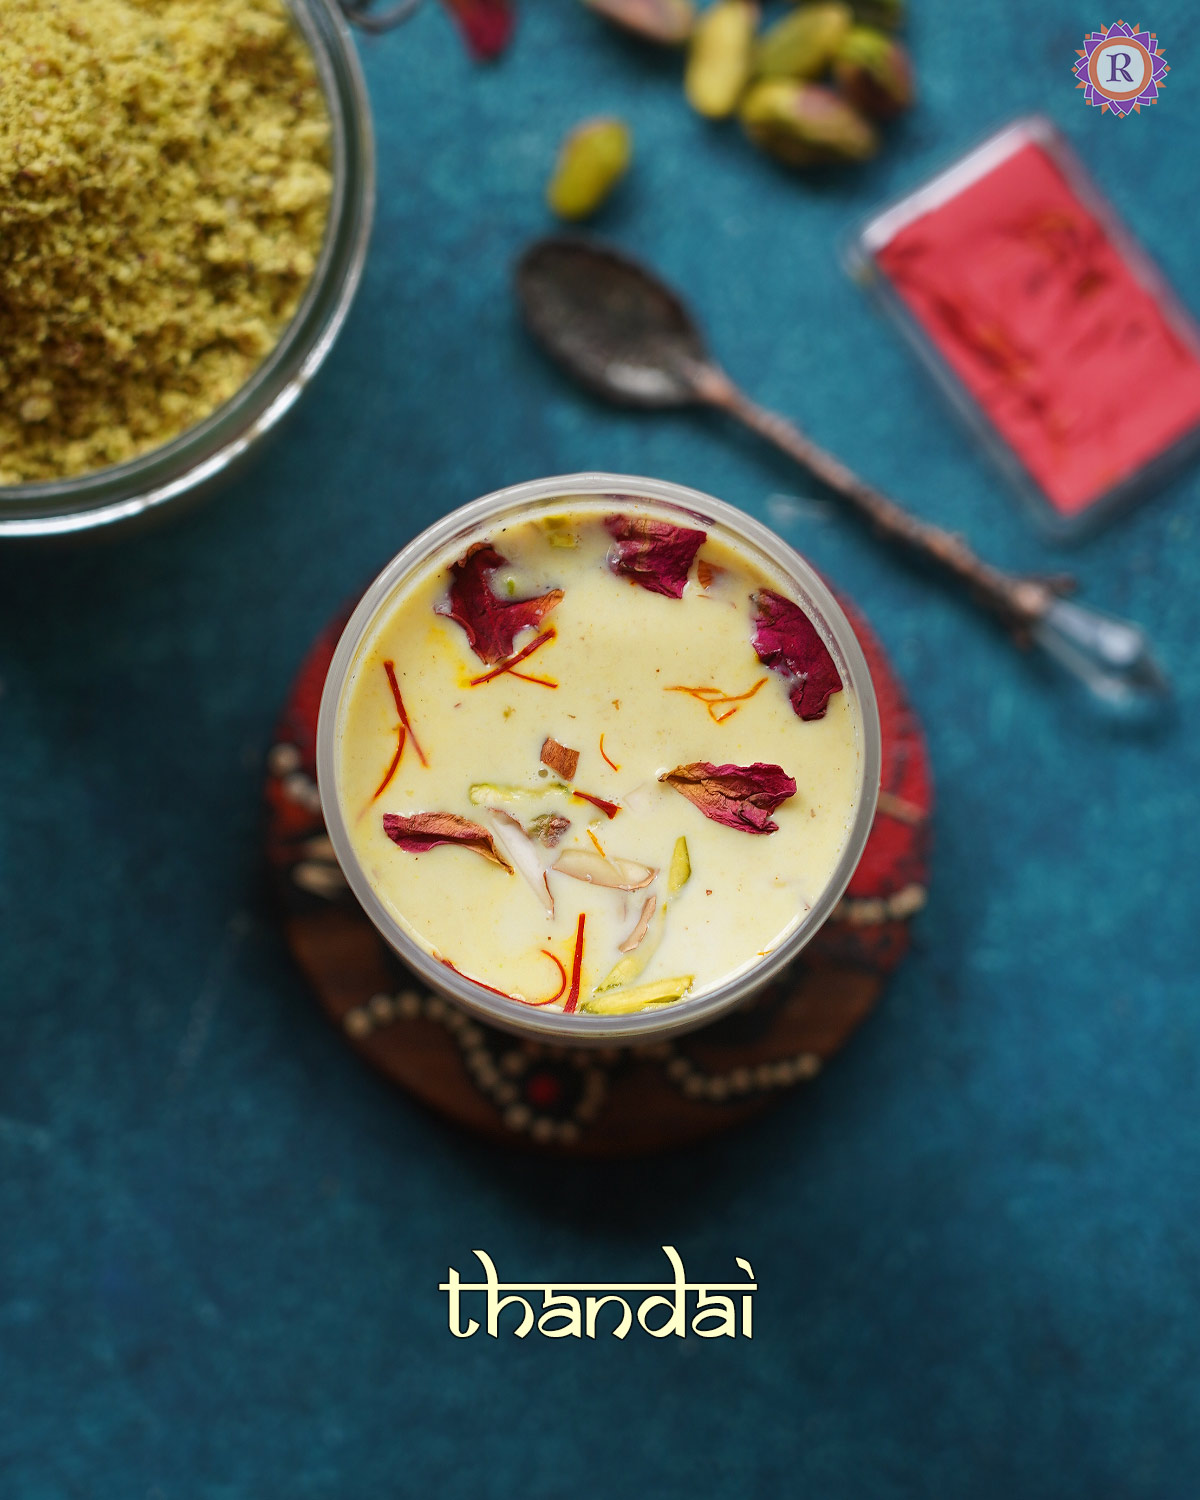
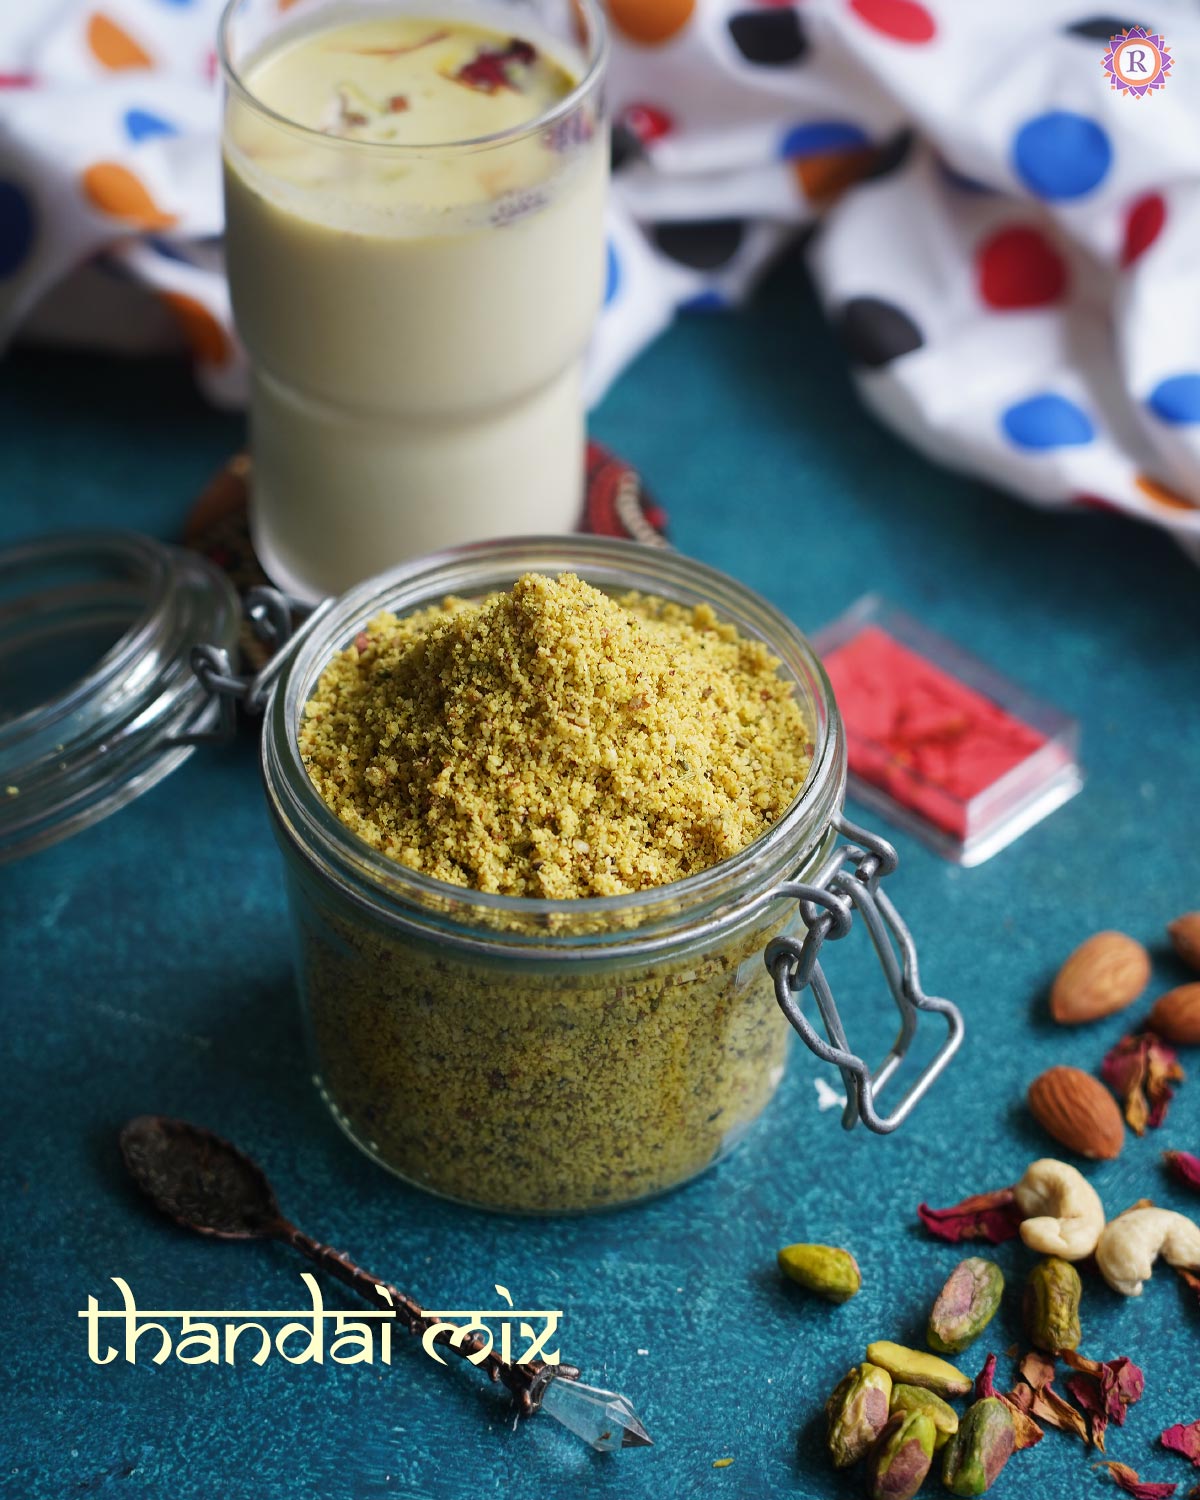
- Thandai Masala | Spice Mix
Thandai masala is a rich, flavourful blend of nuts and spices used to prepare traditional Indian drink Thandai.
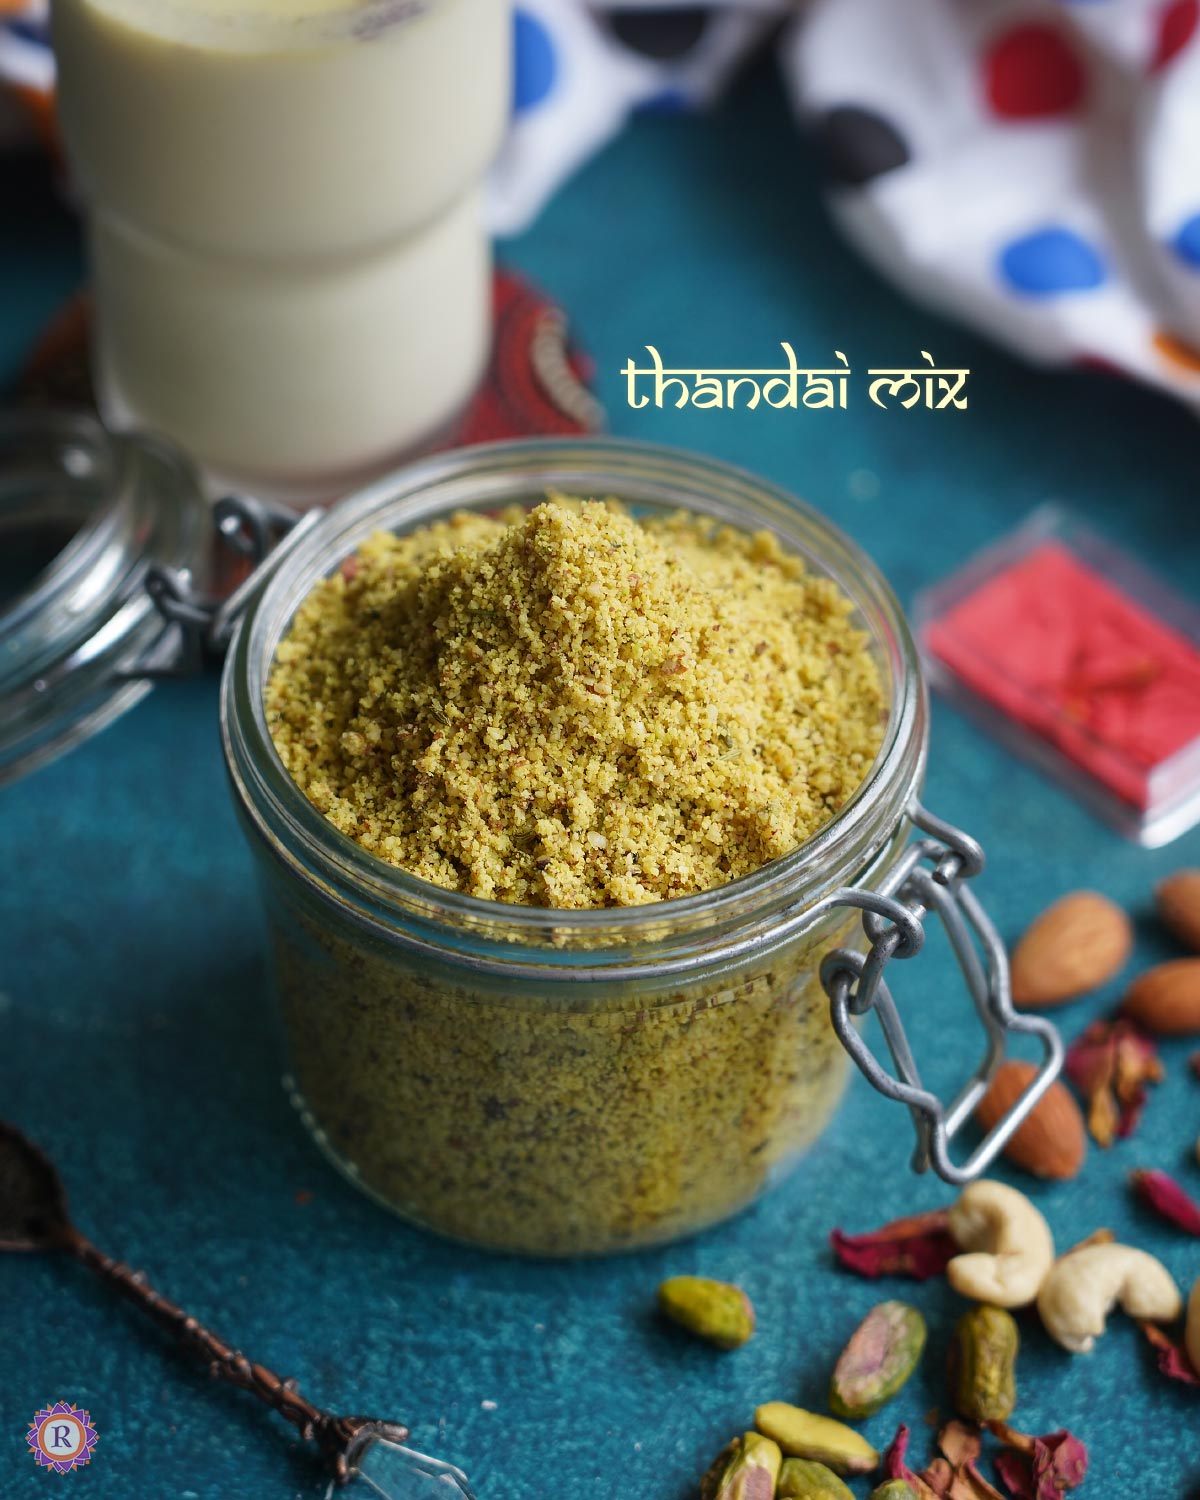
This homemade mix is used to whip up a refreshing Thandai quickly in summer or during festivals like Holi, Mahashivratri prasad. It has cooling ingredients to beat the heat in summer as well as aids digestion.
Check out my gujiya recipe and this Malpua rabri recipe in this website.
[feast_advanced_jump_to]Every Holi season, I wanted to try and post this Thandai masala, I don't know what took me so long to make this simple spice mix. This is nourishing and rich, delicious as well. Do give this a try!
Ingredients
Here are the ingredients needed to prepare thandai masala.
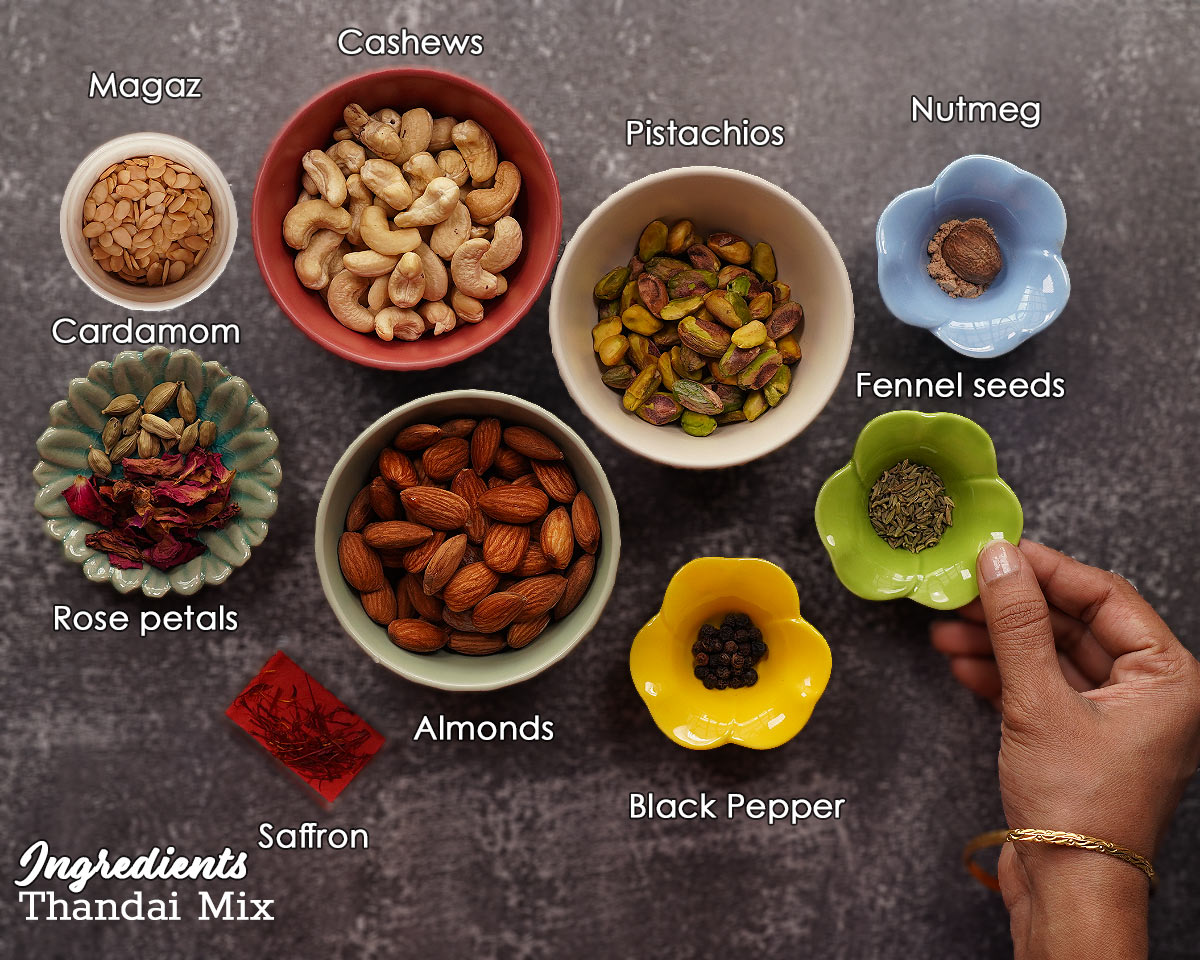
- Almonds - Main ingredient in the masala
- Cashews - I add it little less than almonds and it is perfect filler and gives a rich texture
- Pistachios - Add lesser than other nuts
- Melon seeds - Added for it's cooling properties, rich in nutrients too
- Poppy seeds - I skip this but adds the traditional taste to the drink, gives you a relaxed mood.
- Fennel seeds - Helps with digestion and adds wonderful flavour.
- Black pepper - Added for flavour, gives subtle heat that balances the sweetness in the drink. With turmeric, it is good for health too.
- Cardamom pods - Gives flavour, good for digestion.
- Saffron strands - for flavour, colour
- Nutmeg powder- For flavour
- Rose petals - Adds an amazing flavour, for it's calming properties
- Turmeric - For colour and health benefits.
Please see the recipe card for quantities.
Step by step pictures
Let's see how to make thandai masala.
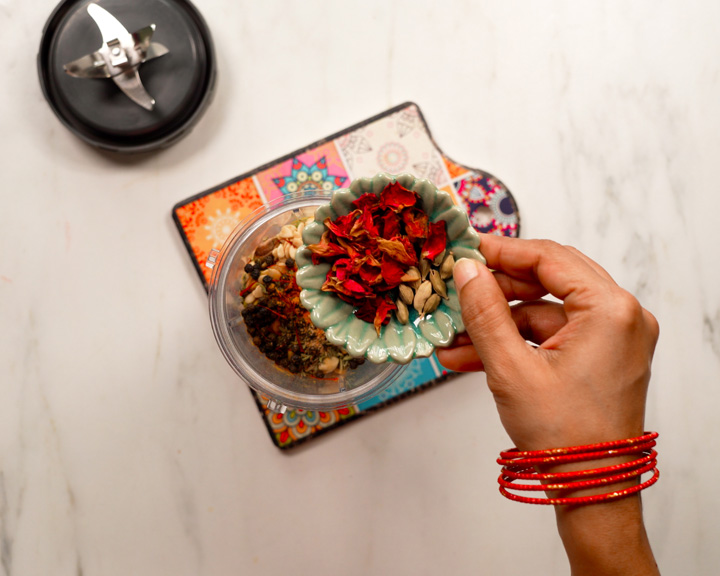
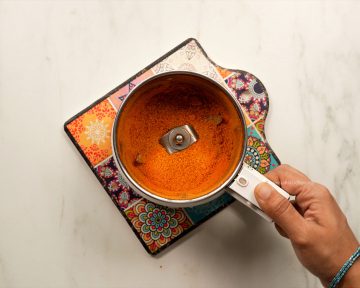
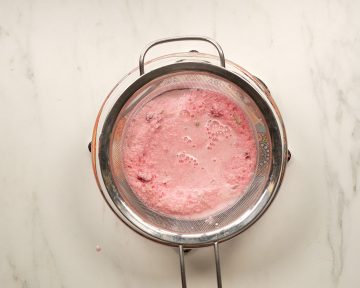
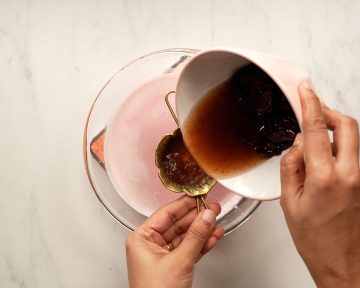
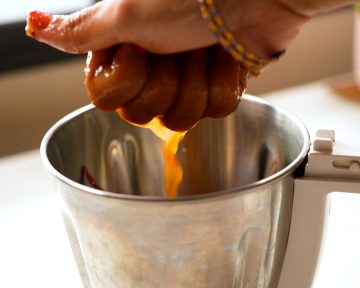
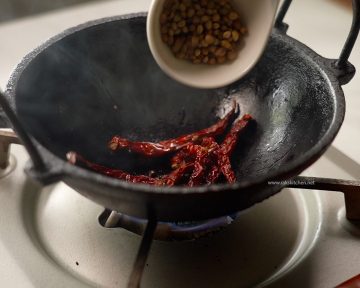
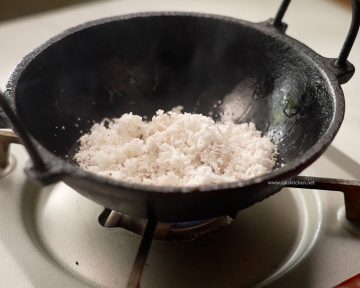
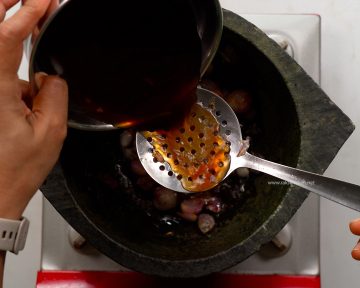
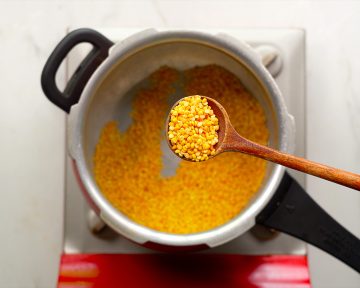
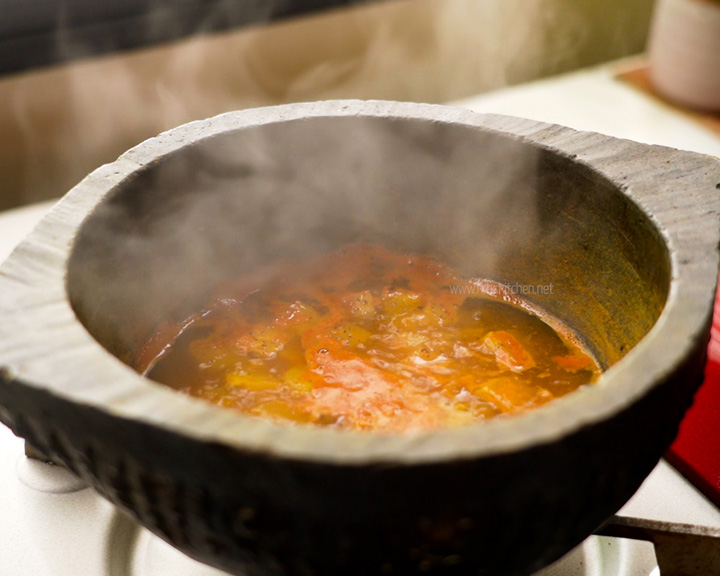
- Firstly, take all the ingredients in the blender.

- Then use just pulse option to grind in small intervals.
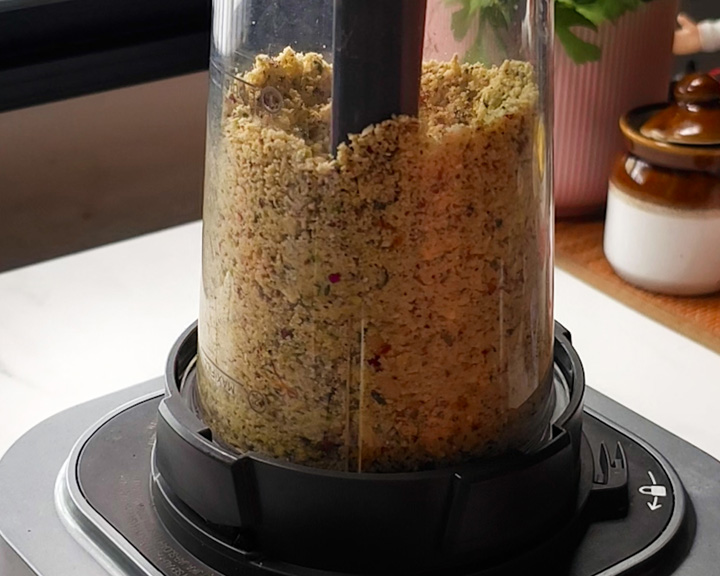
- It gets done in no time, do not over grind it thinking it is not evenly powdered. Instead, open the mixer and mix all the nuts in the sides by wiping each time your grind.

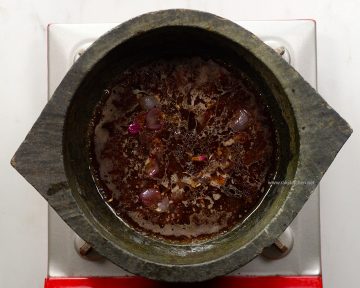
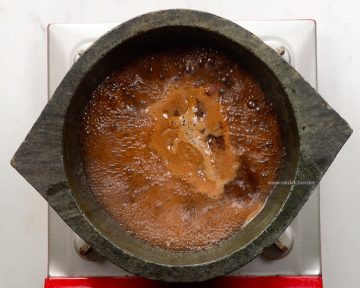
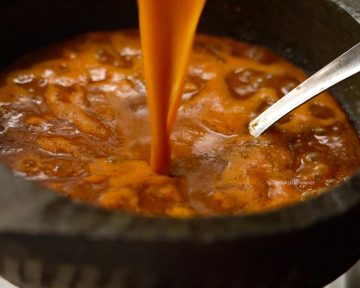
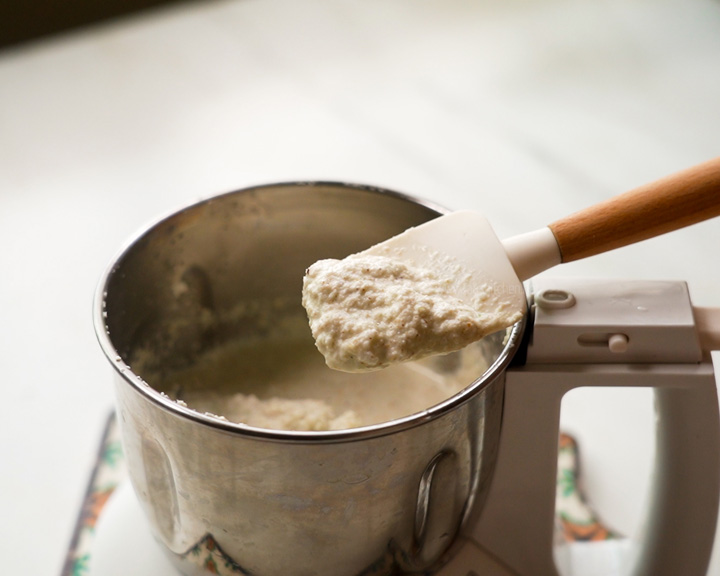
- Thandai powder is ready! If you over grind it, it will leave out oil. So stop when you see its ground and starts to get lumpy.
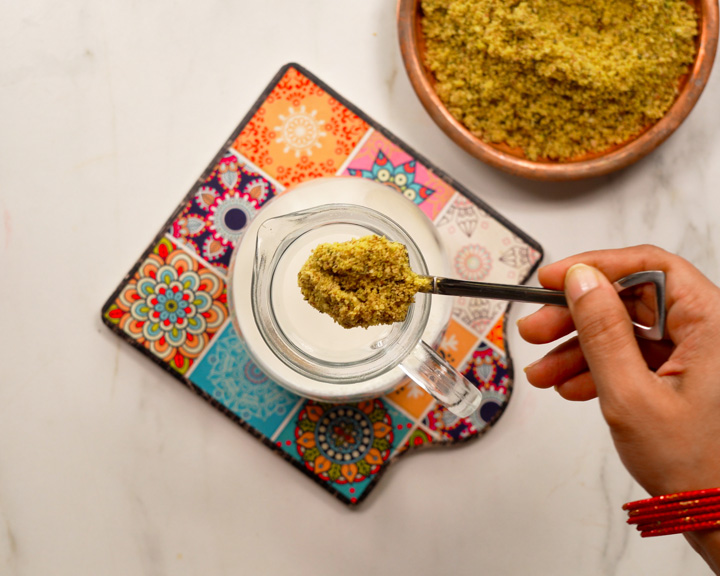
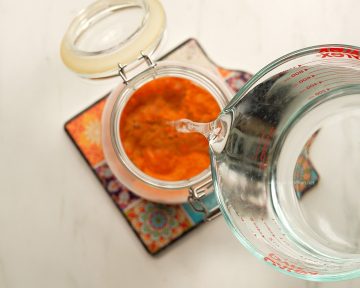
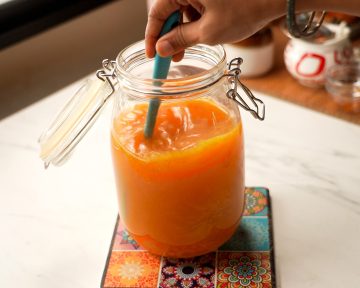
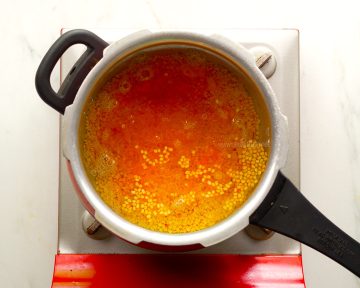
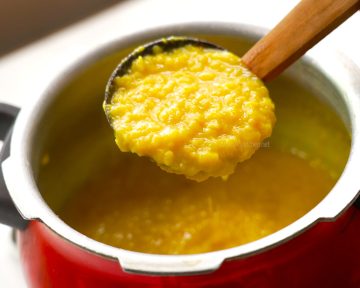
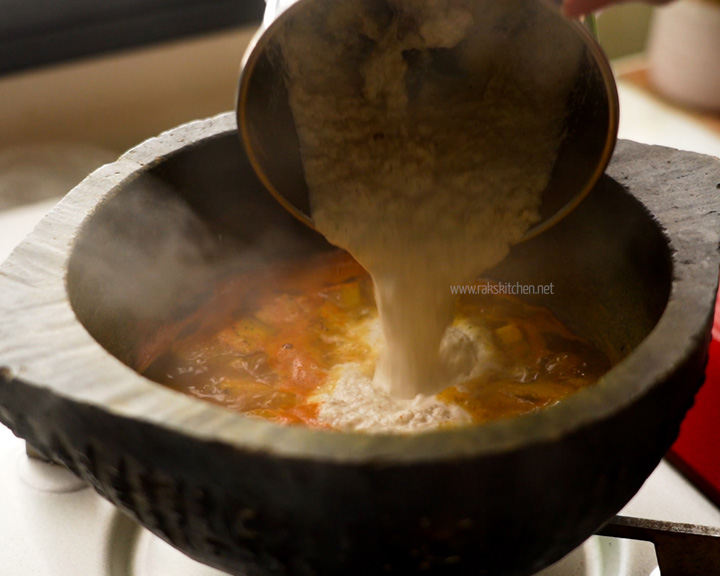
- Mix a heaped tablespoon of thandai masala to 1 cup milk and add sugar as needed.
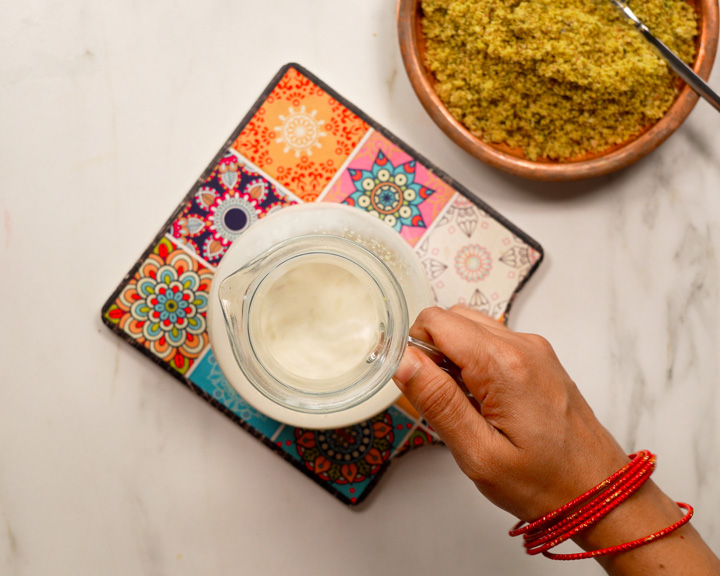
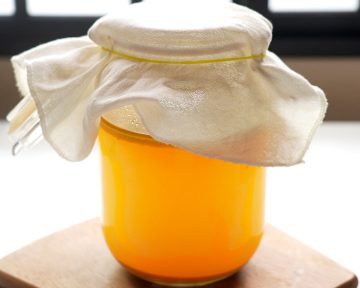
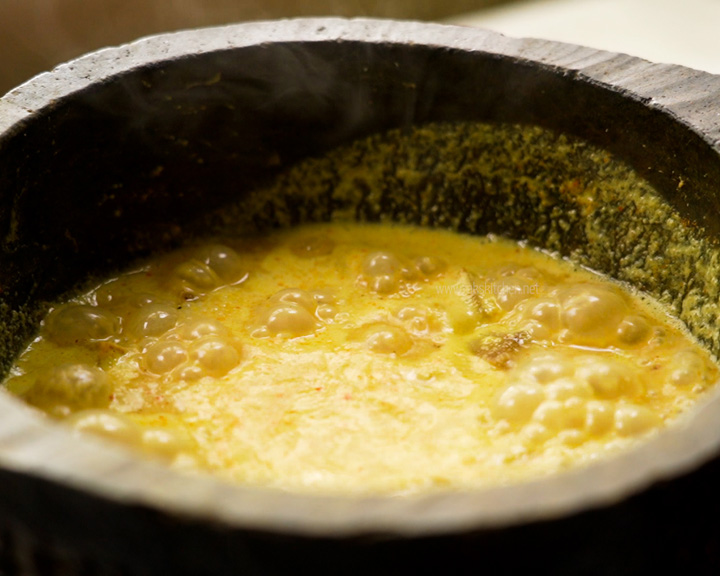
- Mix well and refrigerate until you serve. You can serve over ice immediately too.
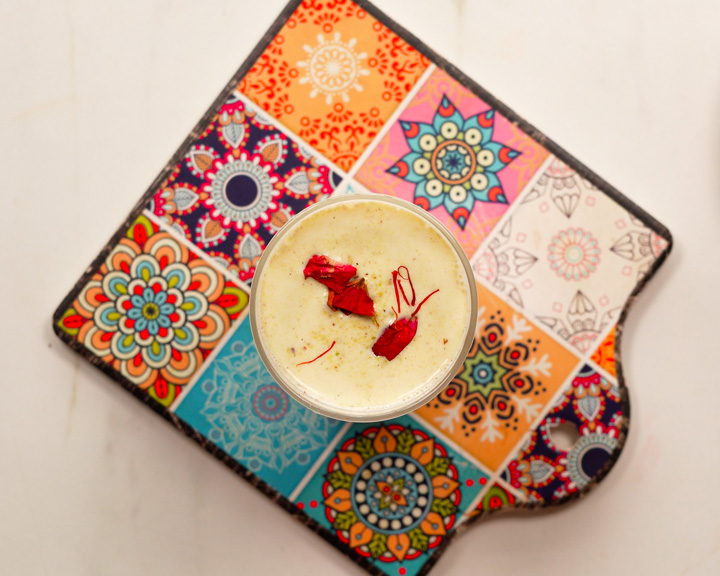
Serve with rose petals, saffron and some nuts garnished.
Substitutions & Variations
- You can skip pistachios, in fact I make it at times only with almonds.
- Poppy seeds are also optional, I never add as it is banned in my country.
- You can skip saffron if not available.
- Instead of fennel seeds, you can add cumin seeds.
Storage
You can store thandai masala in an air tight container for 1 month in fridge comfortably.
Top Tip
- Grind in short pulses to prevent the nuts from releasing excess oil and turning into a paste. Do not grind for long time.
- Use a dry blender jar for best results.
- Use nuts in room temperature, not from fridge or freezer.
FAQ
Is thandai a healthy drink?With all the nuts, ingredients to cool your body and relax your mind, thandai sure is healthy when you make sure you do not over consume it. Keep sugar you add to the milk in check and make sure to burn those calories too! Of course during holi, this is going to be an energy booster.
Don't forget to check my other Holi Recipes for party food ideas. Happy Holi 2025 to all who are celebrating!
Recipe card
Thandai masala Recipe | Thandai powder
Thandai masala Recipe | Thandai powder is a rich, flavourful blend of nuts and spices used to prepare traditional Indian drink Thandai.Servings 1.5 cupsCup measurementsIngredients
- ½ cup Almonds
- ½ cup Cashews
- ¼ cup Pistachios
- 2 tablespoon Magaz
- 1 teaspoon Fennel seeds
- ½ teaspoon Black pepper
- 10-12 Saffron strands
- ⅛ teaspoon Nutmeg powder
- ⅛ teaspoon Turmeric powder
- 2 teaspoon Rose petals
- 5-6 small Cardamom
Prevent your screen from going darkInstructions
- Firstly, take all the ingredients in the blender.
- Then use just pulse option to grind in small intervals.
- It gets done in no time, do not over grind it thinking it is not evenly powdered. Instead, open the mixer and mix all the nuts in the sides by wiping each time your grind.
- Thandai masala is ready! If you over grind it, it will leave out oil. So stop when you see its ground and starts to get lumpy.
- Mix a heaped tablespoon of thandai masala to 1 cup milk and add sugar as needed.
- Mix well and refrigerate until you serve. You can serve over ice immediately too.
- Serve with rose petals, saffron and some nuts garnished.
Video
Notes
- Grind in short pulses to prevent the nuts from releasing excess oil and turning into a paste. Do not grind for long time. Use a dry blender jar for best results.
- Use nuts in room temperature, not from fridge or freezer.
YoutubeDo you like short videos? Subscribe now!InstagramMention @rakskitchen or tag #rakskitchen if you have tried this recipe.The post Thandai Masala | Spice Mix appeared first on Raks Kitchen.
-
 View
Pub Date: 11 March 2025 | 8:43 am
View
Pub Date: 11 March 2025 | 8:43 am
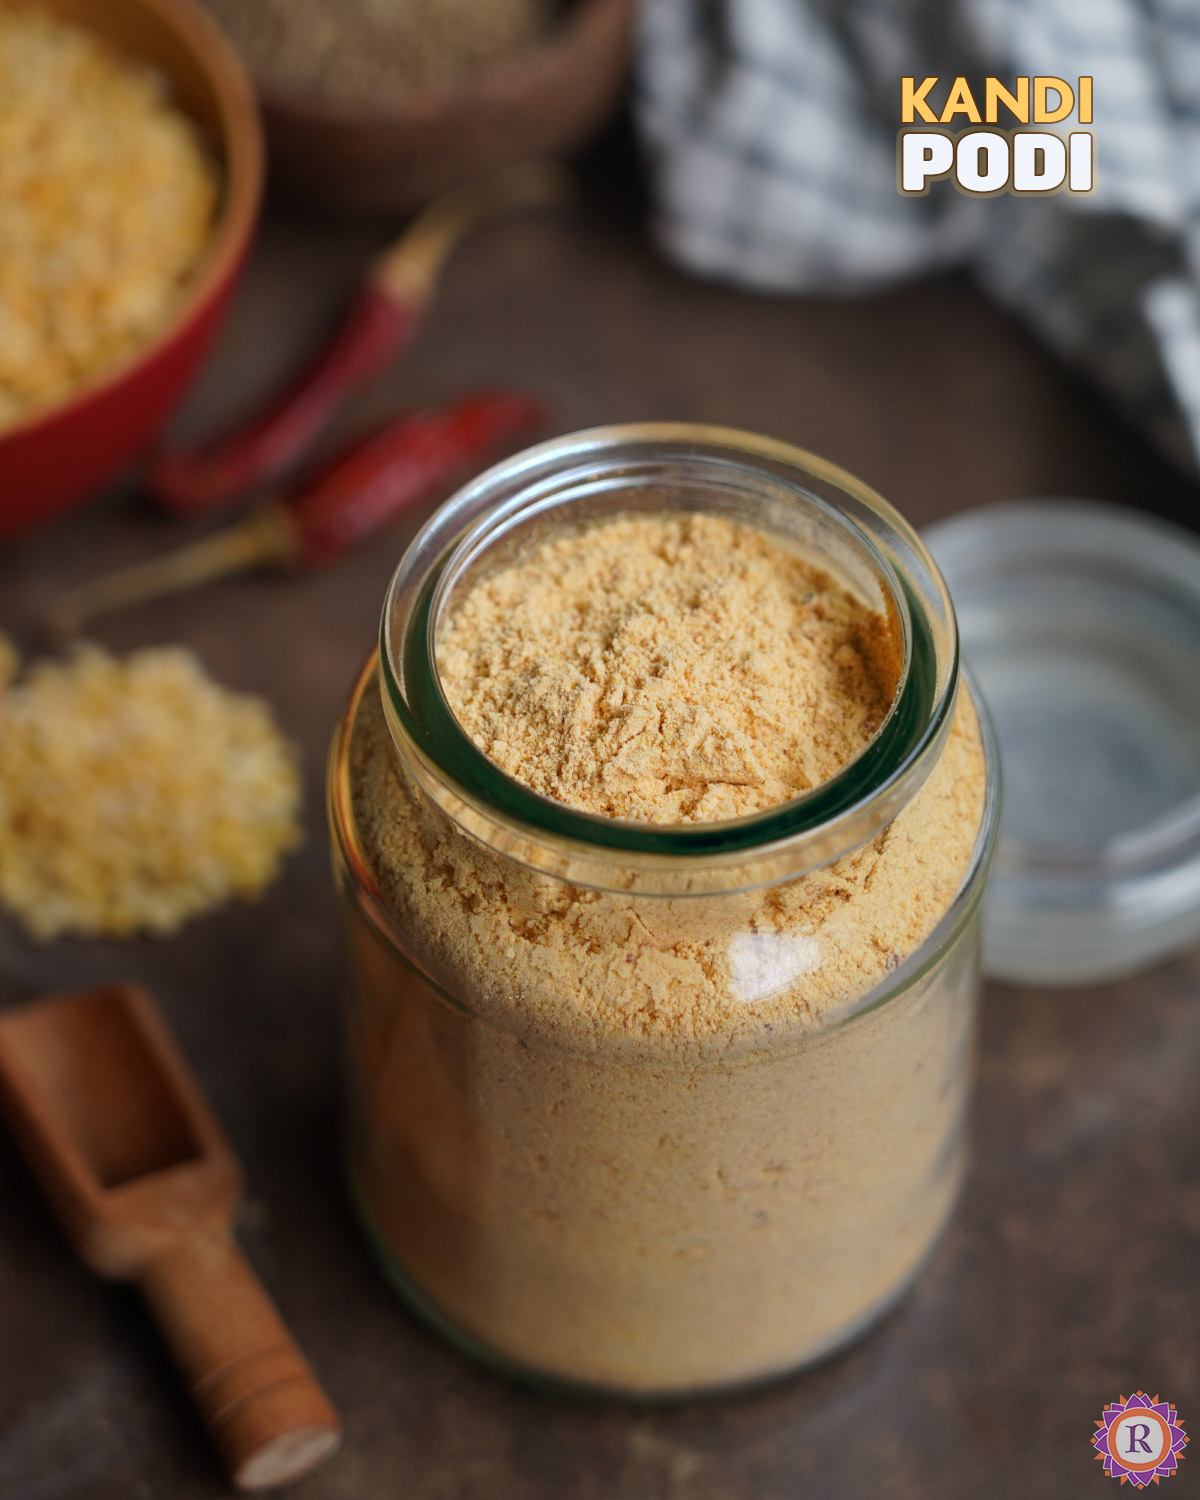
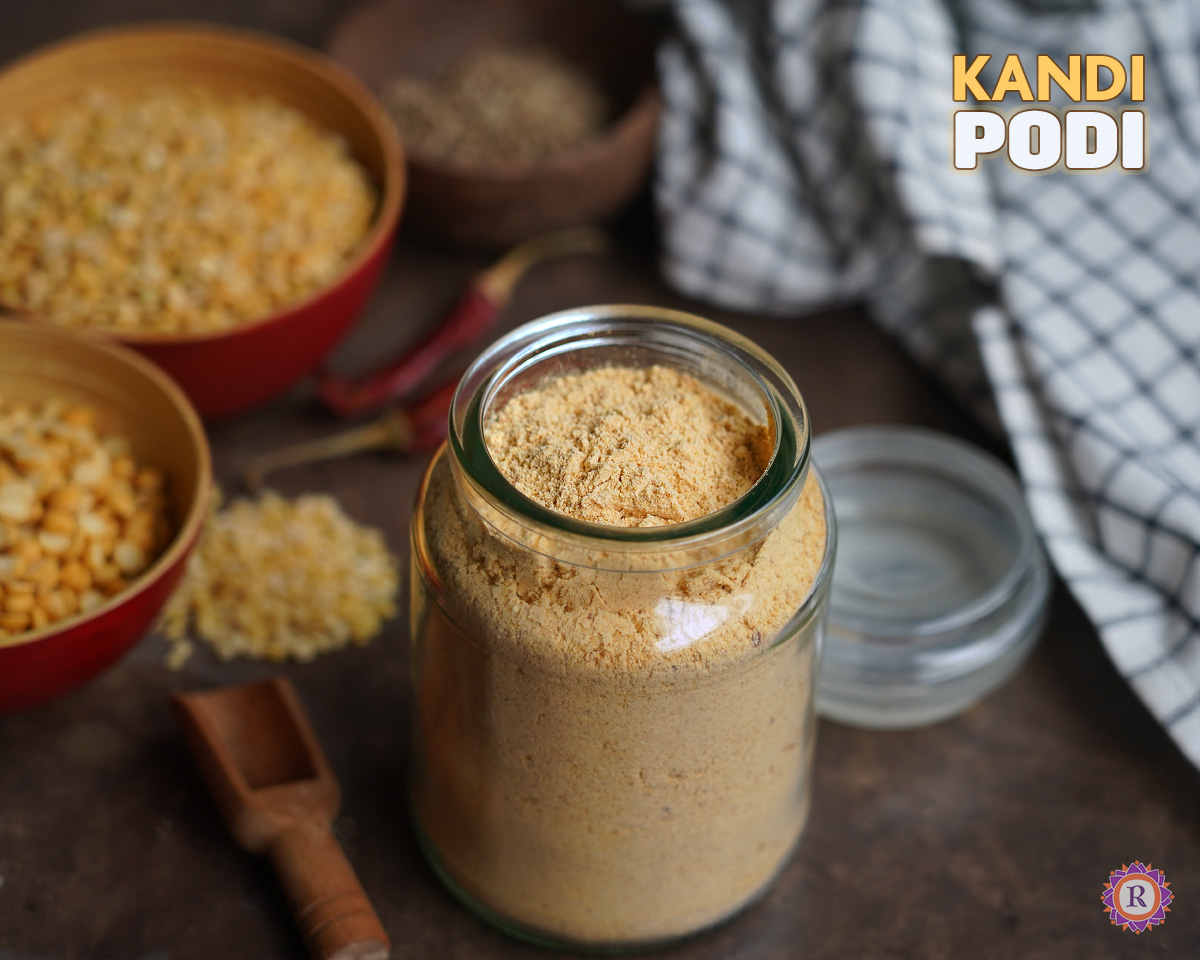
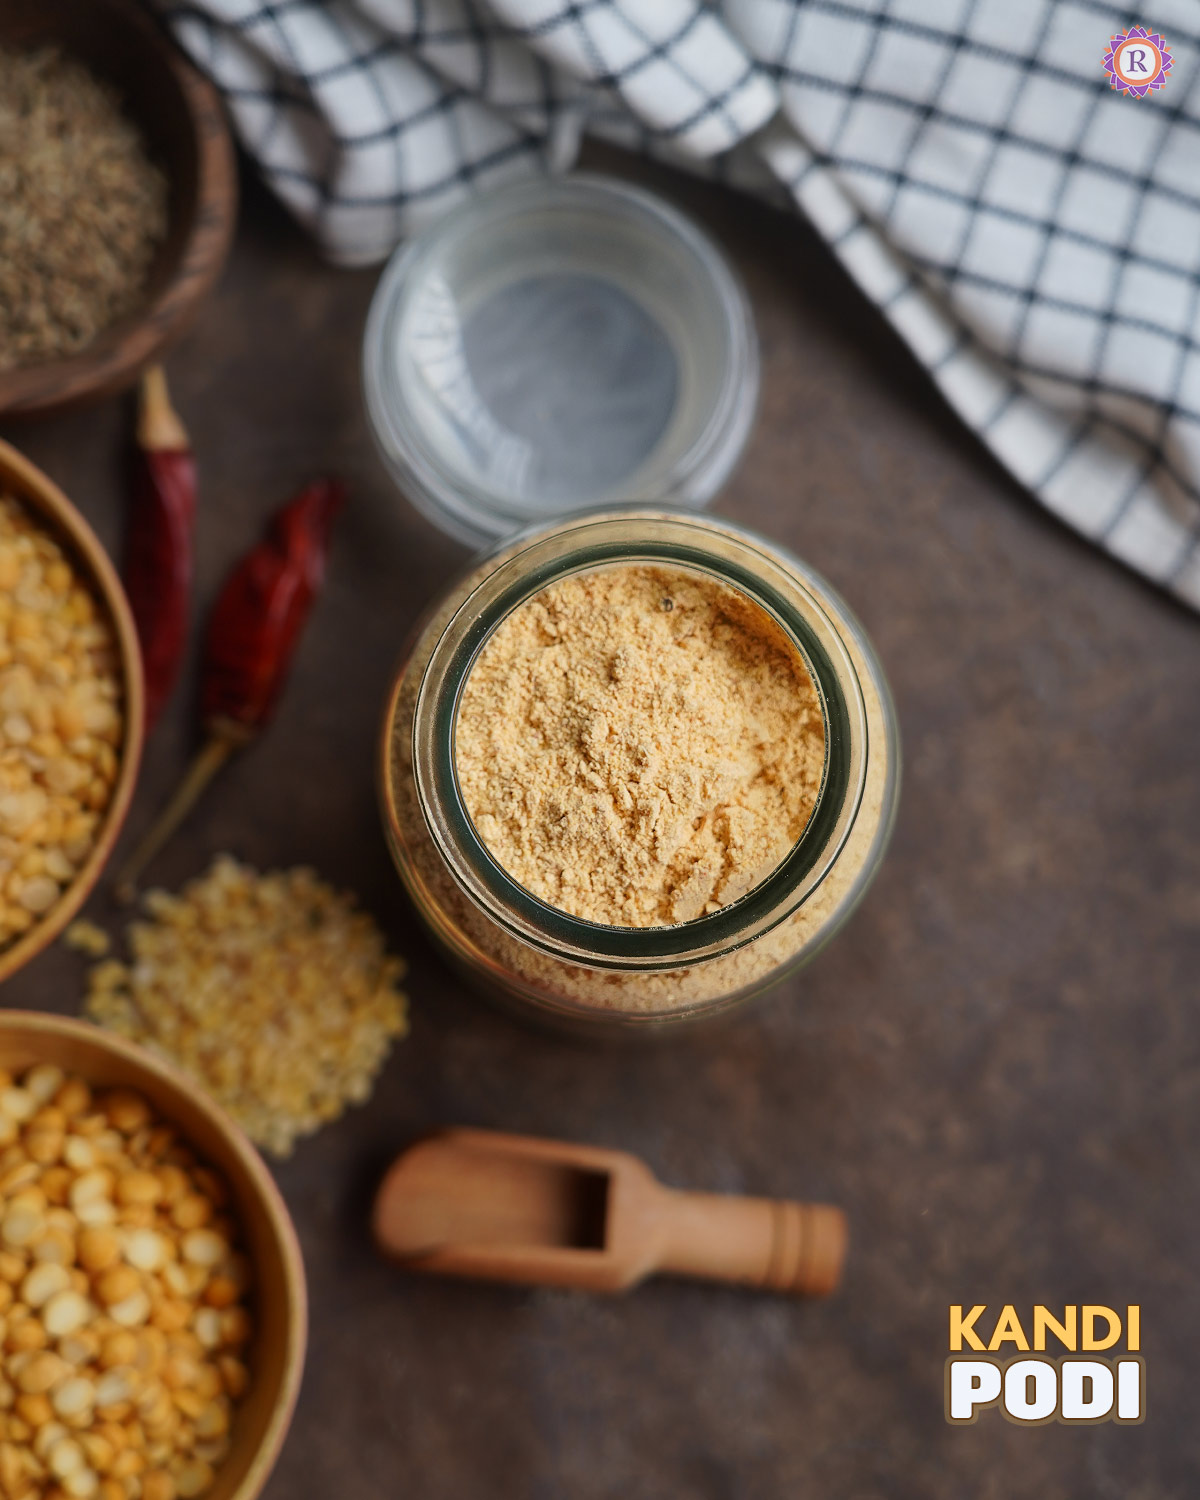
- Kandi Podi Recipe
Kandi podi is a lentil spice powder made with roasted toor dal (kandi pappu), chana dal, dry red chillies as main ingredients. This traditional podi is a staple in Andhra households, served with hot rice and ghee.
Comes handy in south Indian households for lunch as we start the course with podi and ghee/ sesame oil.
Check out my mom's Paruppu podi recipe and Idli podi recipe in this website.
[feast_advanced_jump_to]I always wanted to try this Andhra style podi they serve in the restaurants. Knew this one only last year though I have heard the name several times earlier, I got familiar with the name only last year.
When I wanted to make a batch of podi last month, I suddenly remembered this one and tried a slightly different version. This time I made kandi podi as I have shared and the taste and flavour was perfect as I expected.
I know there are many versions who authentically make in the Andhra households, this one is my version you can try confidently for best results. I am not sure if this is called gunpowder, so far I assumed gun powder is another name for idli podi.
Ingredients
Here are the ingredients I used to make Andhra style podi (Kandi podi)

- Toor dal - Kandi Pappu - Split pigeon peas, the main ingredient in the recipe, which is why it is called Kandi podi in Andhra cuisine, directly translates to 'toor dal powder' highlighting it's primary component.
- Chana dal - Adds extra flavour to the podi
- Moong dal - Gives a wonderful flavor as well as a lighter texture which I like about the andhra podis.
- Garlic cloves - small variety - Gives main flavour in the podi
- Dry red chillies - For spice, I used long variety.
- Cumin seeds - Adds a unique flavour in this.
- Curry leaves - For a good aroma.
See recipe card below for exact quantities.
Instructions
Let's see how to make Andhra style podi.

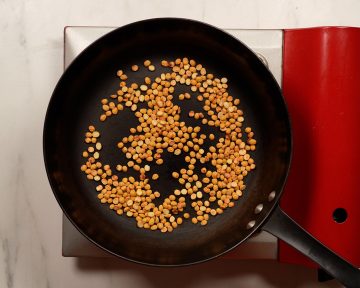
- Heat a pan firstly and dry roast toor dal in high heat.

- Once you could smell the toor dal aroma half way, reduce the flame to medium and add garlic cloves (with skin) and dry red chillies.

- Roast furthermore until the toor dal turns golden brown in colour. Take care not to burn as towards end, it tends to turn dark fast.

- Once done, transfer to a plate and set aside.
- Same way roast chana dal and transfer to the plate for cooling.

- Then roast moong dal carefully in medium heat and in low towards the end.
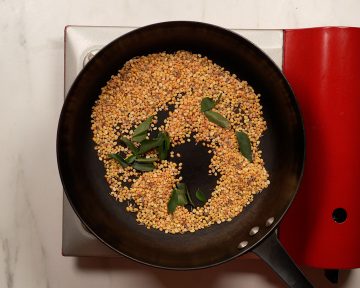
- Lastly switch off the flame and cumin seeds, curry leaves and roast in the heat itself.
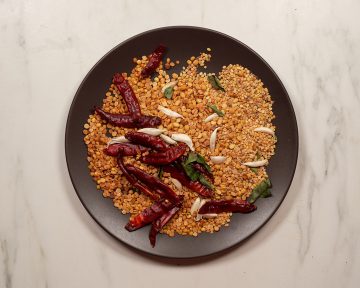
- Remove everything in the plate for cooling.

- Once cooled completely, place in a mixer and add salt.
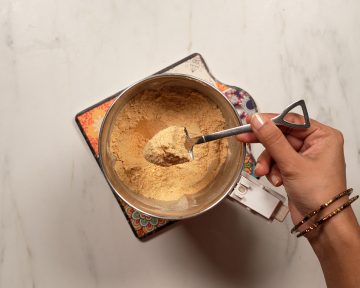
- Grind to a fine powder. Mix in between for even texture.
Try to use a cast iron pan or something heavy bottomed as you want to roast the dals in steady heat.
Let the powder stay for a while before storing in an airtight container. Enjoy with steamed rice and ghee or sesame oil.
Variations
Dals: I used 3 types of dal. You can also use urad dal in addition and make it. Make sure Toor dal ratio is more. You can also make it with toor dal alone.
No Garlic - You can skip garlic and use ¼ teaspoon of Asafoetida.
If you want a quicker version, just use roasted toor dal and chutney dal (roasted gram dal) Pottu kadalai/ dariya instead of other dals.
Storage
You can use it for about a month in room temperature. In fridge it stays longer like around 2-3 months easily.
Top Tip
- Always roast patiently in medium or low heat, especially towards the end.
- You can adjust the red chilli numbers according to your spice level as well as the variety of chilli you use.
- Use dry spoon and handle with dry hands properly for a longer shelf life.
FAQ
What is Kandi Podi made of?Kandi podi is made with roasted dal and other spices , with toor dal (Kandi pappu) as main ingredient.
Is Kandi podi healthy?Yes it is packed with protein as main ingredient is dal.
What can I pair Kandi Podi with?Kandi podi served best with hot rice and ghee or sesame oil. You can also pair it up with idli, dosa.
Recipe card
Kandi Podi Recipe | Andhra Paruppu Podi
Kandi podi is a lentil spice powder made with roasted toor dal (kandi pappu), chana dal, dry red chillies as main ingredients. This traditional podi is a staple in Andhra households, served with hot rice and ghee.Servings 1 CupCup measurementsIngredients
- ½ cup Toor dal Kandi pappu
- ¼ cup Chana dal
- ¼ cup Moong dal
- 15 Garlic cloves small variety
- 10 - 12 Dry red chillies
- 1 teaspoon Cumin seeds
- 1 Sprig Curry leaves
- Salt
Prevent your screen from going darkInstructions
- Heat a pan firstly and dry roast toor dal in high heat.
- Once you could smell the toor dal aroma half way, reduce the flame to medium and add garlic cloves (with skin) and dry red chillies.
- Roast furthermore until the toor dal turns golden brown in colour. Take care not to burn as towards end, it tends to turn dark fast.
- Once done, transfer to a plate and set aside.
- Same way roast chana dal and transfer to the plate for cooling.
- Then roast moong dal carefully in medium heat and in low towards the end.
- Lastly switch off the flame and cumin seeds, curry leaves and roast in the heat itself.
- Remove everything in the plate for cooling.
- Once cooled completely, place in a mixer and add salt.
- Grind to a fine powder. Mix in between for even texture.
Video
Notes
- Always roast patiently in medium or low heat, especially towards the end.
- You can adjust the red chilli numbers according to your spice level as well as the variety of chilli you use.
YoutubeDo you like short videos? Subscribe now!InstagramMention @rakskitchen or tag #rakskitchen if you have tried this recipe.The post Kandi Podi Recipe appeared first on Raks Kitchen.
-
View
Pub Date: 7 March 2025 | 7:05 pm
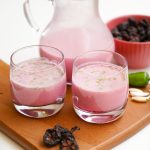
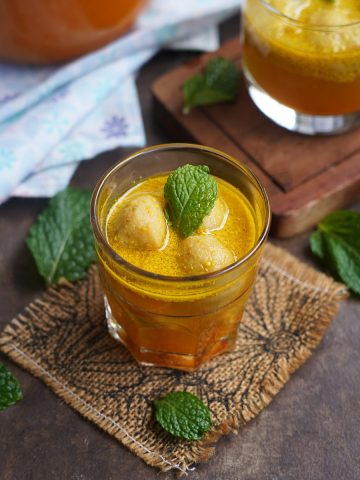
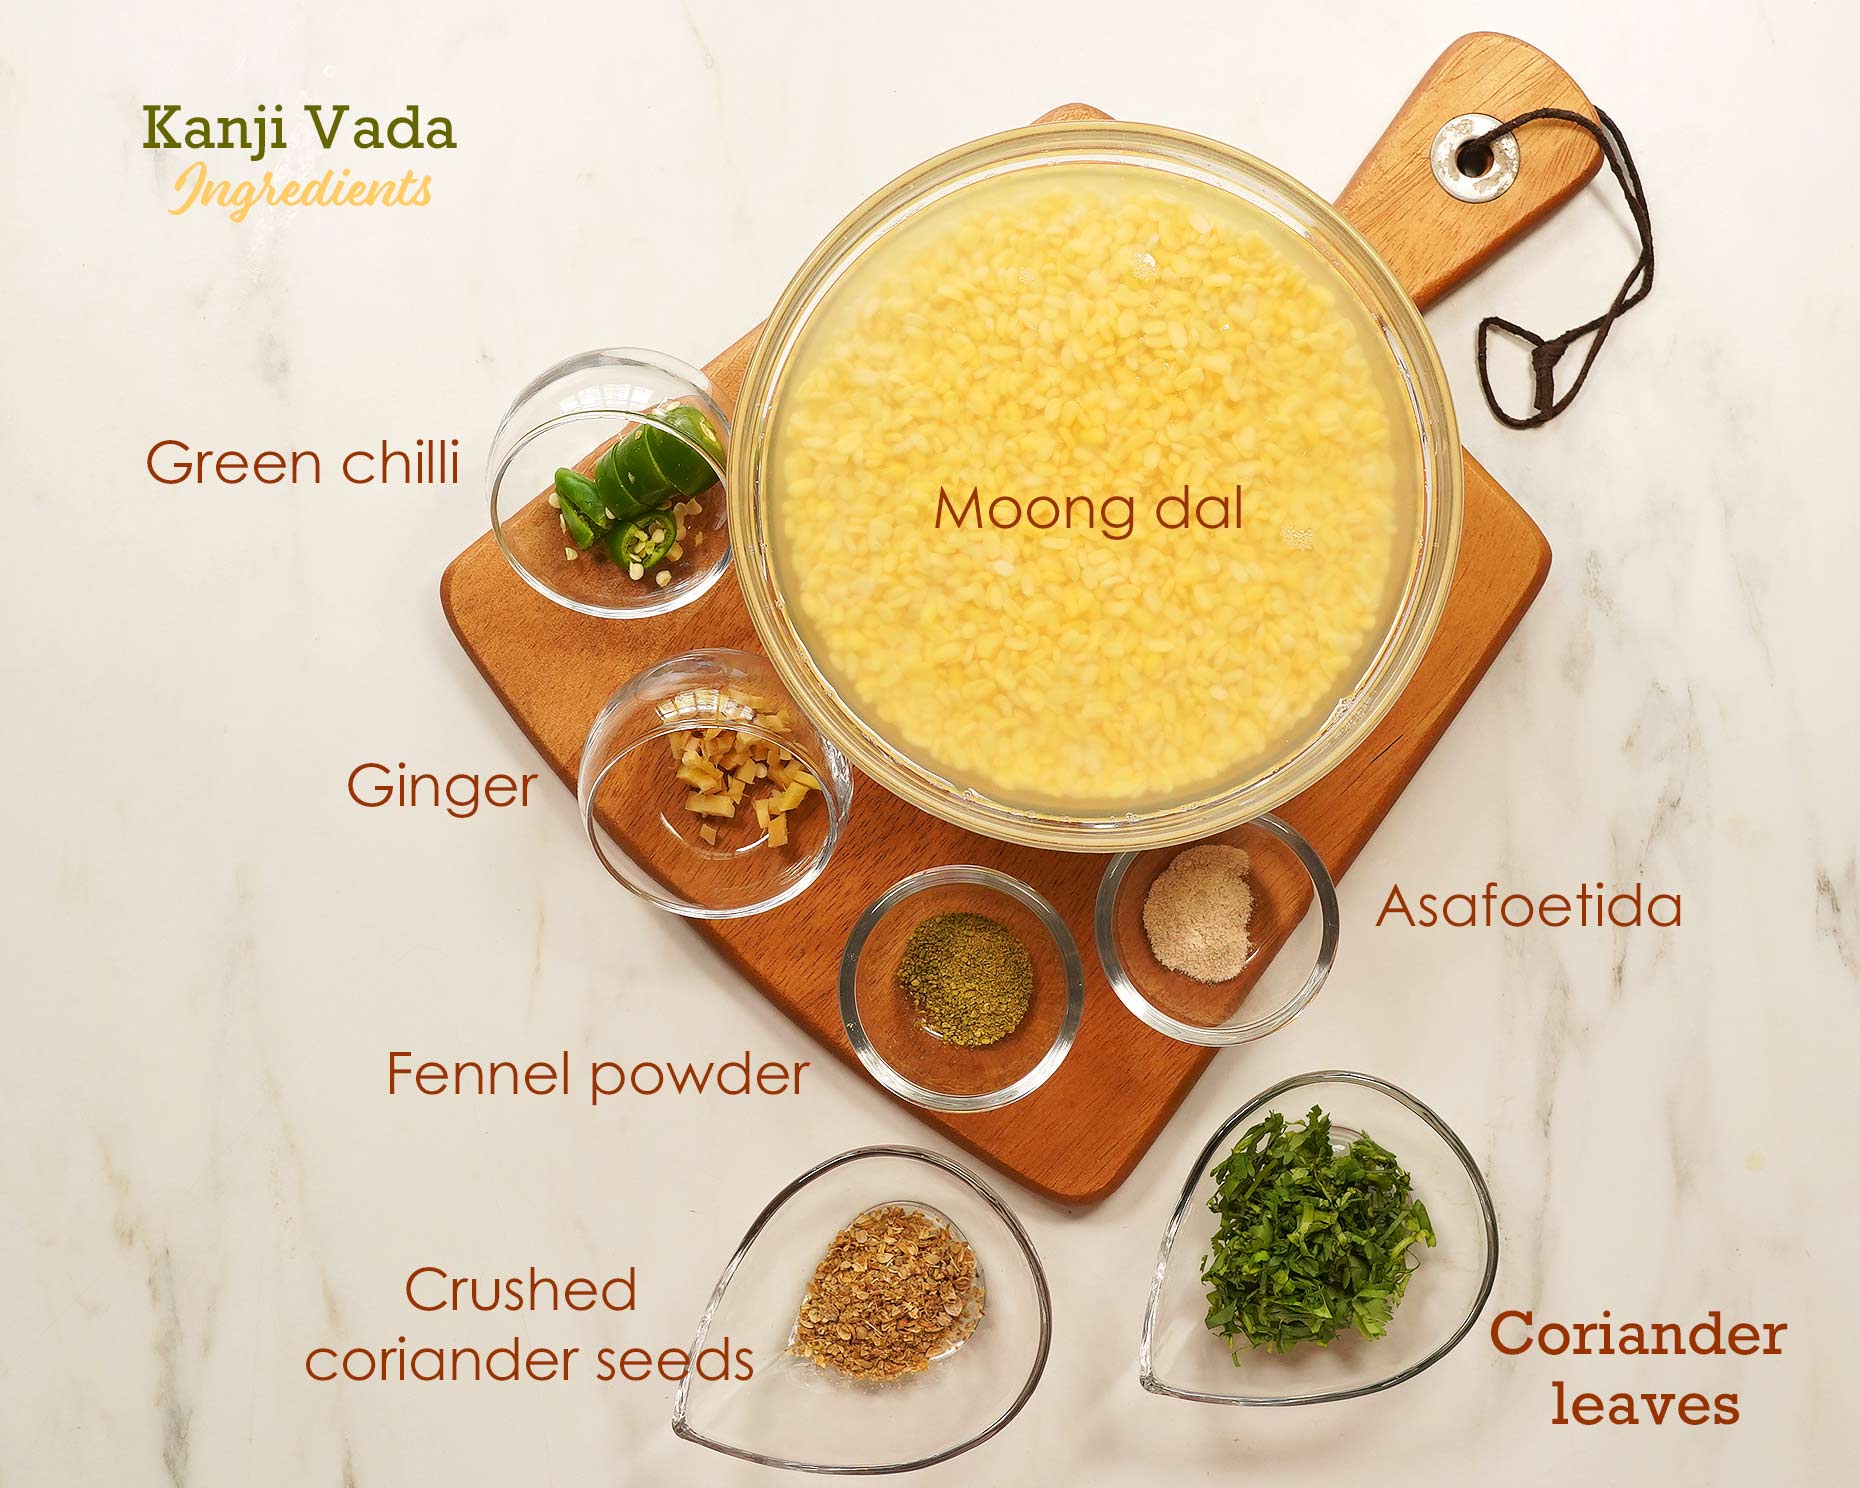
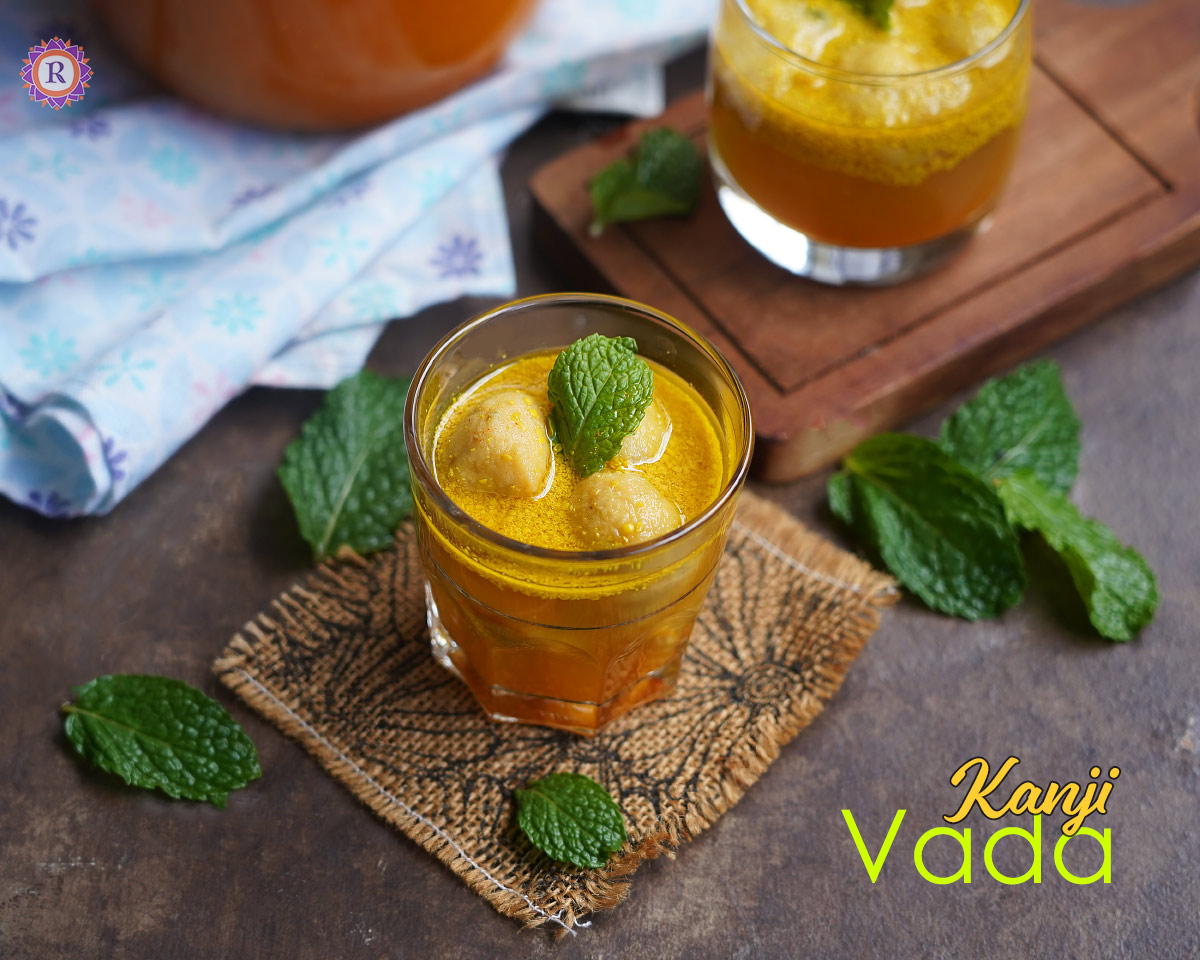
- Kanji Vada Recipe
Kanji vada is a fermented drink (kanji) with lentil fritters (vada), a special dish from Rajasthan/ Uttar Pradesh. Made with mustard as main ingredient in the kanji and moong dal for vada, this has a unique flavour.
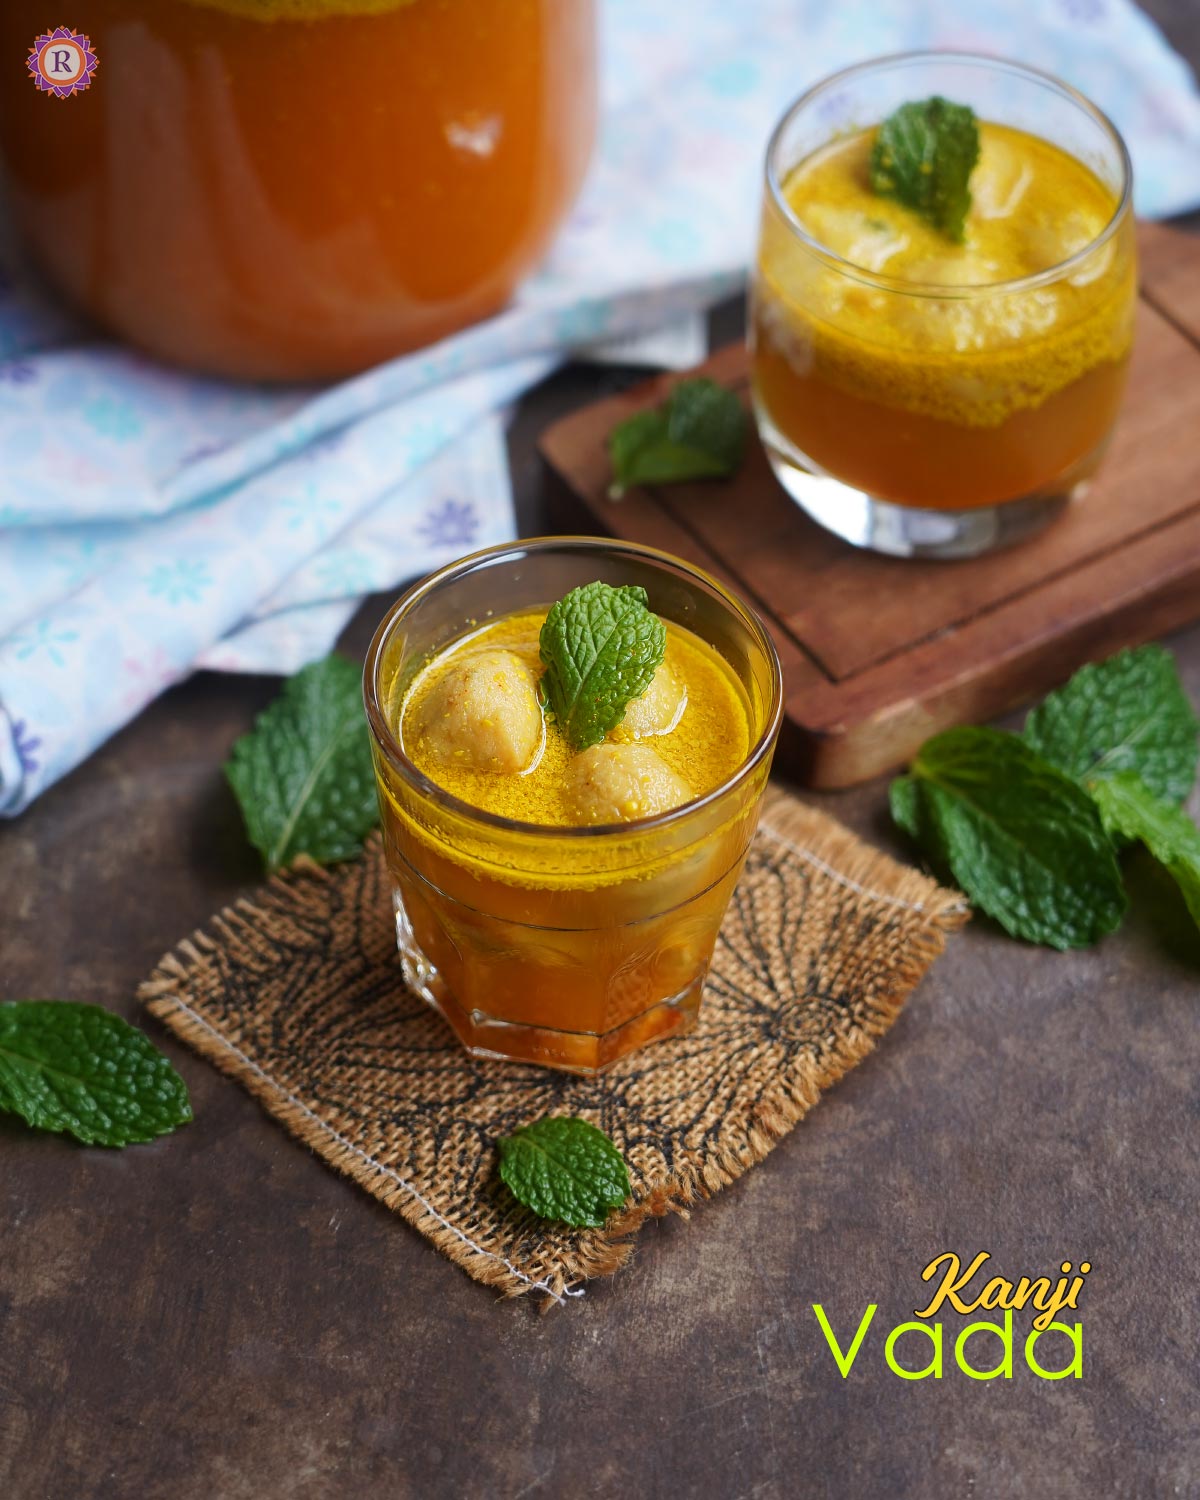
This tangy, probiotic-rich drink is especially made for Holi and during winter months, which gives you a refreshing taste and also gut friendly.
Check out my Thandai recipe and Solkadhi recipe in this website.
[feast_advanced_jump_to]As you all could see I have slowly started posting new recipes and this one was in my to try list for long time. I see this recipe often when it is Holi and very tempting.
I thought it would be similar to maavadu or neer nellikai brine and been waiting to try. So decided to try this before this year's Holi 2025 and picked up yellow mustard seeds from Mustafa on my way back home from work.
I have gone through many recipes and tested this one with mustard oil. Actually I never buy mustard oil as the flavour too strong for me, so avoid buying it. This time, wanted to add to jhal muri and try again. But still have not made. But saw a recipe adding mustard oil to Kanji, and thought of trying it.
If you are like me who doesn't like mustard oil flavour, I would suggest to skip it in the recipe as it is too strong. Given we add mustard seeds too, I think you can simply skip it.
Ingredients
Here are the ingredients needed for making Kanji vada.
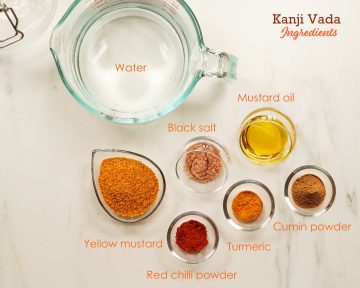

For Kanji
- Mustard seeds - Rai - I used yellow mustard, but you can also use black variety.
- Black salt - Kala namak - Gives flavour for kanji
- Chilli powder - For spice, flavour, colour
- Cumin powder - Roasted & powdered, pairs up well with kala namak and gives "chaat" like flavour
- Mint leaves - For serving
Optional
- Turmeric powder - For colour
- Mustard oil - Use only if you like/ used to mustard oil flavour (use heated & cooled oil)
For vada
- Moong dal - I use split unpolished moong dal.
- Ginger - add lots of ginger, for taste, aids digestion.
- Green chilli - For spice
- Fennel seeds - Gives a subtle flavour
- Asafoetida - Adds unique aroma, helps with reducing gastric nature of dal
- Oil for deep frying
See recipe card for quantities.
Instructions
Let's see how to make Kanji vada with step-by-step images
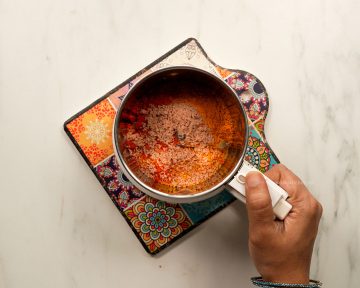
- Take mustard, red chilli powder, cumin seeds powder, black salt, turmeric, asafoetida (if adding) all in a mixer firstly.
- Then powder it to a fine mixture.
- After that, add it to a glass or porcelain container. Pour 6 cups of water to it.
- Then mix it well. Use wooden ladle or any non reactive material.
- Cover the mouth of the container with a clean muslin/ cotton cloth. Tie or use a rubber band to secure. For 5 days, keep in sun, stirring every day without fail to prevent fungus formation.
- After 5 days it will be fermented and have a sour taste, smell. Kanji is ready.
Make vada
Soak moong dal for 3 hours minimum.

- Drain water and place it in a mixer. Add ginger, green chilli to it while grinding. I did not add extra water, just the water retained in the dal was enough.
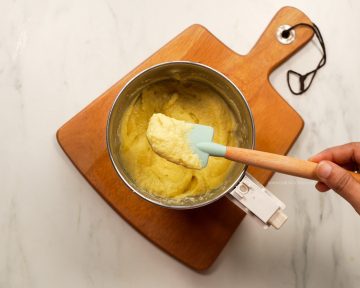
- If you want you can use a little water, but it does not take much of water, so be very careful while adding water. Batter should be light, not like a paste. Grind smooth.
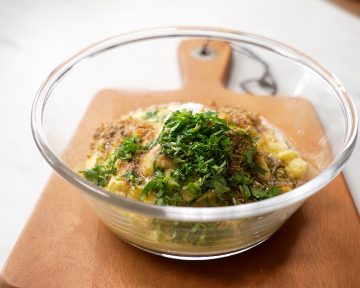
- After that, add asafoetida, coriander seeds, fennel seeds powder, asafoetida, hot oil, required salt and coriander leaves.
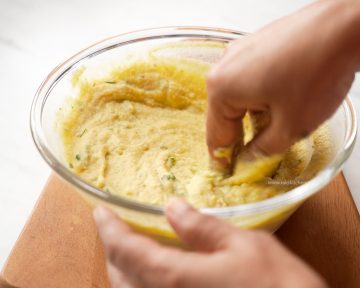
- Then mix it well, so that the batter is aerated well. It should not be very thick and tight.
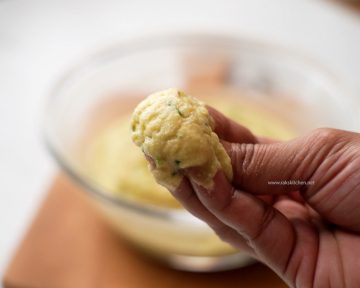
- Then take a small portion with your fingers. Heat oil in a kadai.

- Add to hot oil carefully, few per batch. Try to add in different places to avoid clusters.

- Cook in medium or low heat, making sure it is cooked from inside. Keep stirring for even cooking. After a while, if you see any vada sticking together, you can gently separate with the ladle carefully.

- Once golden, drain from oil over a kitchen tissue.
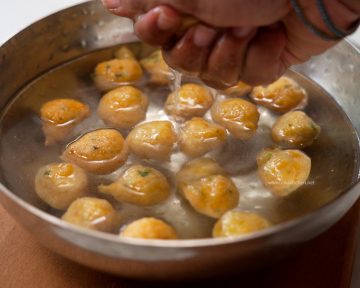
- In warm water, add salt and the fried vadas. squeeze it in water so that it is softened. Do not break the vadas, be very gentle like it is a sponge.

- This step ensures the kanji well absorbed in the vada.

- After that, add it to the fermented Kanji and let it sit for 30 minutes minimum.
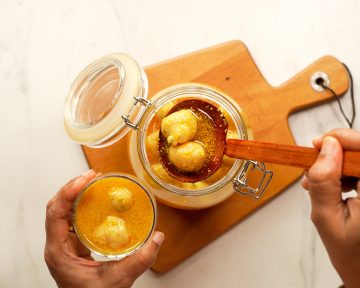
- Finally serve the vadas with lots of kanji and garnish with mint leaves.
You can also sprinkle a little red chilli powder, chaat masala if you like. Enjoy kanji vada!

Substitutions & Variations
- Turmeric, Asafoetida, Mustard oil are all optional. You can skip mustard oil if you do not like that strong flavour.
- For making vada, you can use a mix of both urad dal and moong dal. This gives more softer vada.
Equipment
Do not use metal containers for making the fermented kanji or storing it. It is better to use glass or porcelain jar. Here's an affiliate link to glass jar with clip.
Storage
Kanji can be stored in the fridge after fermentation for maximum 10 days.
Top Tip
If you feel the mustard flavour is too sharp, you can use more water and balance it with some rock salt.
In case you decide to use black mustard seeds, use just 1 tablespoon for the recipe as it is more stronger.
While making vada, make sure to add less water. While I drain and add to the mixer, the water retained was enough to make the batter.
Also make sure the batter is not too thick/ heavy like a paste. Otherwise it may burst in the oil while frying. To check if the batter is light, place a spoon of batter in water in bowl and the batter should float.
You can beat the batter well with hands if it is too thick to aerate it. Or use a electric hand blender to whip the batter to aerate.
FAQ
How long can we store Kanji Vada?At room temperature, 2 days after adding vada. 7-10 days in fridge.
Can I use black mustard instead of yellow?Yes, use just 1 tablespoon for 6 cups water.
Can I skip black salt and use regular salt?Kala namak or black salt adds a lot of flavour to kanji and highly recommend using it.

Recipe card
Kanji Vada Recipe
Kanji vada is a fermented drink (kanji) with lentil fritters (vada), a special dish from Rajasthan/ Uttar Pradesh.Servings 20 peopleCup measurementsEquipments (Amazon Affiliate links)
Ingredients
For Kanji
- 2-3 tbsp Mustard seeds Yellow
- 2 teaspoon Black salt
- 1 teaspoon Chilli powder
- ½ teaspoon Turmeric powder
- ½ tsp Roasted cumin seeds powder
- ½ tsp Asafoetida Optional
- 6 cups Water
- Salt as needed
For Vada
- 1 cup Moong dal
- 1 piece Ginger
- 2 Green chillies
- 1 teaspoon Coriander seeds crushed
- ½ teaspoon Fennel seeds powder
- ⅛ teaspoon Asafoetida
- 2 tablespoon Coriander leaves
- 1 tbsp Hot oil
- Salt
Prevent your screen from going darkInstructions
- Take mustard, red chilli powder, cumin seeds powder, black salt, turmeric, asafoetida (if adding) all in a mixer firstly.
- Then powder it to a fine mixture.
- After that, add it to a glass or porcelain container. Pour 6 cups of water to it.
- Then mix it well. Use wooden ladle or any non reactive material.
- Cover the mouth of the container with a clean muslin/ cotton cloth. Tie or use a rubber band to secure. For 5 days, keep in sun, stirring every day without fail to prevent fungus formation.
- After 5 days it will be fermented and have a sour taste, smell. Kanji is ready.
Make vada
- Soak moong dal for 3 hours minimum.
- Drain water and place it in a mixer. Add ginger, green chilli to it while grinding. I did not add extra water, just the water retained in the dal was enough.
- If you want you can use a little water, but it does not take much of water, so be very careful while adding water. Batter should be light, not like a paste. Grind smooth.
- After that, add asafoetida, coriander seeds, fennel seeds powder, asafoetida, hot oil, required salt and coriander leaves.
- Then mix it well, so that the batter is aerated well. It should not be very thick and tight.
- Then take a small portion with your fingers. Heat oil in a kadai.
- Add to hot oil carefully, few per batch. Try to add in different places to avoid clusters.
- Cook in medium or low heat, making sure it is cooked from inside. Keep stirring for even cooking. After a while, if you see any vada sticking together, you can gently separate with the ladle carefully.
- Once golden, drain from oil over a kitchen tissue.
- In warm water, add salt and the fried vadas. squeeze it in water so that it is softened. Do not break the vadas, be very gentle like it is a sponge.
- This step ensures the kanji well absorbed in the vada.
- After that, add it to the fermented Kanji and let it sit for 30 minutes minimum.
- Finally serve the vadas with lots of kanji and garnish with mint leaves.
Video
Notes
- Turmeric, Asafoetida, Mustard oil are all optional. You can skip mustard oil if you do not like that strong flavour. I found it too strong, so skipped it in the ingredients list. If you are adding just add 1 teaspoon of heated and cooled oil.
- Adding kala namak and roasted cumin seeds powder along with asafoetida helps the flavour enhance.
YoutubeDo you like short videos? Subscribe now!InstagramMention @rakskitchen or tag #rakskitchen if you have tried this recipe.The post Kanji Vada Recipe appeared first on Raks Kitchen.
-
View
Pub Date: 28 February 2025 | 8:09 pm
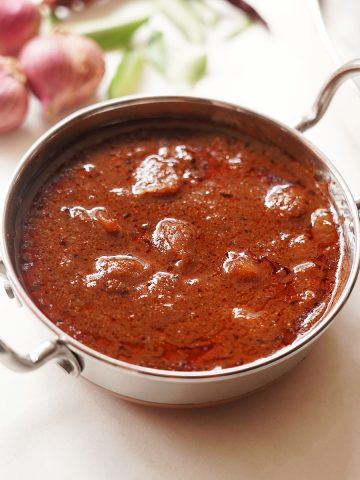
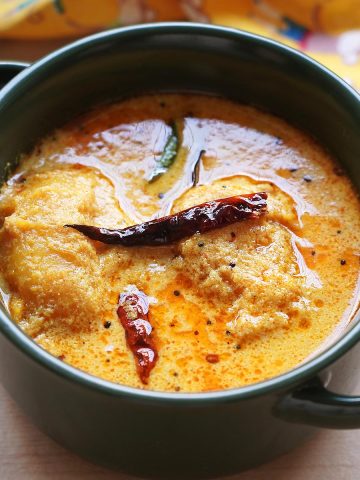
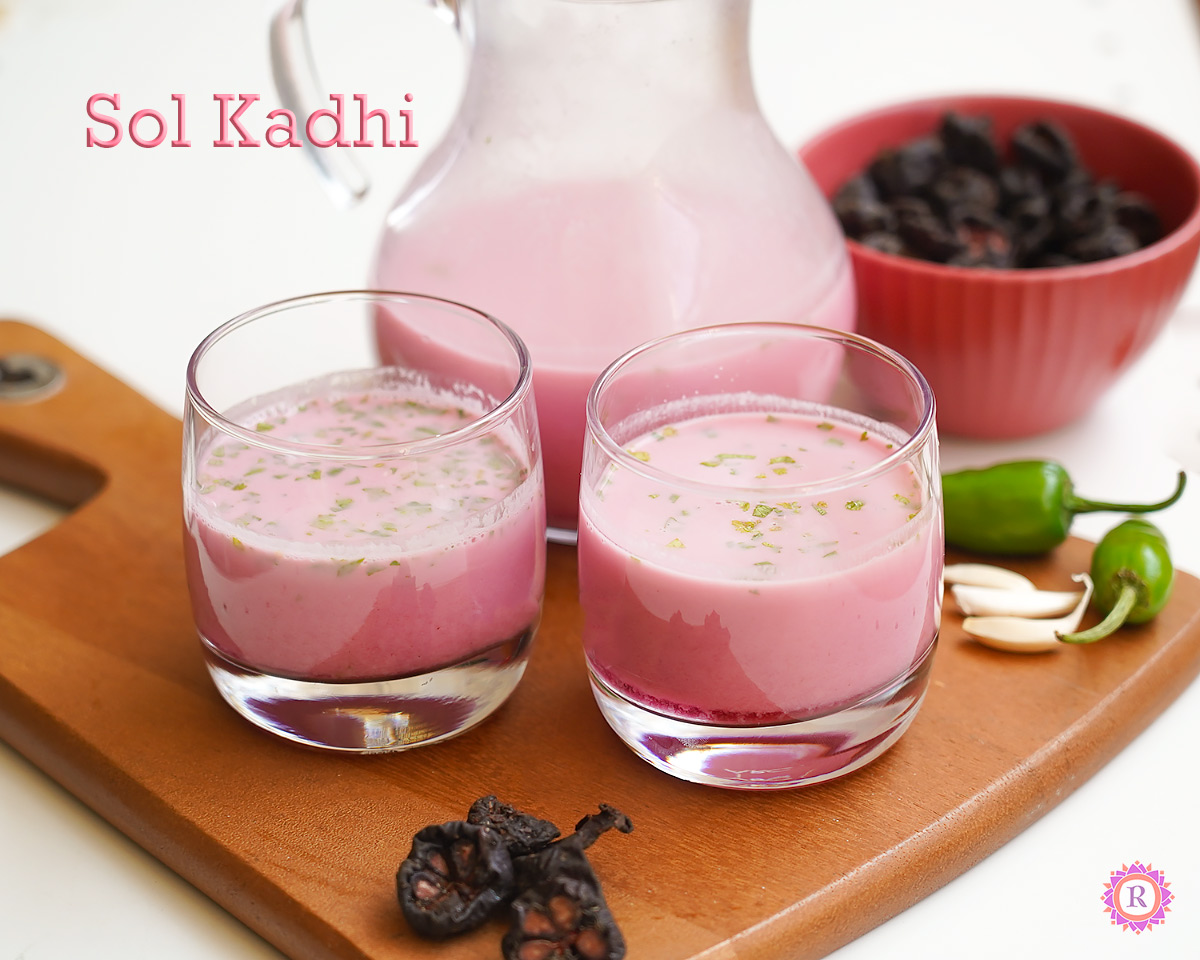
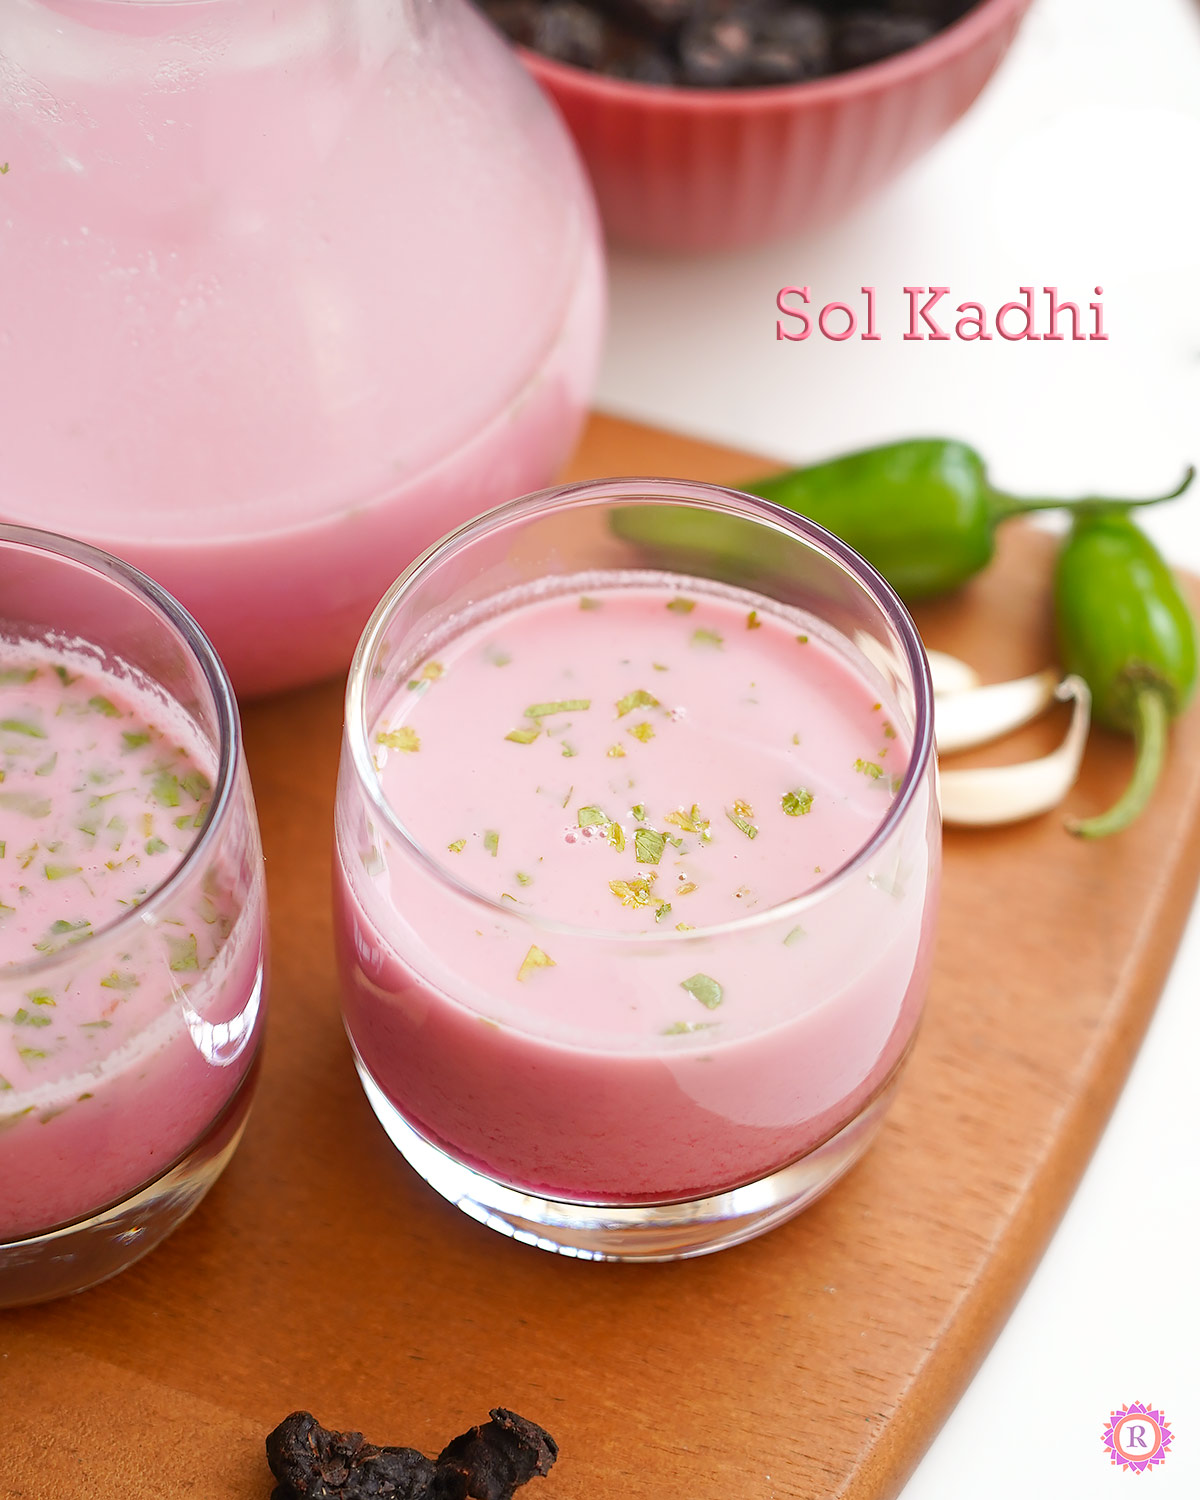
- Solkadhi Recipe | Kokum Curry
Solkadhi also known as kokum curry is a cooling and digestive drink popular in the state of Maharashtra & Goa. The pink-hued drink is delicious and super easy to prepare without any cooking.
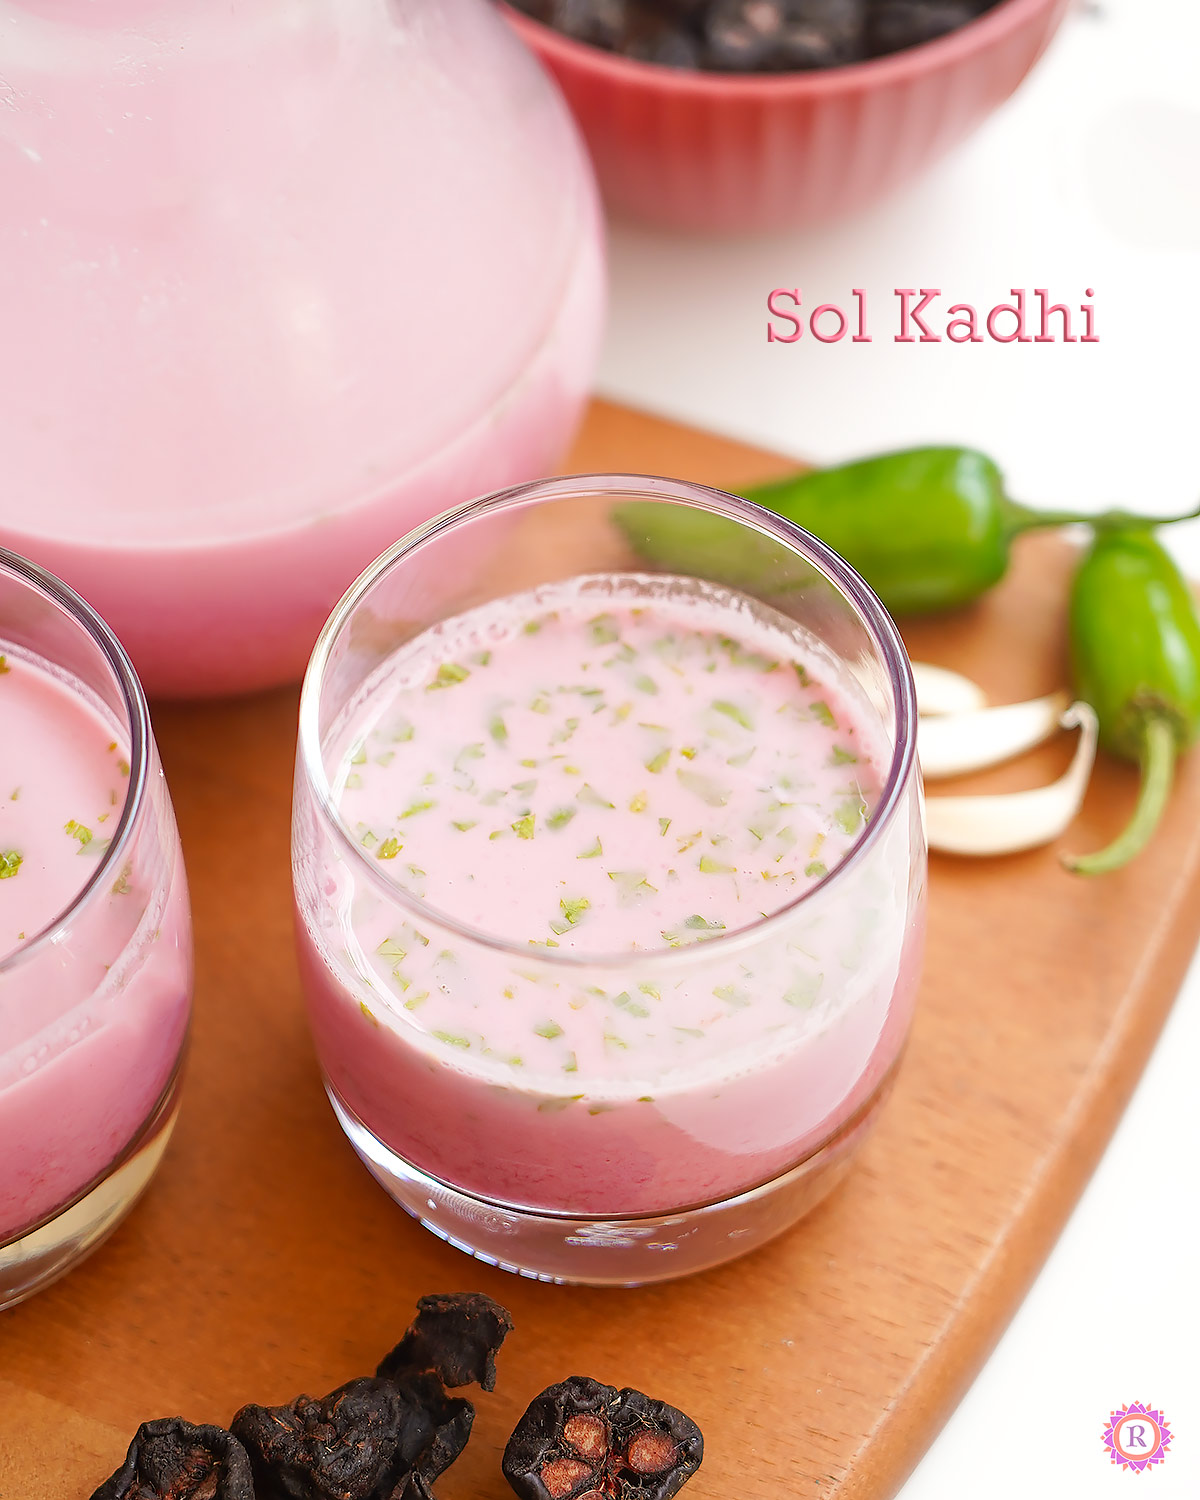
With it's unique ingredients, kokum is perfect for hot summers and had with meals as drink.
Check out my Jal jeera recipe and Aam panna recipe in this website.
[feast_advanced_jump_to]Kokum is totally new ingredient to me but have heard about it a lot. I initially thought it is same as kudampuli used in Kerala and Sri lankan cuisine, but no, they are different though from same Garcinia Genus.
Wanted to try recipes using it for a long time, but always forget to look for kokum. Finally I bought it in Mustafa. First thing came to mind is this beautiful curry.
While Konkani kokum curry is simple with just coconut milk and kokum, the Maharashtrian version may include various ingredients to make it complex in the flavour and spice.
We usually make thanni saaru and have it as drink or with rice. So I thought it will be similar to it and went ahead. It was really good and soothing to have after I had a episode of heartburn the previous day!
Ingredients
Here are the simple ingredients needed for making Sol kadi.
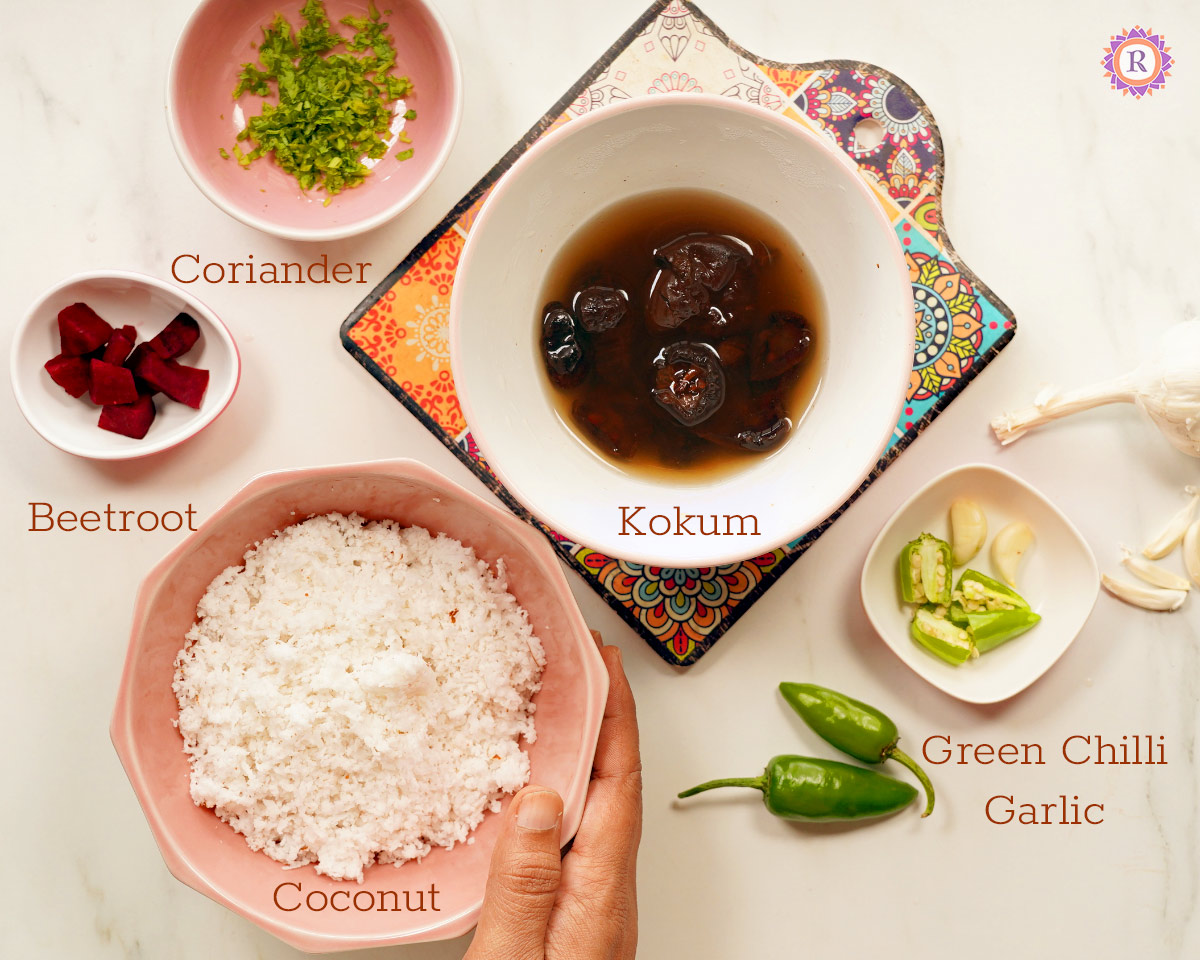
- Kokum (Garcinia Indica) - The key ingredient that aids digestion with all it's goodness in it.
- Coconut - Fresh grated coconut for extracting coconut milk, base of the recipe.
- Garlic - Gives flavour
- Green chilli - For spice
- Beetroot - Optional, but gives lovely hue, especially the kokum I got here was so dry and dark.
- Coriander leaves - For garnish
Please see recipe card below for quantities.
Step by step photos
Let's see how to make Sol Kadhi / kokum curry

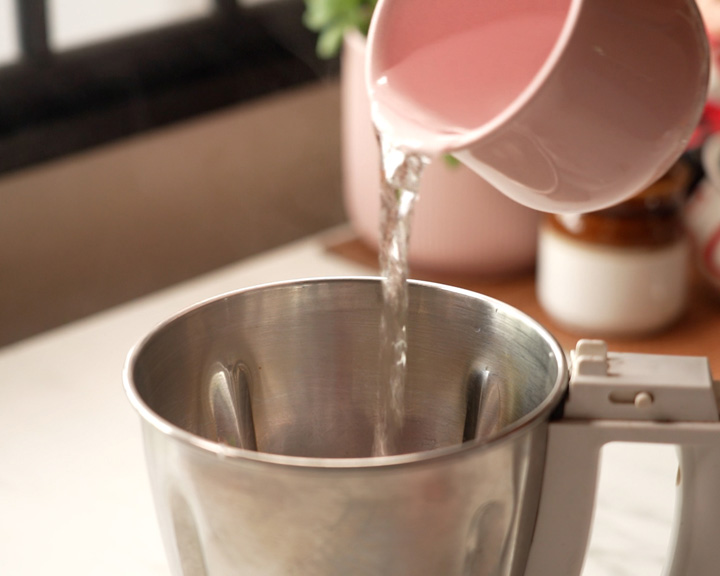
- Firstly, give it a rinse and soak kokum in ½ cup hot water for 30 minutes minimum. Set aside.
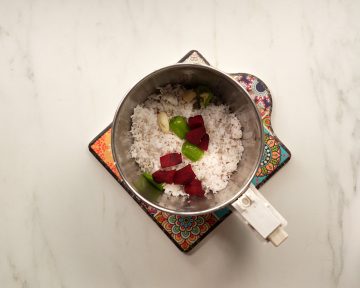
- Meanwhile, we can prepare coconut milk for the curry. Take grated coconut in a mixie jar. After that, add garlic, green chilli, beetroot and 1 cup of warm water to it.
- Then grind smoothly and pour over a metal strainer.
- After that, squeeze out the milk from it.

- Then again return the remains to the mixie jar and add ½ cup of warm water. Again grind well.
- After that, pour over the strainer, squeeze out the milk from it completely.
- Now with hands, squish the kokum well to bring out the tanginess from it.
- Then strain it and add to the kadhi.
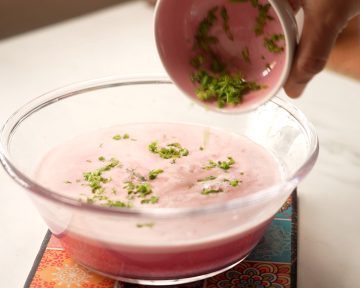
- Add salt and mix well. Garnish with coriander leaves. Sol kadhi is ready.
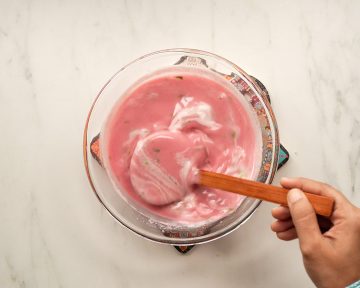
- Finally mix well and serve.
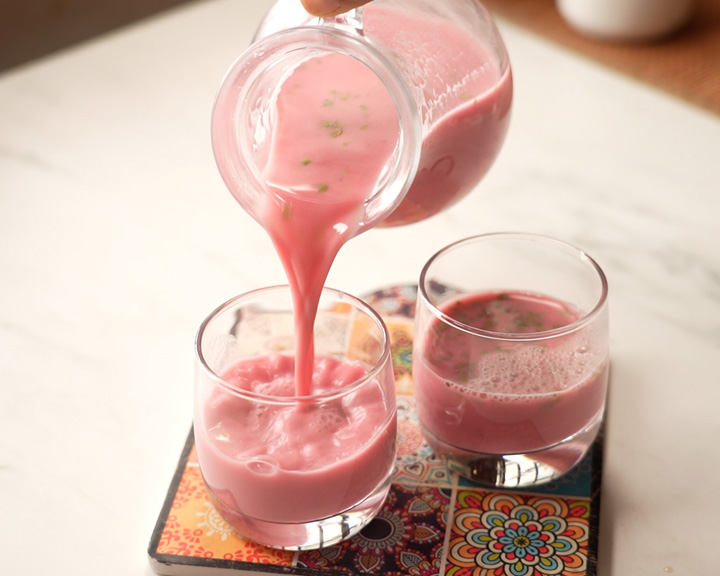
Enjoy solkadhi as such or chilled. Perfect to have as a drink or with rice.
Variations
- Add ½ teaspoon ginger, cumin seeds while grinding for more flavour.
- You can make it thicker if you want to eat it with rice. Give a temper with mustard, cumin seeds, asafoetida and dry red chilli.
- Add a little sugar if the kokum is too tart.
- You can make without beetroot too.
Storage
Store kokum kadhi in fridge as it is coconut milk and consume best within 6 hours. It is normal for the solkadhi to look bit separated after a while, just stir well before serving.
Top Tip
You can prepare solkadhi with ready made light coconut milk. I like to use organic coconut milk.
Since we use warm water, be careful while starting the mixer. It may blow up through lid. So I always give it a pulse option for the steam to escape and then start grinding.
My notes
- When grinding, I suggest to grind first without water to ensure chilli, beetroot and garlic gets ground and then add warm water. Otherwise if ground together with water, it stays as such at times.
FAQ
What is the liquid in solkadi?The base of the dish is coconut milk.
Is sol kadhi good for health?Yes, with goodness of coconut milk and kokum, the solkadhi is good for gut health. It is said that, Kokum has good bacteria and helps with digestion. Coconut milk in this traditional Maharashtrian drink, soothes your stomach and have healthy fat too.
Recipe card
Solkadhi Recipe | Kokum Curry | Sol Kadhi | Solkadi
Solkadhi also known as kokum curry is a cooling and digestive drink popular in the state of Maharashtra & Goa. The pink-hued drink is delicious and super easy to prepare without any cooking.Servings 3 peopleCup measurementsEquipments (Amazon Affiliate links)
metal strainerIngredients
- 1 cup Grated coconut
- 2 tablespoon Kokum
- 2 tablespoon Beetroot
- 1 Green chilli
- 2 cloves Garlic small variety
- 2 tablespoon Coriander leaves finely chopped
- Salt as needed
Prevent your screen from going darkInstructions
- Let's see how to make Sol Kadhi / kokum curry
- Firstly, give it a rinse and soak kokum in ½ cup hot water for 30 minutes minimum. Set aside.
- Meanwhile, we can prepare coconut milk for the curry. Take grated coconut in a mixie jar. After that, add garlic, green chilli, beetroot and 1 cup of warm water to it.
- Then grind smoothly and pour over a metal strainer.
- After that, squeeze out the milk from it.
- Then again return the remains to the mixie jar and add ½ cup of warm water. Again grind well.
- After that, pour over the strainer, squeeze out the milk from it completely.
- Now with hands, squish the kokum well to bring out the tanginess from it.
- Then strain it and add to the kadhi.
- Add salt and mix well. Garnish with coriander leaves. Sol kadhi is ready.
- Finally mix well and serve.
- Enjoy as such or chilled. Perfect to have as a drink or with rice.
Video
Notes
- Since we use warm water, be careful while starting the mixer. It may blow up through lid. So I always give it a pulse option for the steam to escape and then start grinding.
- When grinding, I suggest to grind first without water to ensure chilli, beetroot and garlic gets ground and then add warm water. Otherwise if ground together with water, it stays as such at times.
YoutubeDo you like short videos? Subscribe now!InstagramMention @rakskitchen or tag #rakskitchen if you have tried this recipe.The post Solkadhi Recipe | Kokum Curry appeared first on Raks Kitchen.
-
View
Pub Date: 15 February 2025 | 2:32 am
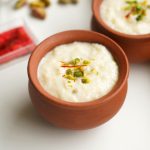
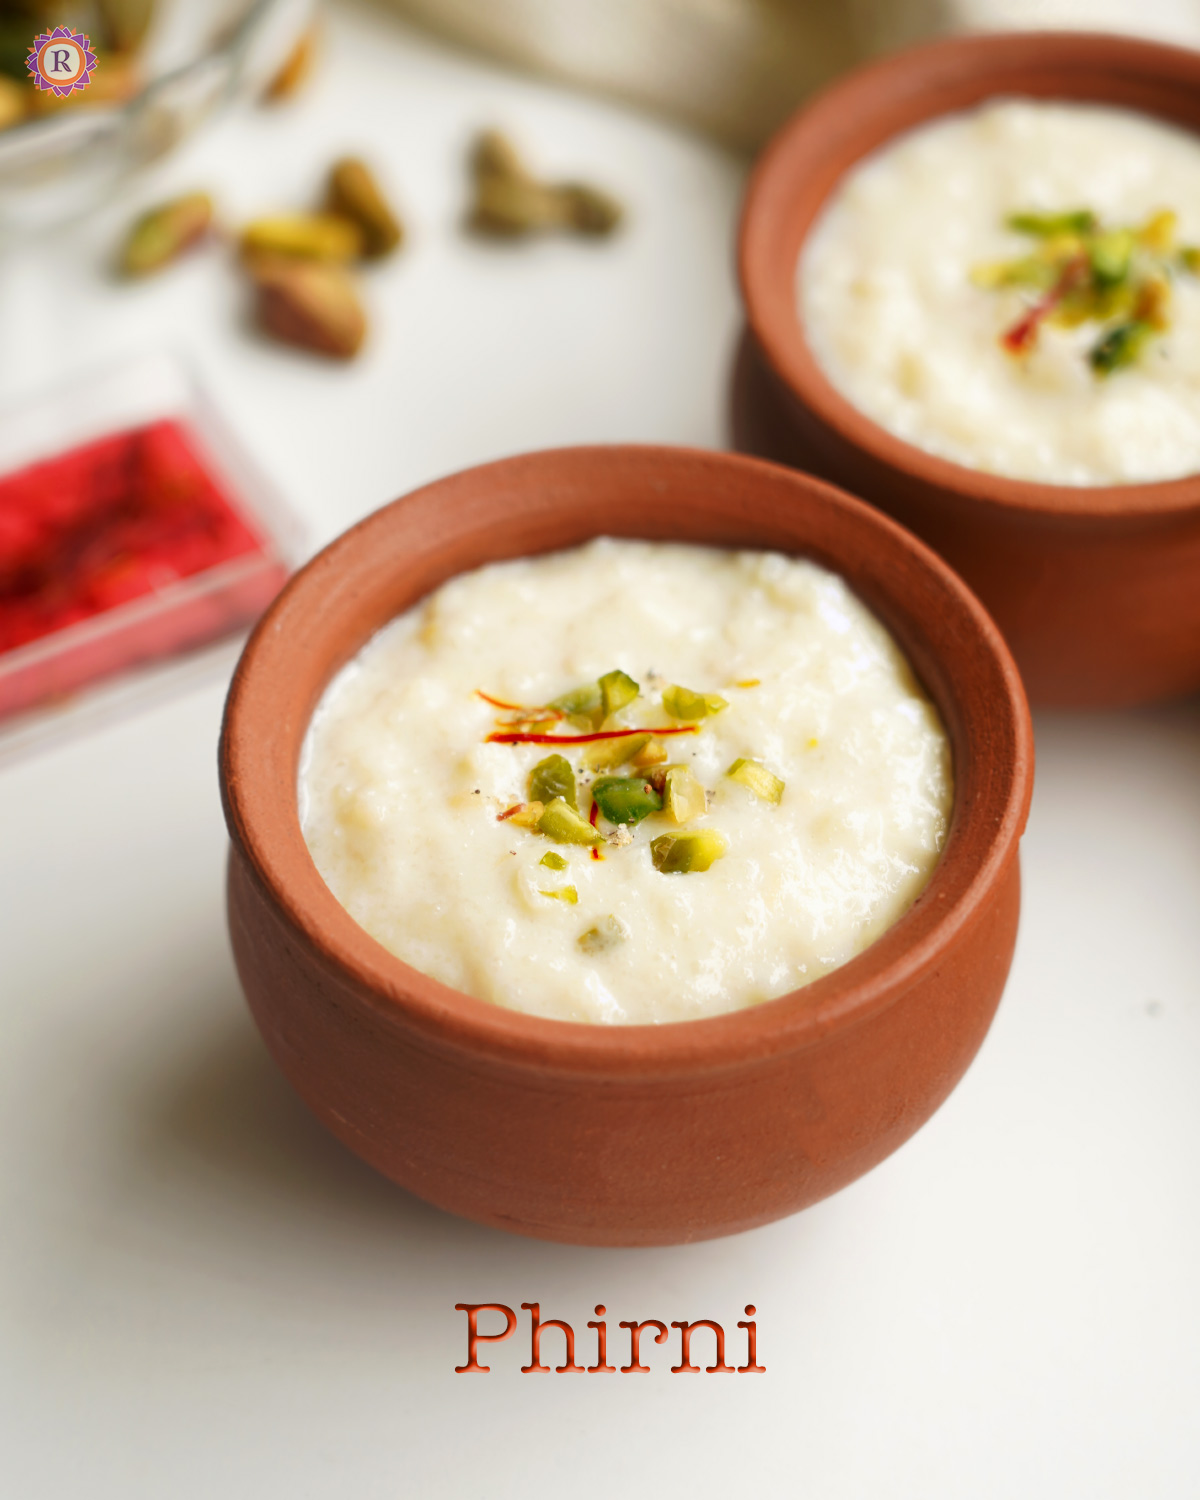
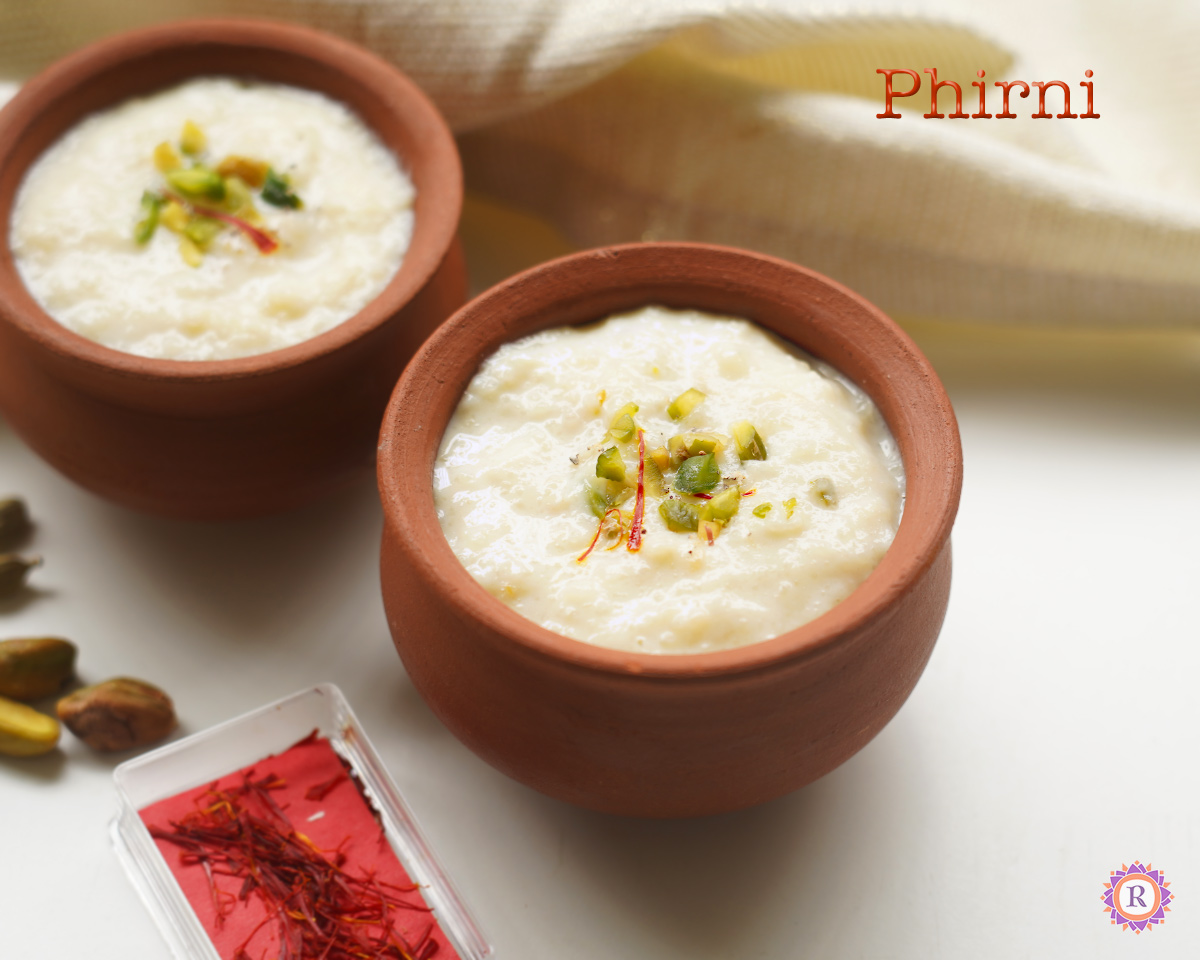
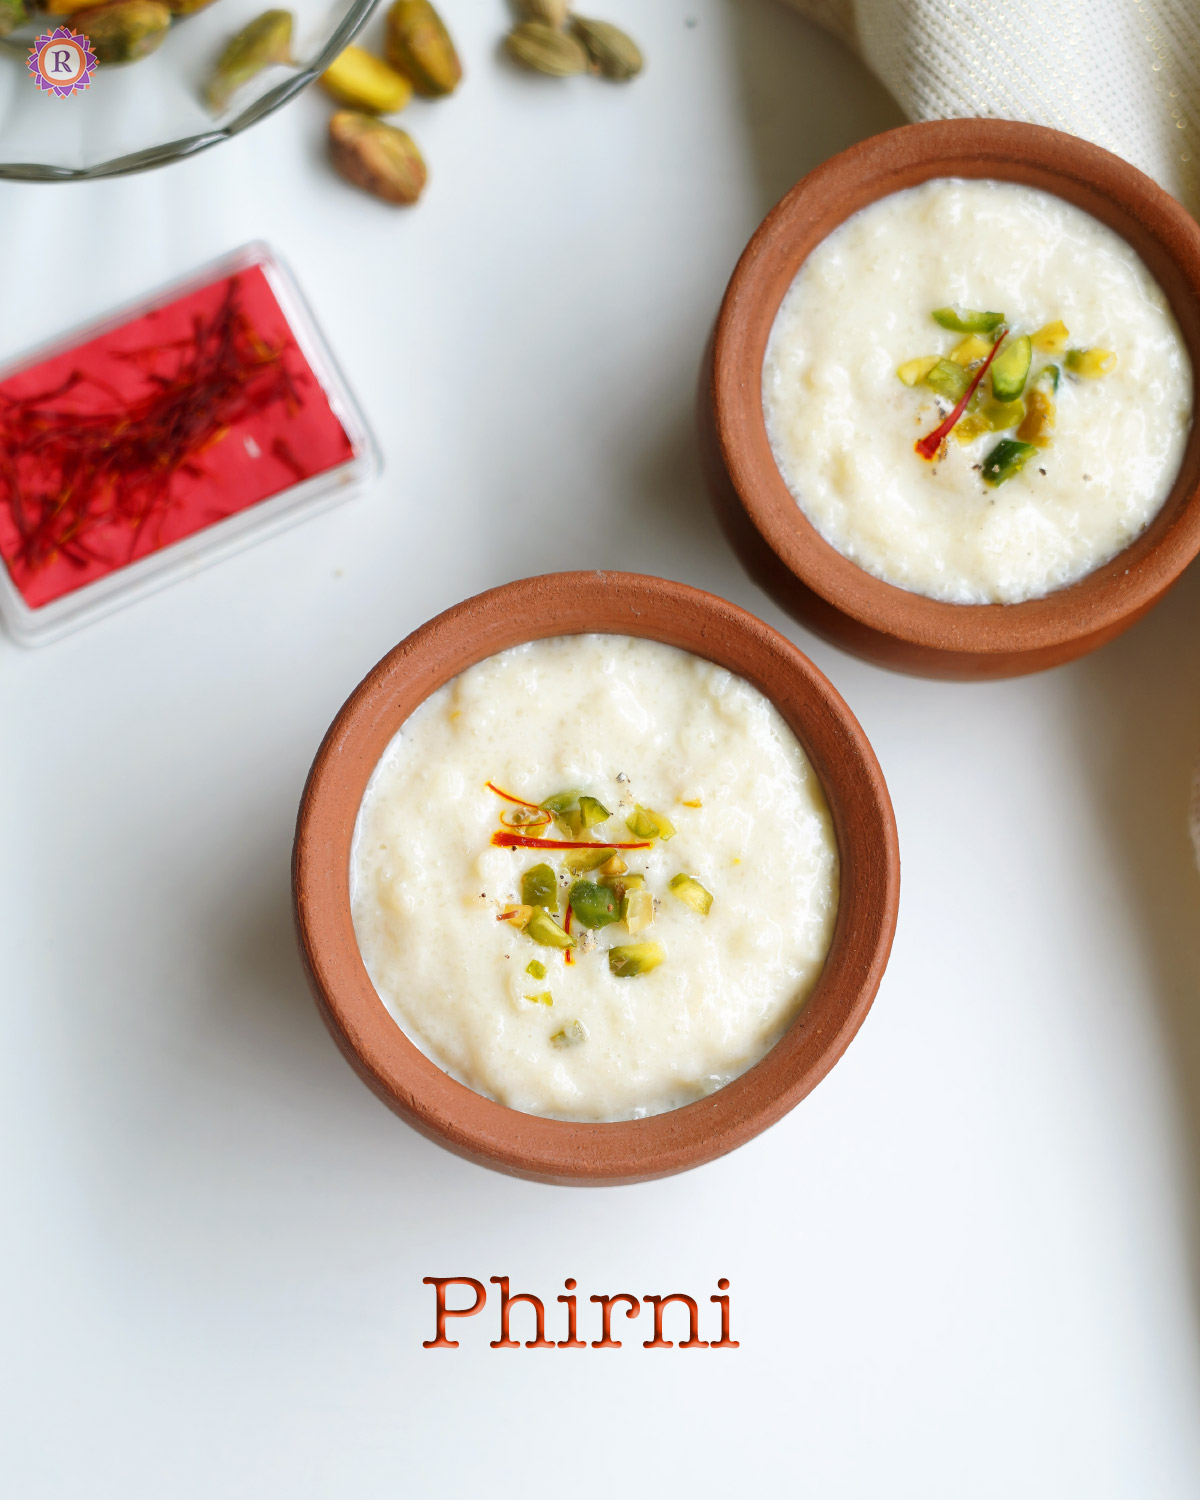
- Phirni Recipe | Creamy Rice Dessert
Phirni is a creamy dessert (rice pudding) made with Basmati rice, milk and sugar as main ingredients and flavoured with cardamom/ rose water, saffron and garnished nuts.
You can make Phirni for special occasions, festivals Diwali, Eid and Ramadan.
Check out this South Indian Paal payasam recipe and sheer khurma recipe in this website.
[feast_advanced_jump_to]Phirni or firni is introduced in India by the Mughals, after that we embraced it as part of culinary tradition in India and there are so many versions, each adding unique flavours and ingredients to the basic recipe. Here is my version of Phirni that you can easily make at home.
Ingredients
Here are the ingredients needed to make phirni.
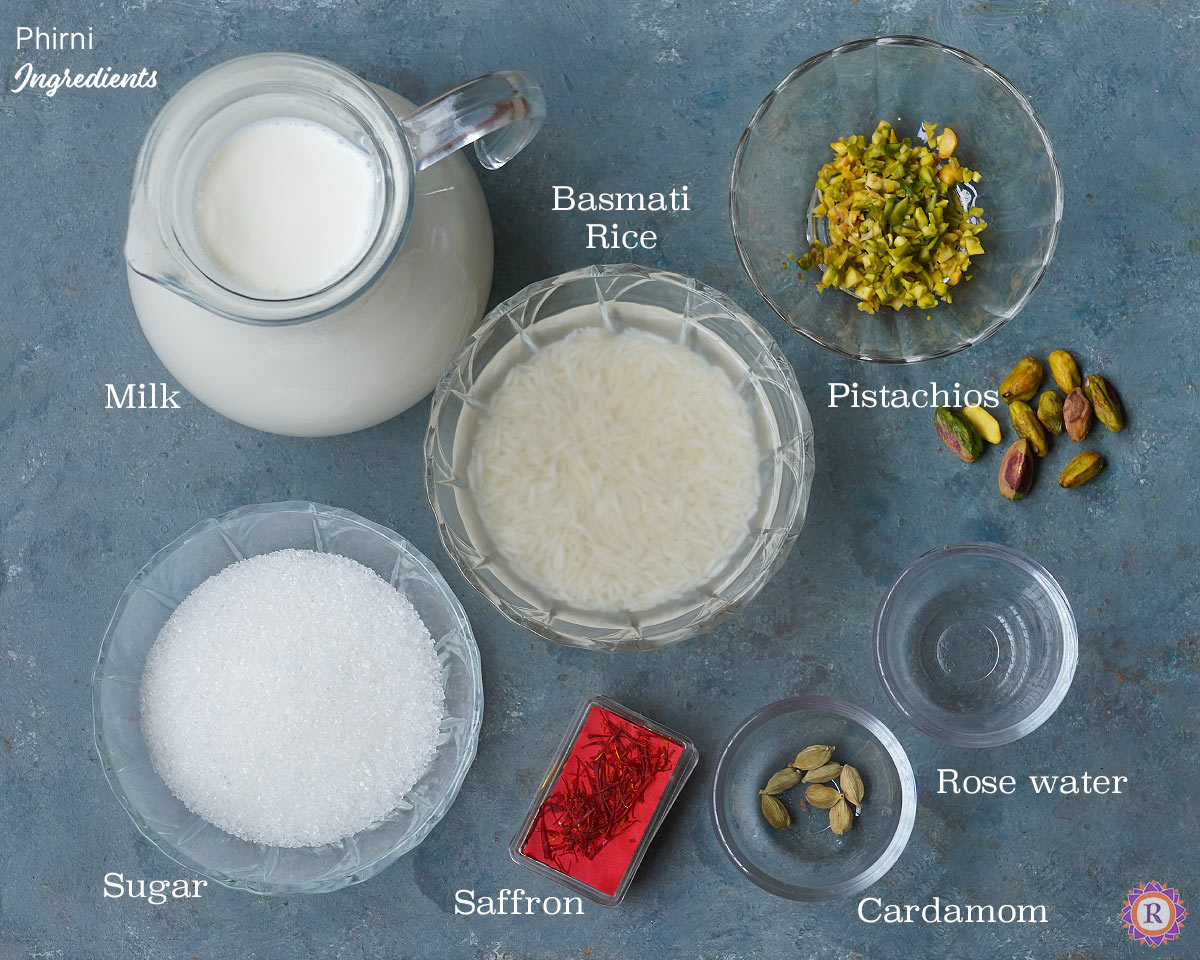
- Basmati rice - typically used for flavour, easy cooking nature.
- Milk - I used full fat milk, UHT, but fresh milk works well too.
- Sugar - White sugar for sweetening
- Rose water - I add this for it's sweet fragrance.
- Cardamom - For wonderful aroma.
- Pistachios - It looks beautiful as well as nice texture to the dessert.
- Saffron - I used for garnishing.
Please check my recipe card below for exact measurements.
Step-by-step instructions
Let's see how to make phirni with step by step photos and instructions.
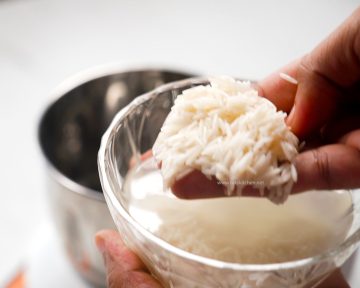
- Wash and soak basmati rice in hot water for 15 minutes with ¼ cup water.

- Then take it in a blender with ¼ cup water and grind it to a paste. I ground to a finer than rava/ suji texture.

- Bring 4 cups of milk to boil in a heavy bottomed vessel.
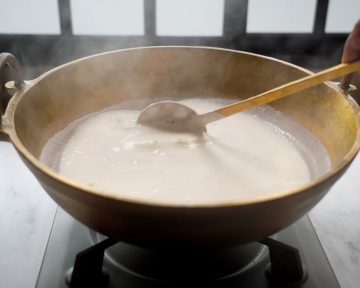
- Once it boils, simmer for 10 minutes.


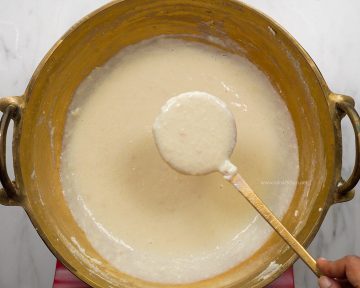
5. After that, add the ground rice gradually stirring in. It easily gets stuck at the bottom and high chances of getting burnt.
6. So keep mixing all the bottom, scraping the bottom.
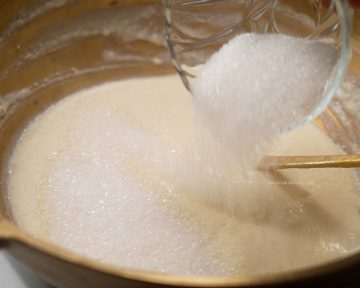
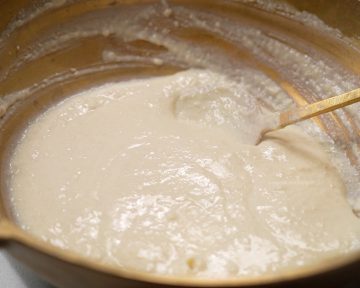
7. Once thick add sugar and it will loosen the texture furthermore. You can add more milk if it is too thick.
8. Let the sugar melt and blend well. Switch off the flame.
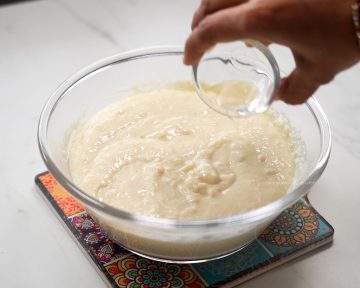
9. Cool down completely and add rose water, mix well.

10. Refrigerate and serve chilled with nuts, saffron topping. I soaked pistachios in warm water for 15 mins and chopped it for the garnish.
They traditionally serve phirni in mud pots called a shakoora. I had some matkas with me in which I served it. This makes the pudding more thick in texture.
Here's the bronze kadai (affiliate link) I used in this recipe.
Substitutions & Variations
- You can make this as rose phirni adding roohafza or saffron phirni by adding saffron while simmering the milk.
- Mix fruit puree with chopped fruits topping to cooled phirni to make it flavoured. Mango, lychee, apple, strawberry are some good ideas.
- Instead of grinding rice, you can also use rice flour to make this rice pudding.
- You can also use millets in place of rice. I have already shared it as Gulabi kheer.
Storage
You can keep the chilled phirni for couple of days in the fridge. Since it uses milk, I would not recommend more than that.
Top Tip
- Add sugar after the rice gets cooked.
- Make sure to keep stirring to avoid lumps in the texture.
- Soaking rice helps in creamy texture as well as easy cooking.
- Add the flavouring agents towards the end. This brings out the best flavour.
FAQ
Why is my phirni runny?Make sure to grind the rice smooth and thicken the milk before adding ground rice.
Difference between phirni and kheer?Rice texture, preparation (cooking process), flavours, consistency, serving style, regional differences. Kheer is mostly made with whole rice, while phirni is made with ground rice.
How to avoid lumps in phirni?Grind with water and make it a liquid instead of thick paste. Also instead of grinding to fine paste, let it have some texture. Keep stirring for smooth texture, otherwise the milk + rice stuck in bottom can affect the texture.
Recipe card
Phirni Recipe | Firni Dessert | Indian Rice Pudding
Phirni is a creamy dessert (rice pudding) made with Basmati rice, milk and sugar as main ingredients and flavoured with cardamom/ rose water, saffron and garnished nuts.Servings 6 PeopleCup measurementsEquipments (Amazon Affiliate links)
Ingredients
- ¼ cup Basmati rice
- 4 cups Milk
- ½ cup Sugar
- ¼ teaspoon Rose water
- 1 Cardamom powdered
- 2 tablespoon Pistachios
- 1 pinch Saffron
Prevent your screen from going darkInstructions
- Wash and soak basmati rice in hot water for 15 minutes with ¼ cup water.
- Then grind it to a paste. I ground to a fine rava/ suji texture.
- Bring 4 cups of milk to boil in a heavy bottomed vessel.
- Once it boils, simmer for 10 minutes.
- After that, add the ground rice gradually stirring in. It easily gets stuck at the bottom and high chances of getting burnt.
- So keep mixing covering all the bottom, scraping the bottom.
- Once thick add sugar and it will loosen the texture furthermore. You can add more milk if it is too thick.
- Let the sugar melt and blend well. Switch off the flame.
- Cool down completely and add rose water or cardamom. Mix well.
- Refrigerate and serve chilled with nuts, saffron topping. I soaked pistachios in warm water for 15 mins and chopped it for the garnish.
Notes
- Add sugar after the rice gets cooked.
- Make sure to keep stirring to avoid lumps in the texture.
- Soaking rice helps in creamy texture as well as easy cooking.
- Add the flavouring agents towards the end. This brings out the best flavour.
YoutubeDo you like short videos? Subscribe now!InstagramMention @rakskitchen or tag #rakskitchen if you have tried this recipe.The post Phirni Recipe | Creamy Rice Dessert appeared first on Raks Kitchen.
-
View
Pub Date: 7 February 2025 | 7:01 pm
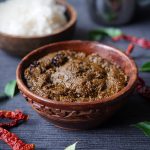
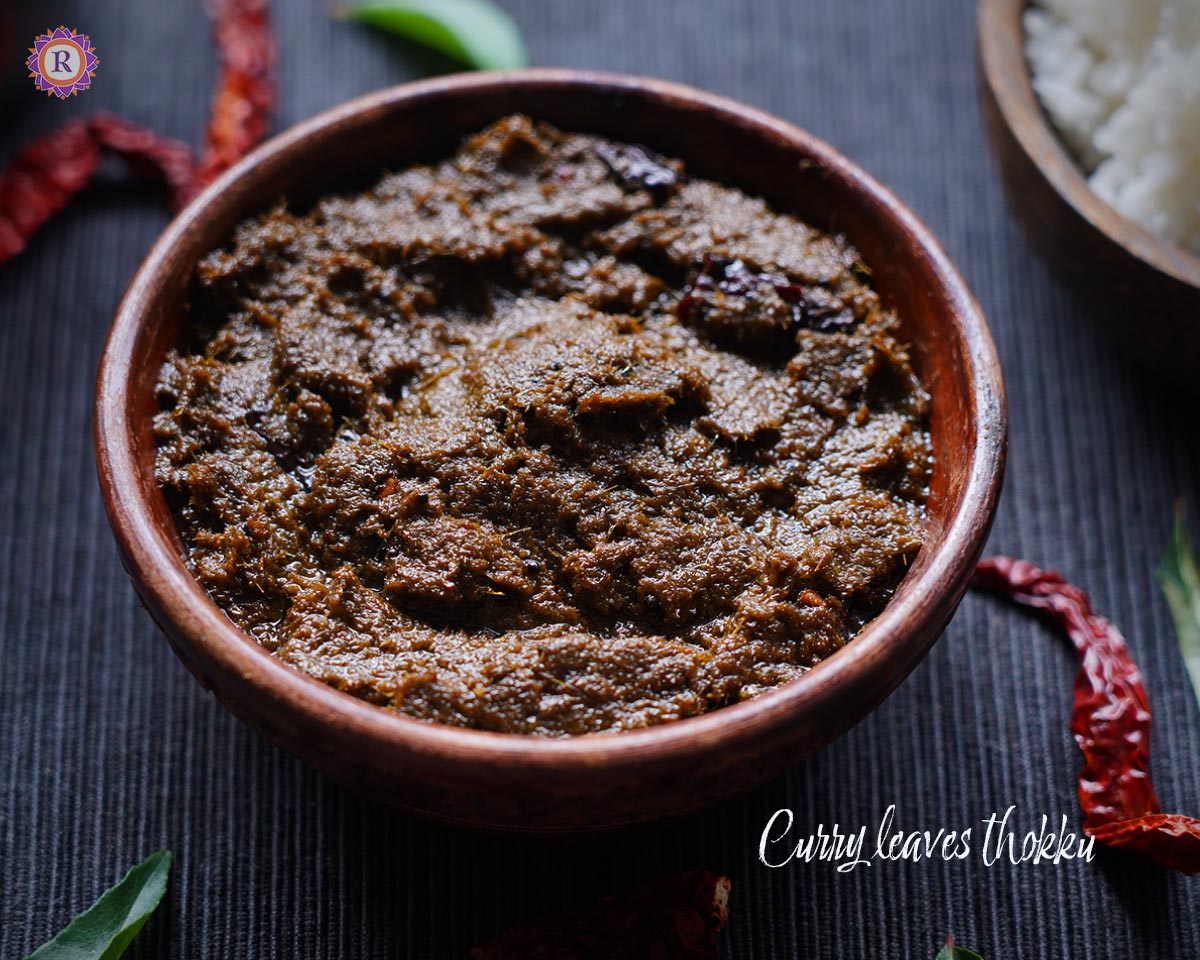
- Karuveppilai Thokku Recipe
Karuveppilai thokku is a tasty south Indian condiment with goodness of curry leaves and best way to use up the fresh leaves, including in the diet. Goes well with steamed rice, idli or dosa.

This aromatic dish can be prepared whenever you have lots of curry leaves in hand, around the year and have it in stock to include the goodness everyday.
Check out my Mint Thogayal Recipe and Curry Leaves Chutney Recipe in this website.
[feast_advanced_jump_to]Difference between thokku and thogayal: My thogayal is small batch and can be stored 5 days in fridge. But karuveppilai thokku can be stored like a pickle for long time in fridge.
Thogayal includes urad dal and coconut sometimes, thokku does not.
Thokku has more oil than a thogayal. I learnt this recipe from my MIL last year and she makes this often. Like the easy method and we always want to use up the curry leaves, consume it. So this is a wonderful way, give it a try.
Ingredients
Here are the simple ingredients needed to prepare this easy dish.
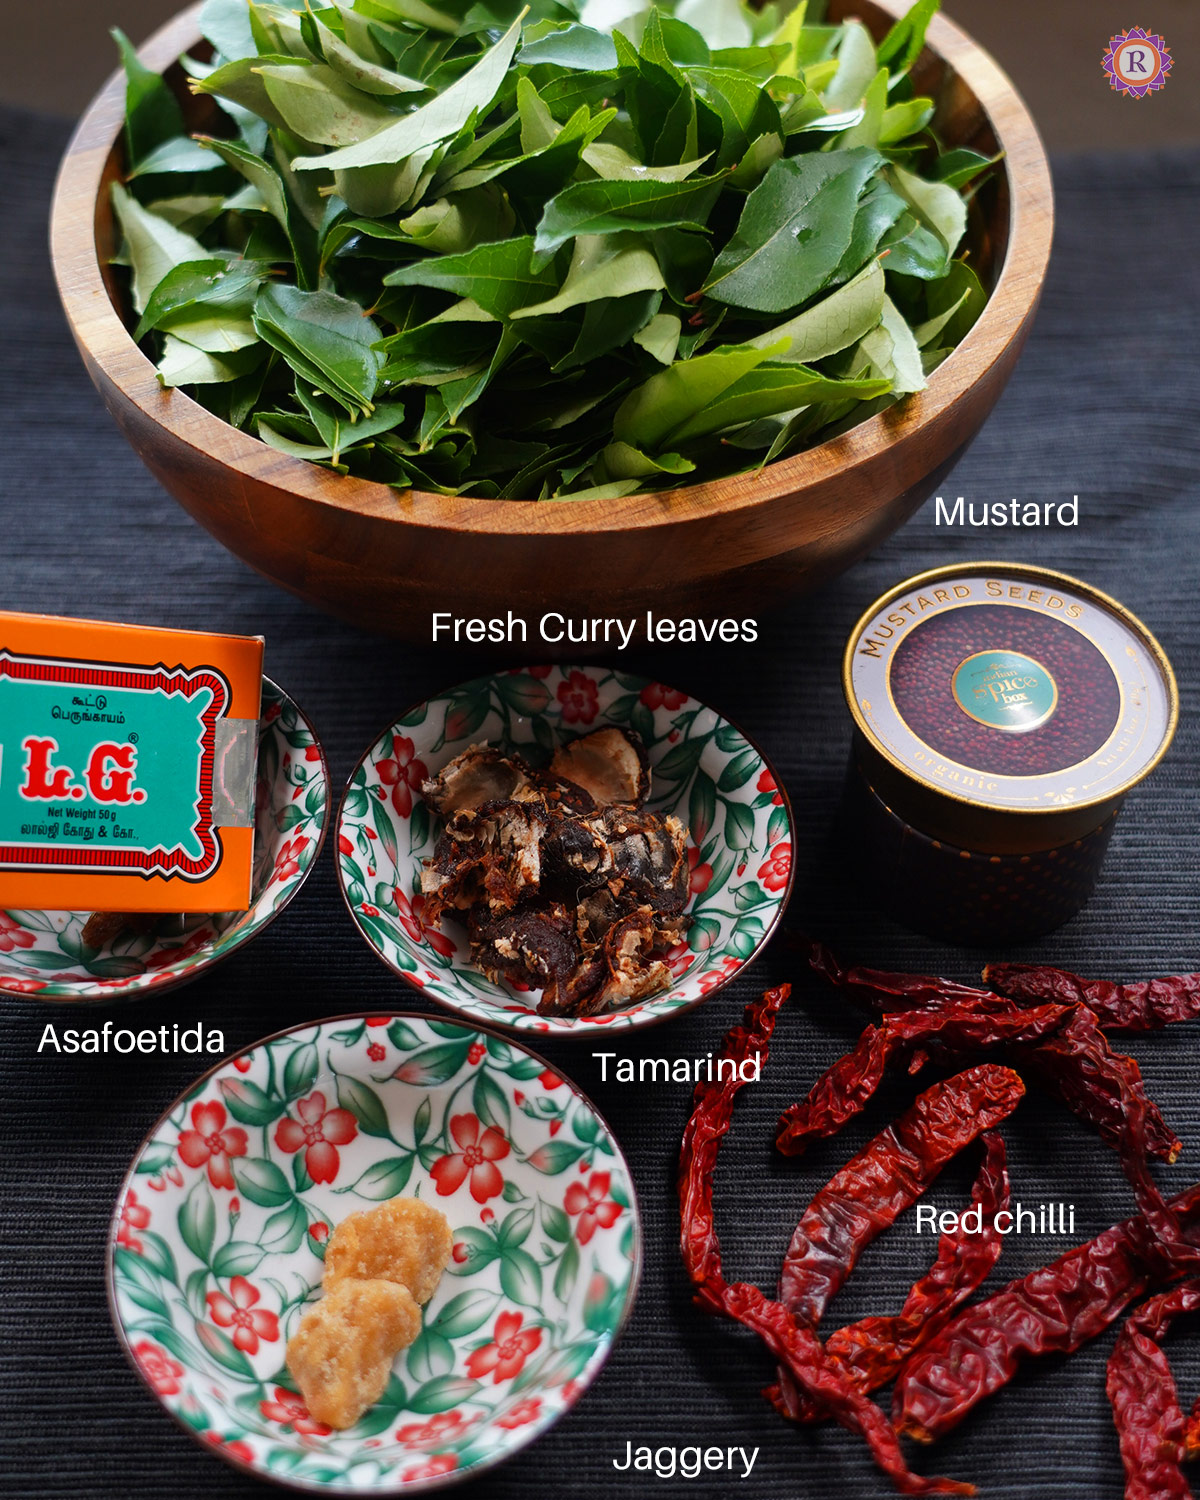
- Curry leaves - Use fresh curry leaves for best taste, flavour and shelf life.
- Red chilli - For spice
- Tamarind - To balance the spice and raw smell of curry leaves
- Jaggery - Enhances overall taste.
- Asafoetida - For flavour.
Please see recipe card below for exact quantities.
Instructions
Let's see how to make curry leaves thokku.
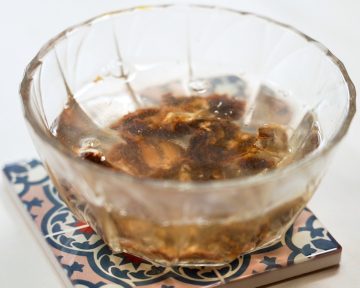
- Firstly, soak tamarind in hot for 30 minutes in little water.
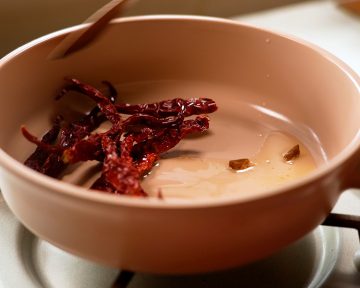
- Meanwhile, roast red chillies, asafoetida (see note 2) in a tablespoon of oil.
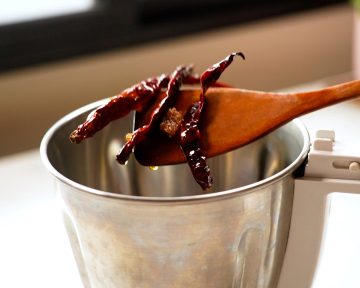
3. Cool and place it in blender along with salt, jaggery.
4. Then, extract thick tamarind extract (thick extract with ½ cup water).
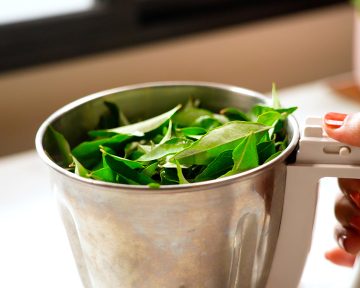
5. Place cleaned, measured curry leaves.
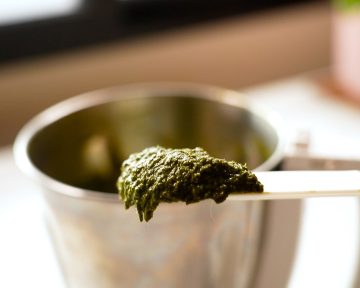
6. Then, grind to a thick paste.

7. Then heat pan / kadai with 1 tablespoon oil and splutter mustard, cut red chillies and asafoetida.

8. Then,add the ground paste.
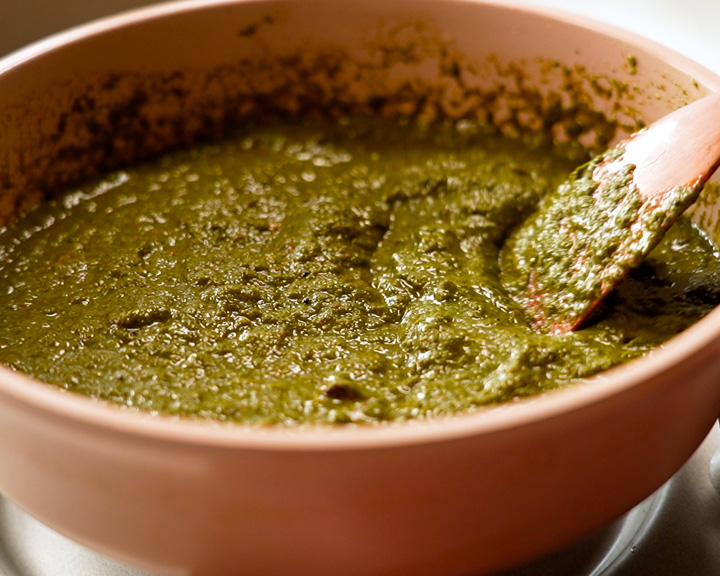
9. Cook furthermore until thick.
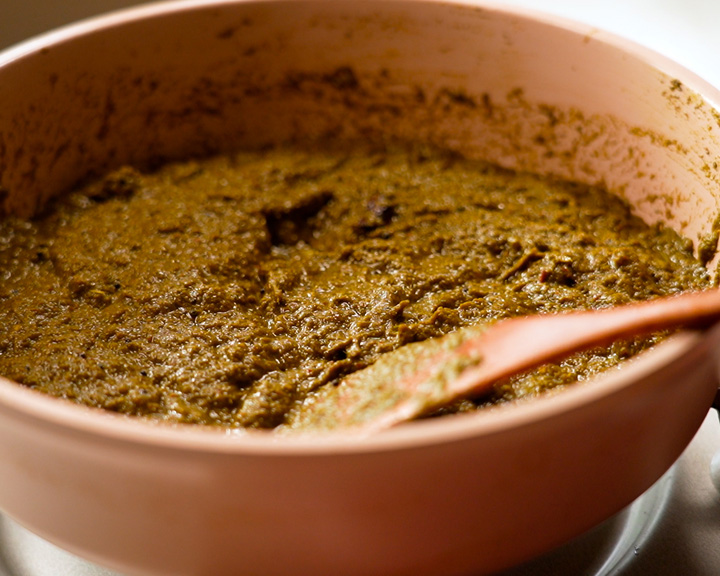
10. Then, as it cooks, the colour changes.

11. After that, add more oil as needed (I added 2 tablespoons).

12. Let the oil gets incorporated in the thokku and gets cooked without any moisture.
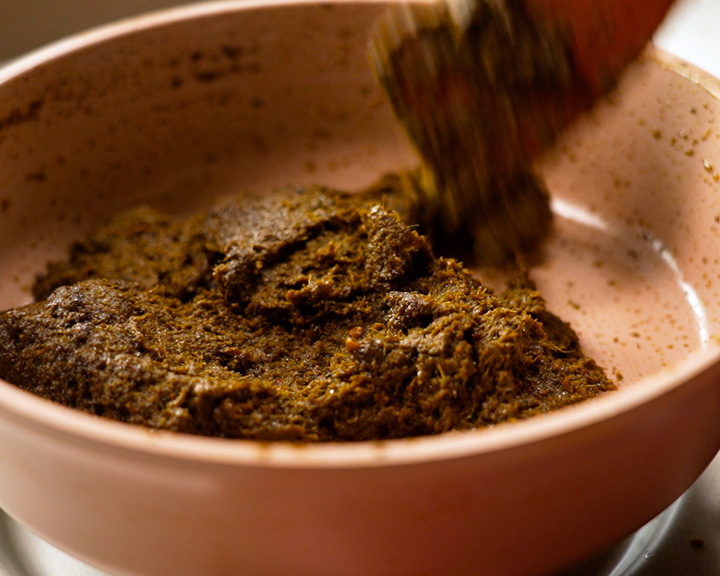
13. Once it looks shiny and thick like in the picture, switch off the stove.
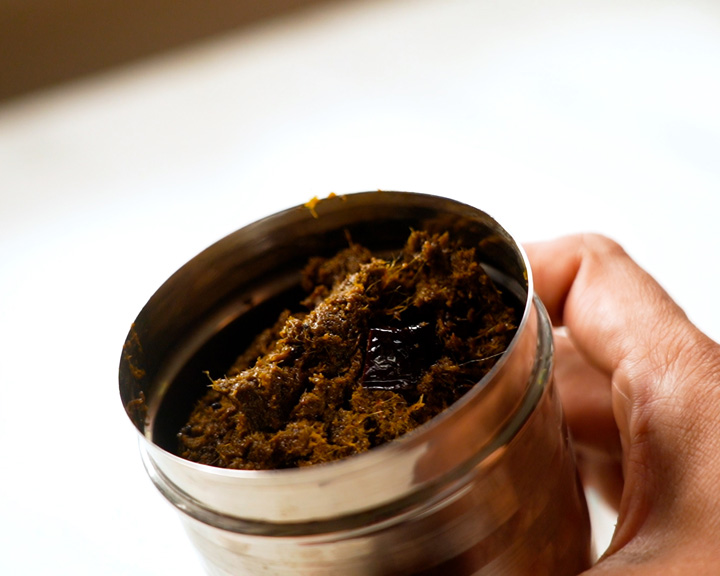
14. Cool down thoroughly before storing in an airtight container.
If you handle well, it stays good for a month in the fridge. You can mix with rice or have it as side dish for idli dosa.
Substitutions & Variations
You can prepare the same with a mixture of curry leaves, mint and coriander leaves.
You can use tamarind paste in place of tamarind extract. Use as per the instructions in the tamarind paste bottle.
Storage
Store karuveppilai thokku after it completely cools down. Otherwise it will affect the shelf life.
Use only clean dry spoons.
Take required amount and put back in fridge as soon as possible. Do not leave over counter top for long time and then put it back in the fridge.
Top tip
Use generous oil as it will make sure thokku is cooked well and there is no moisture as well as helps with texture. It gives longer shelf life as well.
Make sure to balance the tamarind and spice to ensure the taste.

Recipe card
Karuveppilai Thokku Recipe | Curry leaves thokku
Karuveppilai thokku is a tasty south Indian condiment with goodness of curry leaves and best way to use up the fresh leaves, including in the diet. Goes well with steamed rice, idli or dosa.Servings 0.5 cupCup measurementsEquipments (Amazon Affiliate links)
Ingredients
- 4 cups Curry leaves Measure loosely filled
- 1 tablespoon Tamarind Pack & measure
- 7 Red chilli
- ½ teaspoon Jaggery
- Salt
- 3 tablespoon Sesame oil Divided
To temper
- 1 tablespoon Oil I used sesame oil
- ½ teaspoon Mustard
- ¼ teaspoon Asafoetida
- 2 Red chillies
Prevent your screen from going darkInstructions
- Firstly, soak tamarind in hot for 30 minutes in little water.
- Meanwhile, roast red chillies, asafoetida (see note 2) in a tablespoon of oil.
- Cool and place it in blender along with salt, jaggery.
- Then, extract thick tamarind extract (thick extract with ½ cup water).
- Place cleaned, measured curry leaves.
- Then, grind to a thick paste.
- Then heat pan / kadai with 1 tablespoon oil and splutter mustard, cut red chillies and asafoetida.
- Then,add the ground paste.
- Cook furthermore until thick.
- Then, as it cooks, the colour changes.
- After that, add more oil as needed (I added 2 tablespoons).
- Let the oil gets incorporated in the thokku and gets cooked without any moisture.
- Once it looks shiny and thick like in the picture, switch off the stove.
- Cool down thoroughly before storing in an airtight container.
Video
Notes
- You can prepare the same with a mixture of curry leaves, mint and coriander leaves.
- I used solid asafoetida, so roasted along the red chilli, if using powder, add lastly once the chillies get roasted.
- You can use tamarind paste in place of tamarind extract. Use as per the instructions in the tamarind paste bottle.
- I made the thokku thick and lesser in oil though I have added 4 tablespoon oil. If the thokku is bit loose/watery, shelf life is lesser. So it is your choice to add more oil, less thick in consistency.
YoutubeDo you like short videos? Subscribe now!InstagramMention @rakskitchen or tag #rakskitchen if you have tried this recipe.The post Karuveppilai Thokku Recipe appeared first on Raks Kitchen.
-
View
Pub Date: 31 January 2025 | 7:01 pm
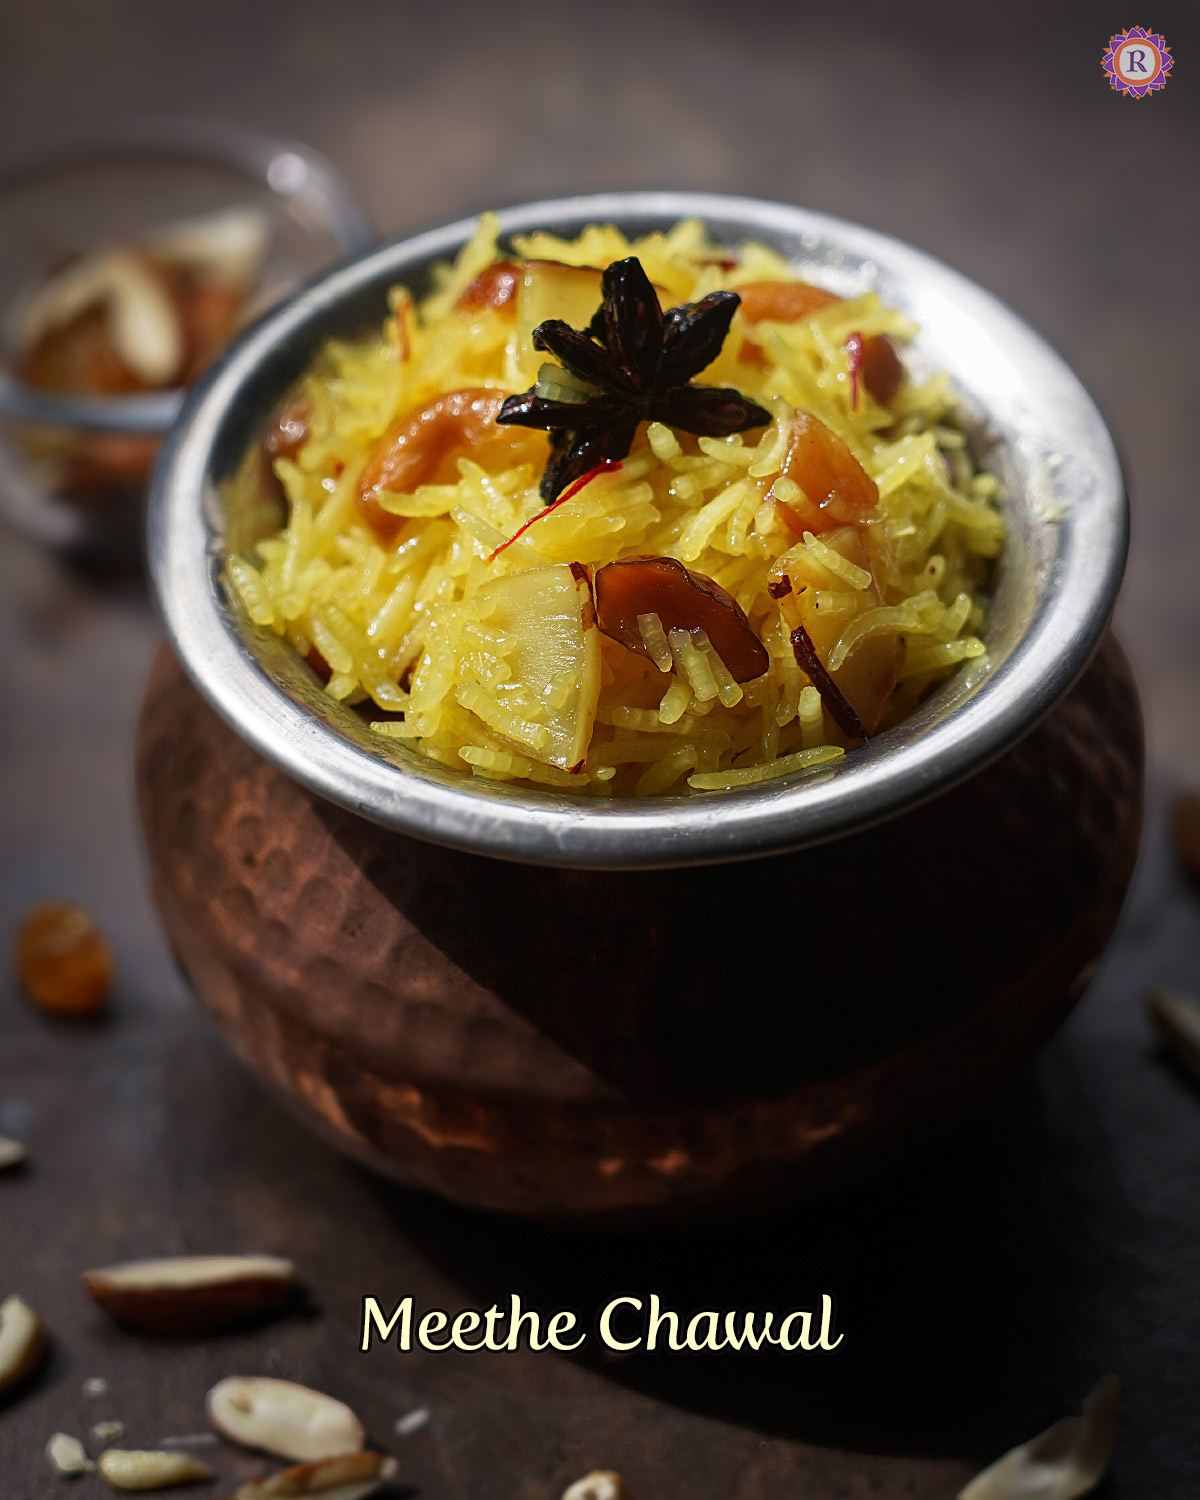
- Meethe Chawal Recipe | Zarda Pulao
Meethe chawal is a sweet rice, a traditional dish made in India during festival seasons Basant Panchami. Also known as Zarda or Zarda pulao, it is typically prepared with Basmati rice, colour (Turmeric, safforn), whole spices for flavor, ghee, nuts, raisins and sugar or jaggery for sweetening. Let's see how to make a perfect Meethe chawal with fluffy, not watery results in this post, guides you even if you are a begginer.
Typically made during Festival like Basant Panchami or also as a rich dessert during special occasions.
Do check out my Kashmiri pulao recipe and my Kashmiri naan recipe which also has a sweet note in it.
[feast_advanced_jump_to]Ingredients
Methe chawal is made typically during Basant Panchami festival, where yellow food symbolize prosperity and happiness. I have used only natural food colours, no hidden artificial colour!

- Basmati Rice : Aromatic, long-grain rice perfect for sweet dishes.
- Sugar : Adds sweetness to the dish, adjust as per taste.
- Turmeric : Provides a vibrant yellow color naturally. Has very subtle earthy flavour, matches the flavour profile of the dish.
- Ghee: Adds richness and aroma.
- Coconut Slices: For a mild flavour and texture.
- Saffron: Infuses a luxurious flavor and golden hue.
- Cashews : Crunchy, adds a nutty flavor.
- Almonds: Thinly sliced for texture.
- Raisins : Adds a sweet, tangy taste.
- Cardamom: For a sweet aroma.
- Cloves , Cinnamon: For flavour
- Kewra Water : Enhances the fragrance of the basmati rice.
- Salt : Balances sweetness, making it not flat.
See recipe card for exact quantities.
Step by step images
Let's see how to make one pot meethe chawal in pressure cooker.

- Start by washing rice and soak it in 1 & ½ cups water for minimum 30 minutes. This step is very important for easy cooking and soft texture. I used hot water, but you can soak in plain too.

- Once done, drain water. Then heat a pressure cooker with ghee. Add the tempering items to it.

- After that, add sliced coconut and give it a roast, followed by nuts and raisins.

- Once the raisin bloats, add rice drained from water. Give it a roast to coat ghee and there's no extra moisture.


5. Then, add water, salt, saffron, kewra water, turmeric and mix well. Bring to boil.

6. Let it boil for 2 minutes or until the rice is seen on the surface.

7. Add sugar and give it a stir without breaking the rice.

8. Cook in lowest flame possible for 14 minutes firstly.

9. After that, open and give it a mix. For me at this point it was still watery at the bottom.

10. So again gave another 5 minutes low flame cooking.

11. Once done, let the pressure go down naturally (if any). Again give it a mix, you may still have some moist syrup at the bottom. But no need to worry.

12. Mix and keep closed for 15 minutes.


13. After 15 minutes, all the syrup will be absorbed by the rice and become fluffy.
14. If you want you can again heat, garnish with a drizzle of ghee and serve hot!
Enjoy with a mild gravy like paneer pasanda or something like Dum aloo. I can have it as such as there's the coconut + nuts texture, the rice is delicious and fragrant.

Substitutions & Variations
- You can use any raw rice or fragrant rice of your own region. For example jeeraga samba rice is a fragrant rice in southern part of India.
- Use any nut of your choice, chironji, pistachios work well too.
- Replace ¾ cup white sugar with 1 cup powdered jaggery. I like to use organic jaggery powder in case if using jaggery as it has less/no chemicals.
Storage
You can refrigerate the rice for couple of days and reheat to serve again.
Top Tip
My notes
- Soaking the rice really well is important, especially in this recipe where along with sugar, rice takes long time to cook.
- Depending on the cooker make and model, the cooking time may vary. Just make sure to not let it burn in the bottom.
- When you open the cooker, if there is lot of sugar syrup at the bottom, that is dripping amount of syrup, cook furthermore. But if it is just moist and not very watery, you can just mix and give it resting time. As it cools, it gets absorbed, no need to panic.
- I soaked rice in measured amount of water and used the same water for cooking the rice.
FAQ
Does adding turmeric in the meetha chawal give earthy flavour?Since we add lot of whole spices and fragrant kewra water, there would not be any smell of turmeric at all.
Meethe chawal become hard after cooling down?It's normal for the rice become rigid as we cook with sugar, but it should not be hard. It will be slightly chewy. To trouble shoot, you can add 2 tablespoon milk and reheat.
Rice is not cooked properly, why?Make sure to soak minimum 30 minutes prior cooking. Boil 2 minutes before adding sugar. Cook for long time in low flame as mentioned and give 15 minutes standing time.
Since we add sugar, it turns bit chewy. But increasing the cooking time and adding sugar after 2 minutes boiling helps.
Recipe card
Meethe Chawal Recipe
Meethe chawal is a sweet rice, a traditional dish made in India during festival seasons Basant Panchami. Also known as Zarda or Zarda pulao, it is typically prepared with Basmati rice, colour (Turmeric, safforn), whole spices for flavor, ghee, nuts, raisins and sugar or jaggery for sweetening.Servings 4 peopleCup measurementsEquipments (Amazon Affiliate links)
Ingredients
- 1 cup Basmati rice
- 1.5 cups Water
- ¾ cup Sugar
- 10 strands Saffron
- ¼ teaspoon Turmeric
- ½ teaspoon Kewra water
- A pinch Salt
To temper
- 2 - 3 tablespoons of Ghee
- 2-3 cardamom
- 3 cloves
- 1 inch piece cinnamon
- ⅛ cup sliced coconut fresh
- 10 Cashews
- 5 Almonds
- 20 Raisins
Prevent your screen from going darkInstructions
- Start by washing rice and soak it in 1 & ½ cups water for minimum 30 minutes. This step is very important for easy cooking and soft texture. I used hot water, but you can soak in plain too.
- Once done, drain water. Then heat a pressure cooker with ghee. Add the tempering items to it.
- After that, add sliced coconut and give it a roast, followed by nuts and raisins.
- Once the raisin bloats, add rice drained from water. Give it a roast to coat ghee and there's no extra moisture.
- Then, add water, salt, saffron, kewra water, turmeric and mix well. Bring to boil.
- Let it boil for 2 minutes or until the rice is seen on the surface.
- Add sugar and give it a stir without breaking the rice.
- Cook in lowest flame possible for 14 minutes firstly.
- After that, open and give it a mix. For me at this point it was still watery at the bottom, so again gave another 5 minutes low flame cooking.
- Once done, let the pressure go down naturally (if any). Again give it a mix, you may still have some moist syrup at the bottom. But no need to worry. Mix and keep closed for 15 minutes.
- After 15 minutes, all the syrup will be absorbed by the rice and become fluffy.
- If you want you can again heat, garnish with a drizzle of ghee and serve hot!
Video
Notes
- Soaking the rice really well is important, especially in this recipe where along with sugar, rice takes long time to cook.
- Depending on the cooker make and model, the cooking time may vary. Just make sure to not let it burn in the bottom.
- When you open the cooker, if there is lot of sugar syrup at the bottom, that is dripping amount of syrup, cook furthermore. But if it is just moist and not very watery, you can just mix and give it resting time. As it cools, it gets absorbed, no need to panic.
YoutubeDo you like short videos? Subscribe now!InstagramMention @rakskitchen or tag #rakskitchen if you have tried this recipe.The post Meethe Chawal Recipe | Zarda Pulao appeared first on Raks Kitchen.
-
View
Pub Date: 24 January 2025 | 7:01 pm
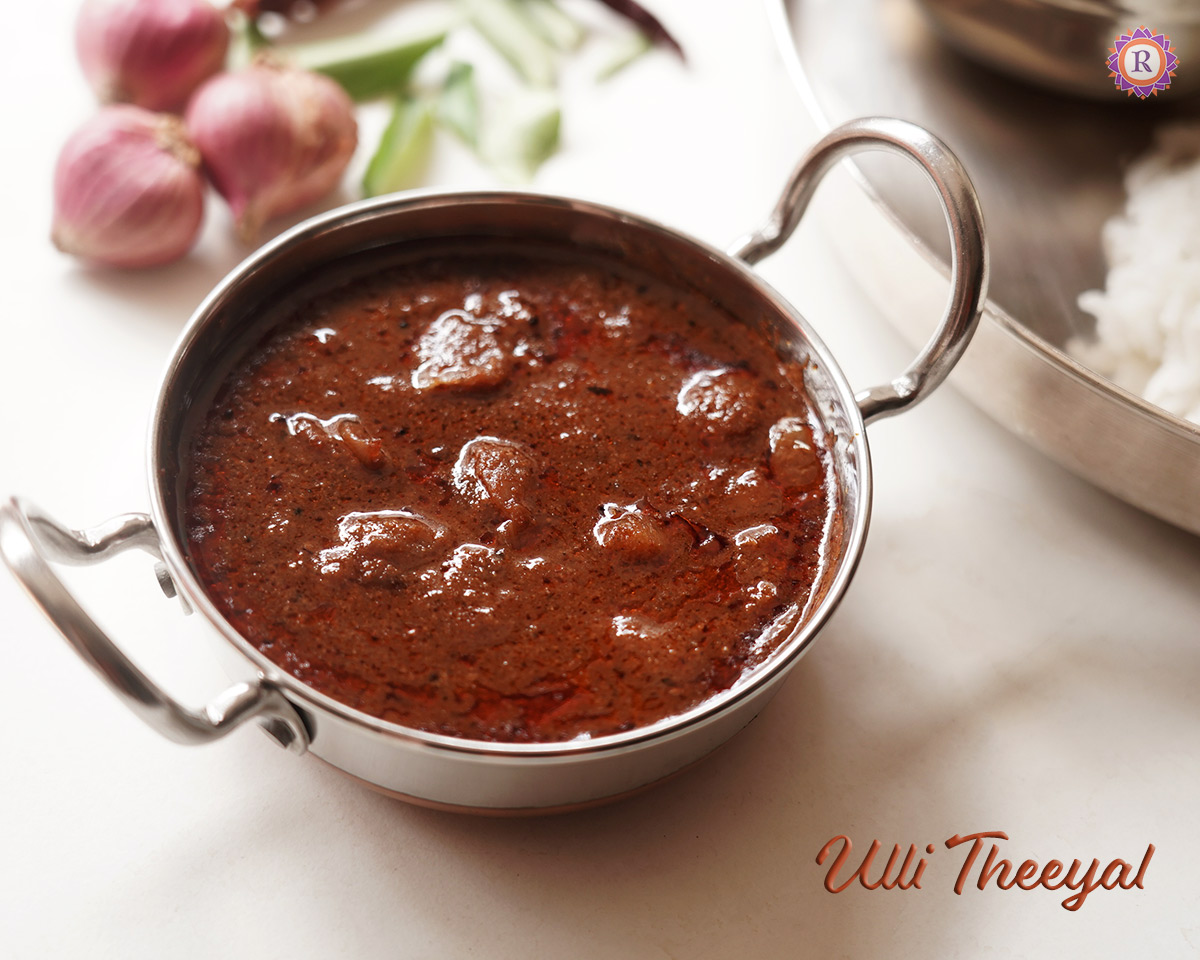
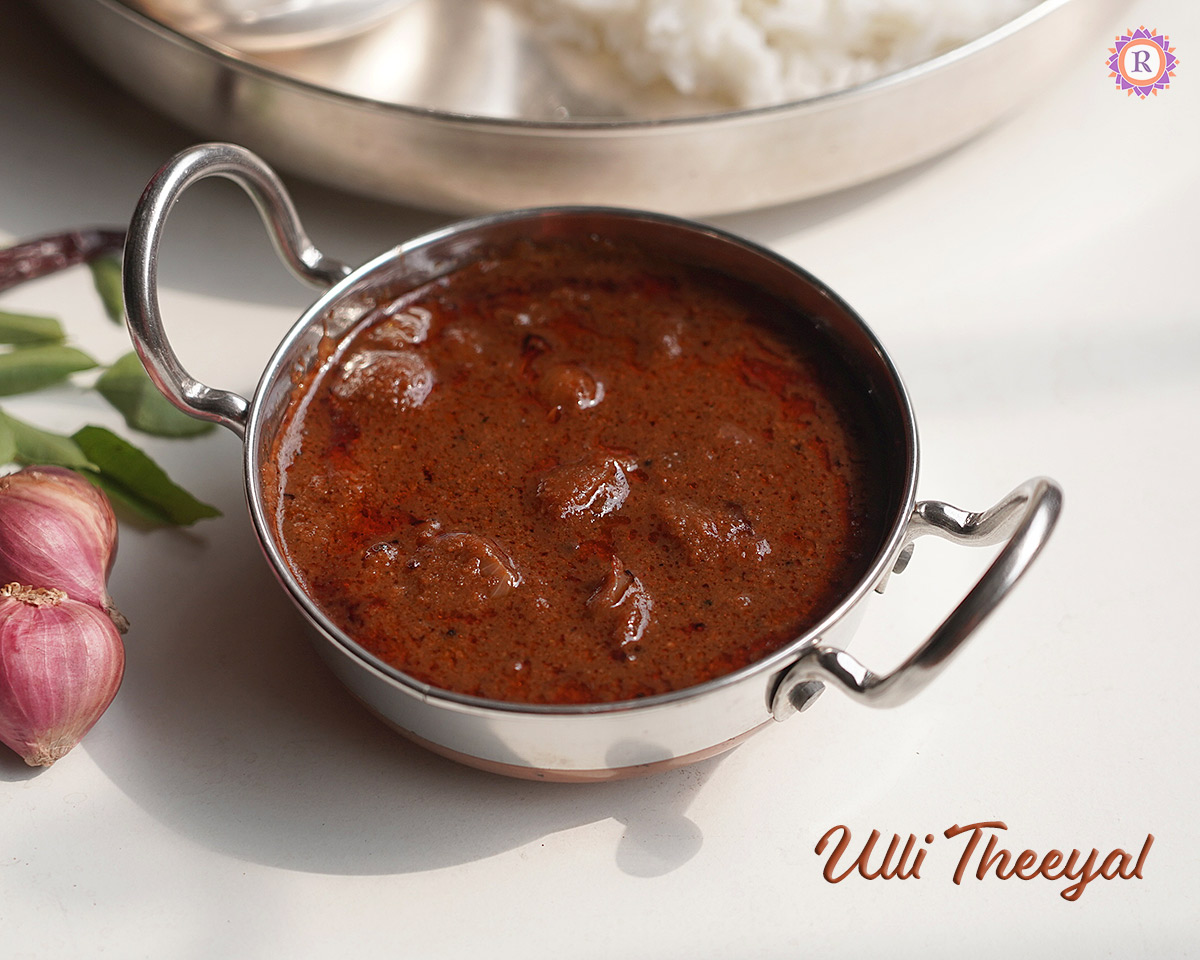
- Ulli Theeyal Recipe
Ulli theeyal is a thick tamarind based shallot gravy made with fresh roasted and ground coconut spice paste. This is a classic Kerala pearl onion curry, served with rice typically.
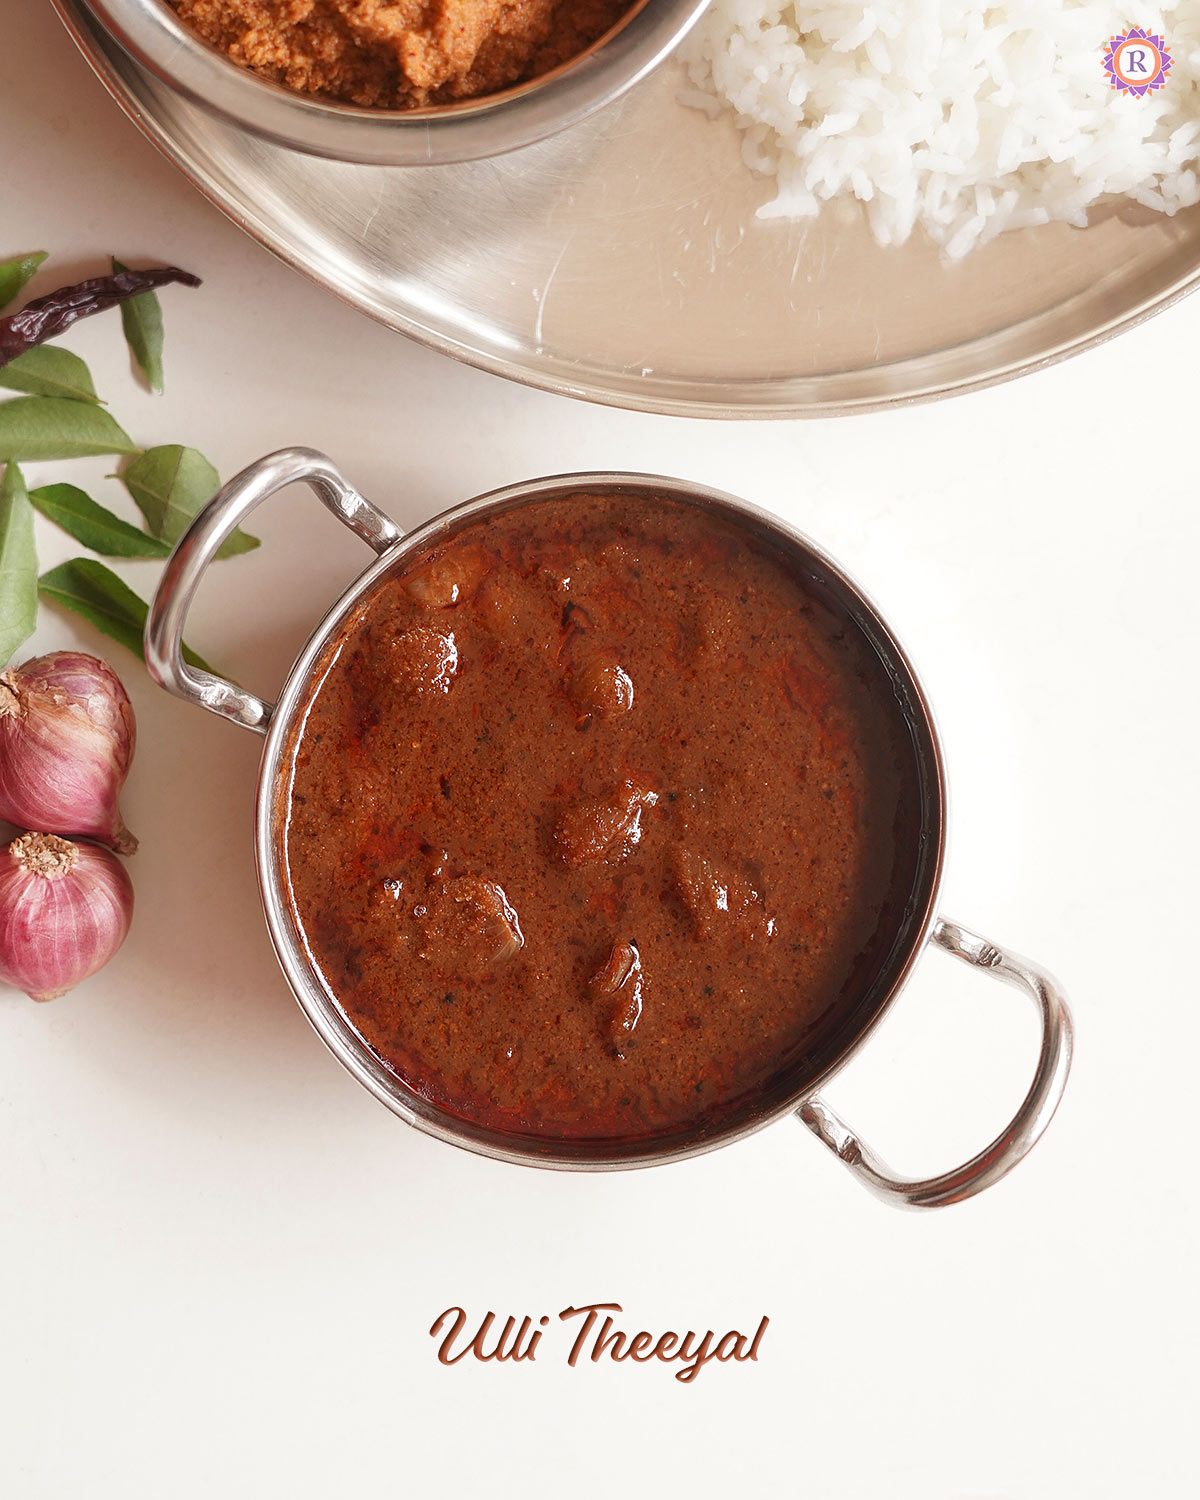
This ozhichu curry (main gravy dish served with rice) is made for lunch anytime of the year or during Onam as part of sadya.
Check out my other Kerala Onam sadhya recipes in my website.
[feast_advanced_jump_to]Ingredients
Here are the ingredients needed for making ulli theeyal.
- Pearl onion - Shallots - Small onions - Ulli - The star ingredient of the dish. I like to use small Indian variety.
- Tamarind - Use fresh dark Indian Tamarind.
- Coconut - Fresh grated coconut gives the colour, flavour for the gravy.
- Red chilli - Dry red chilli for spice.
- Coriander seeds - For flavour
- Fenugreek seeds - This is added very less but adds a good flavour.
- Black pepper - Adds a spice kick to the gravy.
- Curry leaves - For flavour
- Red chilli powder - Gives colour and extra spice.
- Turmeric - For colour.
See recipe card below for full list exact quantities.
Step by step images
Let's see how to make ulli theeyal.
- Firstly, soak puli in hot water for 15 - 30 minutes.

- Meanwhile, heat a teaspoon of coconut oil and roast red chilli, black pepper and fenugreek seeds.
- Once it's almost roasted, lastly add coriander seeds. I forgot to add curry leaves and did it later, but you can add at this stage.

- Remove in a plate for cooling.
- Add coconut and start roasting.

- Keep roasting and once it's dry and starts to change colour, add 2-3 small onions at this stage.

- Turn down the flame and roast carefully without burning, until it turns deep reddish in colour.

- Remove in a plate.
- While it is cooling, you can extract tamarind juice. Let it be total one cup.
- After that, grind the cooled roasted ingredients with red chilli powder and turmeric powder and little water.

- Grind smoothly and keep aside.

- Heat oil in a kadai and splutter mustard seeds.

- Add small onion to it.

- Fry until the onions get cooked and becomes soft.
- After that, add tamarind juice.
- Bring to boil.
- Add required salt.

- Then add the ground paste.
- Adjust water (add 1 to 1 & ¼ cup)
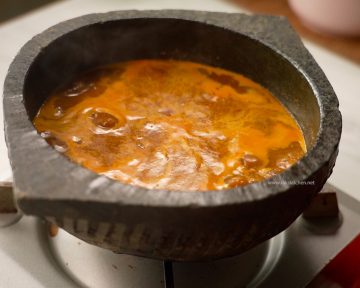
- Mix well and bring to boil.
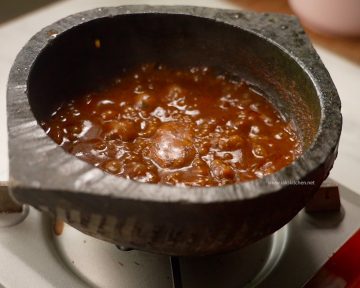
- Simmer for 12-15 minutes or until thick.
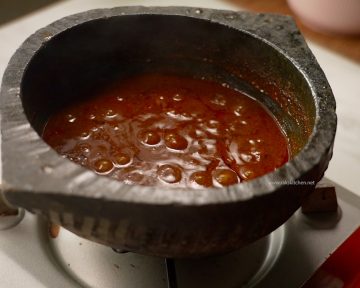
- Switch off. Gets thicker more as it cools down.
Serve ulli theeyal with Matta rice or any cooked rice with chamanthi and pappadam.
Substitutions & Variations
- Pear onion - instead of Indian pearl onion, you can use shallots variety which are available globally.
- Coconut - use frozen coconut in place of fresh coconut.
- Spicy - Increase the number of chillies by one or two for spicer version. You can also use a little more red chilli powder.
Storage
Since we are roasting the coconut, it doesn't get spoiled for the day at room temperature. Perfect for Sadhya to make ahead. You can refrigerate and use upto 2 days. Cool down and store immediately for longer days in the fridge. You can reheat with very little water to balance the thickness.
Top Tip
While roasting the coconut, make sure to not burn the coconut. Towards the end it tends to easily get burned.
If the grated coconut is evenly grated, then roasting is also even. So you can do this easily if you give it a grind in the blender.
Do not add too much water as it gets longer to get thicker. As well as do not add too less water, flavours should blend well as it simmers.
FAQ
What is ulli in English?Pear onion (small onion/ shallots)
Recipe card
Ulli theeyal recipe
Ulli theeyal is a thick tamarind based shallot gravy made with fresh roasted and ground coconut spice paste. This is a classic Kerala pearl onion curry, served with rice typically.Servings 4 peopleCup measurementsIngredients
- ½ cup Pearl onion Small onions/ ulli
- 1 tablespoon Tamarind Indian Tamarind
- ¼ teaspoon Turmeric powder
- 1 teaspoon Red chilli powder
To Roast & Grind
- ½ cup Coconut
- 6 Red chilli
- 1 tablespoon Coriander seeds
- ¼ teaspoon Fenugreek seeds
- ½ teaspoon Black pepper
- 10 Curry leaves
To temper
- 2-3 tablespoon Coconut oil
- ½ teaspoon Mustard seeds Black
Prevent your screen from going darkInstructions
- Firstly, soak puli in hot water for 15 - 30 minutes.
- Meanwhile, heat a teaspoon of coconut oil and roast red chilli, black pepper and fenugreek seeds.
- Once it's almost roasted, lastly add coriander seeds. I forgot to add curry leaves and did it later, but you can add at this stage.
- Remove in a plate for cooling.
- Add coconut and start roasting.
- Keep roasting and once it's dry and starts to change colour, add 2-3 small onions at this stage.
- Turn down the flame and roast carefully without burning, until it turns deep reddish in colour. Remove in a plate.
- While it is cooling, you can extract tamarind juice. Let it be total one cup.
- After that, grind the cooled roasted ingredients with red chilli powder and turmeric powder and little water.
- Grind smoothly and keep aside.
- Heat oil in a kadai and splutter mustard seeds.
- Add small onion to it.
- Fry until the onions get cooked and becomes soft.
- After that, add tamarind juice. Bring to boil. Add required salt.
- Then add the ground paste.
- Adjust water (add 1 to 1 & ¼ cup)
- Mix well and bring to boil.
- Simmer for 12-14 minutes or until thick.
- Switch off. Gets thicker more as it cools down.
Video
Notes
- If the grated coconut is evenly grated, then roasting is also even. So you can do this easily if you give it a grind in the blender.
YoutubeDo you like short videos? Subscribe now!InstagramMention @rakskitchen or tag #rakskitchen if you have tried this recipe.The post Ulli Theeyal Recipe appeared first on Raks Kitchen.
-
View
Pub Date: 10 September 2024 | 8:20 am
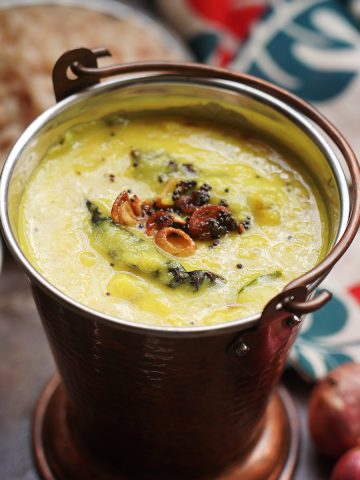
- Parippu curry recipe
Parippu curry is an authentic Kerala dish made from moong dal (split yellow mung bean) in coconut base. This simple dish's Flavor comes from cumin and small onions (shallots) and often served during festivals like Onam.
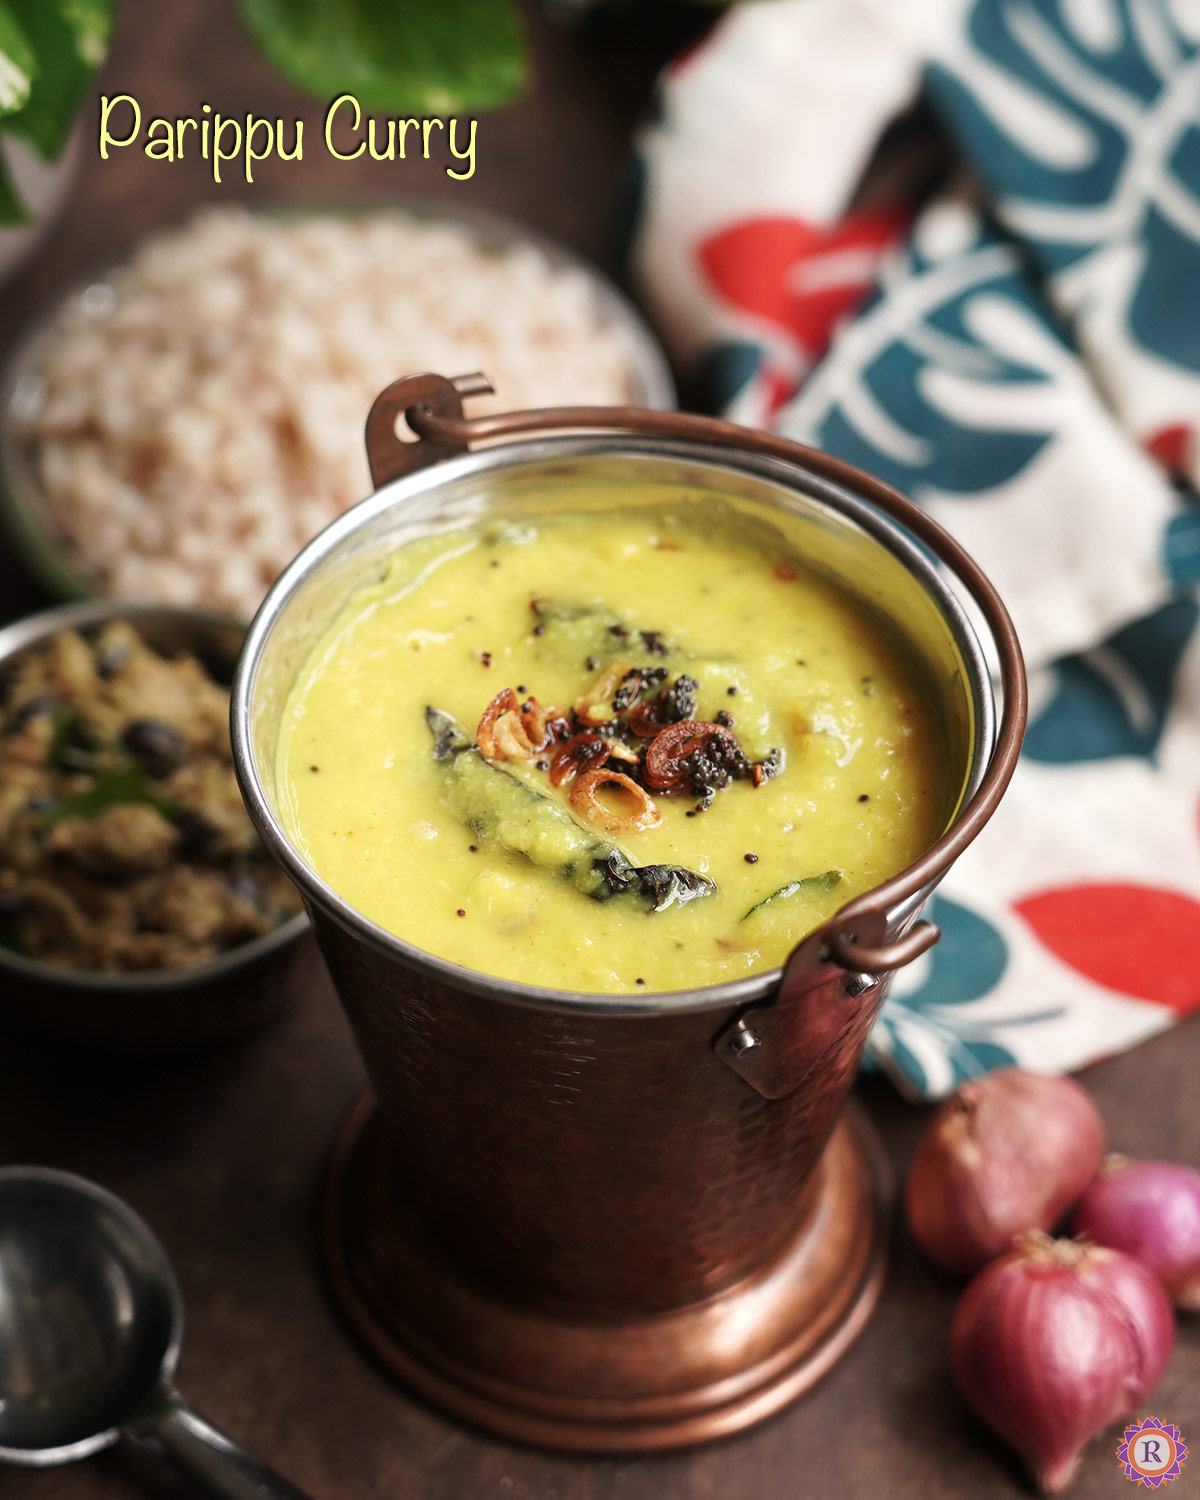
It is the first ozhichu curry that is served in an Onam sadhya. Can be made and enjoyed in regular days too.
Check out my other Tamil Nadu style paruppu that we serve on festival days and this similar simple poricha kuzhambu too in this website.
[feast_advanced_jump_to]Ingredients
Here are the simple ingredients needed to make this.
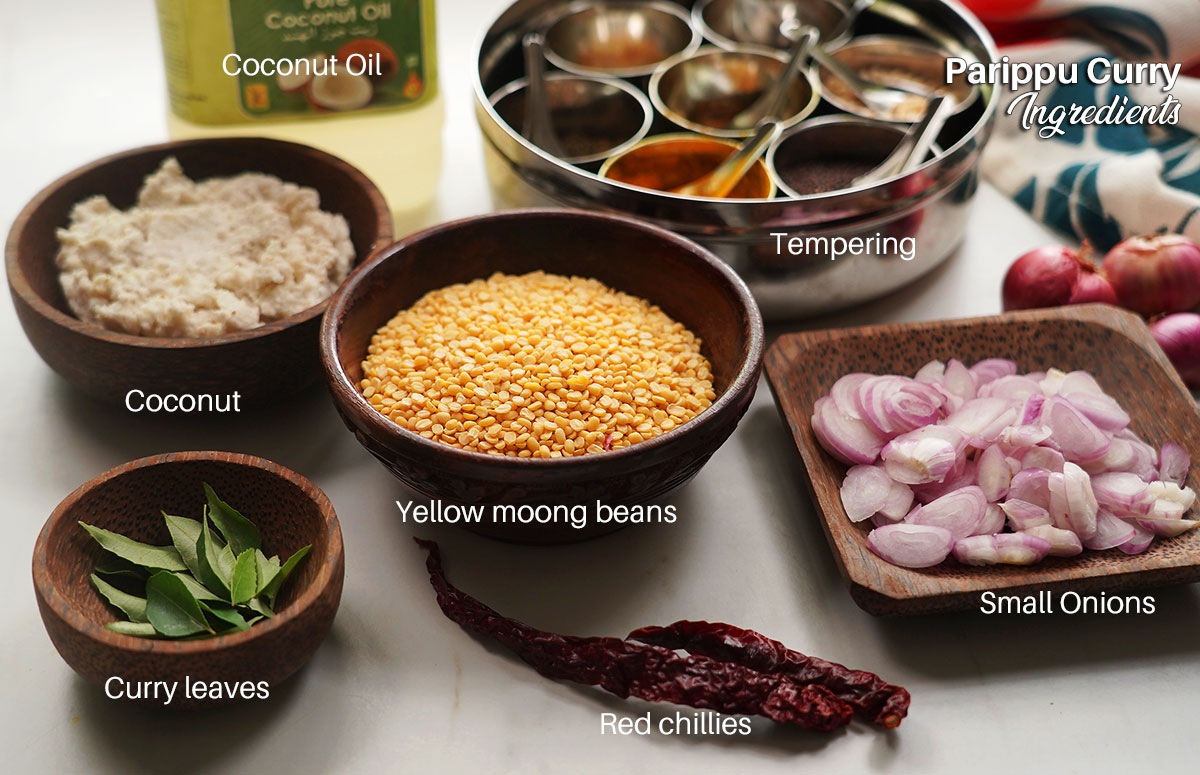
- Split yellow moong beans - moong dal - known as cherupayar parippu is typically used for this dish.
- Coconut - Base of the dish, I like to use fresh grated coconut. (In the above picture, I have used already ground coconut paste that I carried over from another recipe)
- Cumin seeds - Aids digestion as well as balances the gastric property of the dal.
- Small onions - Shallots - The final touch to the parippu adds great flavour.
- Red chilli - Gives a smokey touch as well as slight spice.
- Turmeric powder - Gives a lovely colour and good for health.
- Coconut oil - The basic oil to be used for any Kerala dish, please use a good quality oil, cold pressed if possible.
- Curry leaves - For a wonderful flavour
- Tempering items - Black mustard seeds.
See recipe card for exact quantities and measurements.
Instructions
Let's see how to make parippu curry.
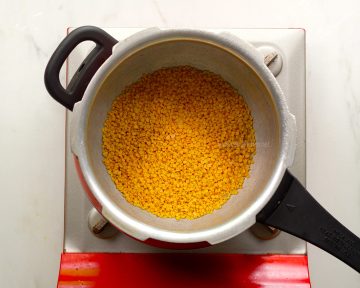
- Start by roasting dal firstly.
- Once it turns golden here and there, lower the flame.
3. Add 1 & ½ cups water, turmeric powder, coconut oil and bring to boil.

4. Pressure cook for 3 whistles in medium flame.
5. Let pressure goes down naturally.
6. Mash by adding little water if it is too dry.

7. Place coconut, cumin in a mixer jar.

8. Grind it to a paste with little water.

9. Add the ground coconut mixture to the cooked dal

10. Adjust water, add some fresh torn curry leaves, coconut oil and salt.

11. Mix well and boil in medium flame.

12. After 2-3 minutes, the parippu curry will have a homogenous consistency. Switch off the flame.

13. Let's do the tempering. Heat coconut oil and splutter mustard, followed by dry red chillies and once it is roasted, add curry leaves.

14. Then add thinly sliced onion and start stir frying it.

15. Fry until it turns golden brown in colour.

16. Finally add to the cooked dal and your parippu curry is ready.
Serve with hot matta rice and top it with ghee for best taste.

Substitutions & Variations
You can make the parippu curry with toor dal too. Especially when you are making in regular days.
Some people do not add onion in the parippu curry, so if you want you can skip that.
For extra spices, you can add green chilli while grinding coconut.
Storage
You can refrigerate and consume parippu curry for 2 days in the refrigerator.
If you want you can freeze upto 3 months. To consume it, defrost for an hour over the counter top and heat it well.
Top Tip
While cooking, make sure to cook dal with enough water, at least 3 times the measure of dal.
Keep stirring occasionally while boiling the cooked dal. It may get burnt otherwise.
Roasting gives a good flavour as well as prevents dal from becoming too gooey. Roasted dal gives a good texture.
FAQ
What is parippu curry made of?Parippu curry is made up of split yellow mung bean (cherupayar parippu) and coconut, cumin seeds, small onions, red chillies tempering as main ingredients. It is usually served as part of Onam Sadhya.
Related
Looking for other recipes like this? Try these:

Recipe card
Parippu Curry Recipe | Kerala style for Ona Sadya
Parippu curry is an authentic Kerala dish made from moong dal (split yellow) in coconut base. This simple dish's Flavor comes from cumin and small onions (shallots) and often served during festivals like Onam.Servings 4 peopleCup measurementsIngredients
- ½ cup Moong dal Cherupayar parippu
- ¼ teaspoon Turmeric powder
- 4 Curry leaves
- ½ teaspoon Coconut oil
To grind
- ½ cup Grated coconut
- ½ teaspoon Cumin seeds
To temper
- 1 tablespoon Coconut oil
- 2 Red chilli
- 1 sprig Curry leaves
- 6 Small onions
Prevent your screen from going darkInstructions
- Start by roasting dal firstly.
- Once it turns golden here and there, lower the flame.
- Add 1 & ½ cups water, turmeric powder, coconut oil and bring to boil.
- Pressure cook for 3 whistles in medium flame.
- Let pressure goes down naturally.
- Mash by adding little water if it is too dry.
- Place coconut, cumin in a mixer jar.
- Grind it to a paste with little water.
- Add the ground coconut mixture to the cooked dal
- Adjust water, add some fresh torn curry leaves, coconut oil and salt.
- Mix well and boil in medium flame.
- After 2-3 minutes, the parippu curry will have a homogenous consistency. Switch off the flame.
- Let's do the tempering. Heat coconut oil and splutter mustard, followed by dry red chillies and once it is roasted, add curry leaves.
- Then add thinly sliced onion and start stir frying it.
- Fry until it turns golden brown in colour.
- Finally add to the cooked dal and your parippu curry is ready.
Video
Notes
- While cooking, make sure to cook dal with enough water, at least 3 times the measure of dal.
- Keep stirring occasionally while boiling the cooked dal. It may get burnt otherwise.
YoutubeDo you like short videos? Subscribe now!InstagramMention @rakskitchen or tag #rakskitchen if you have tried this recipe.The post Parippu curry recipe appeared first on Raks Kitchen.
-
View
Pub Date: 22 August 2024 | 8:02 am
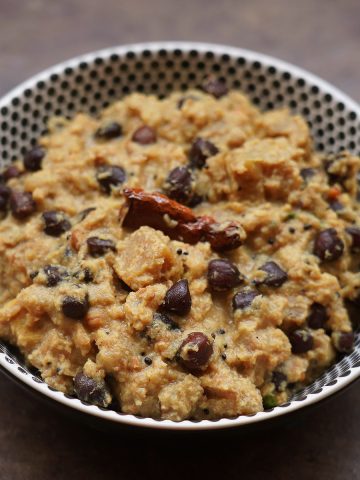
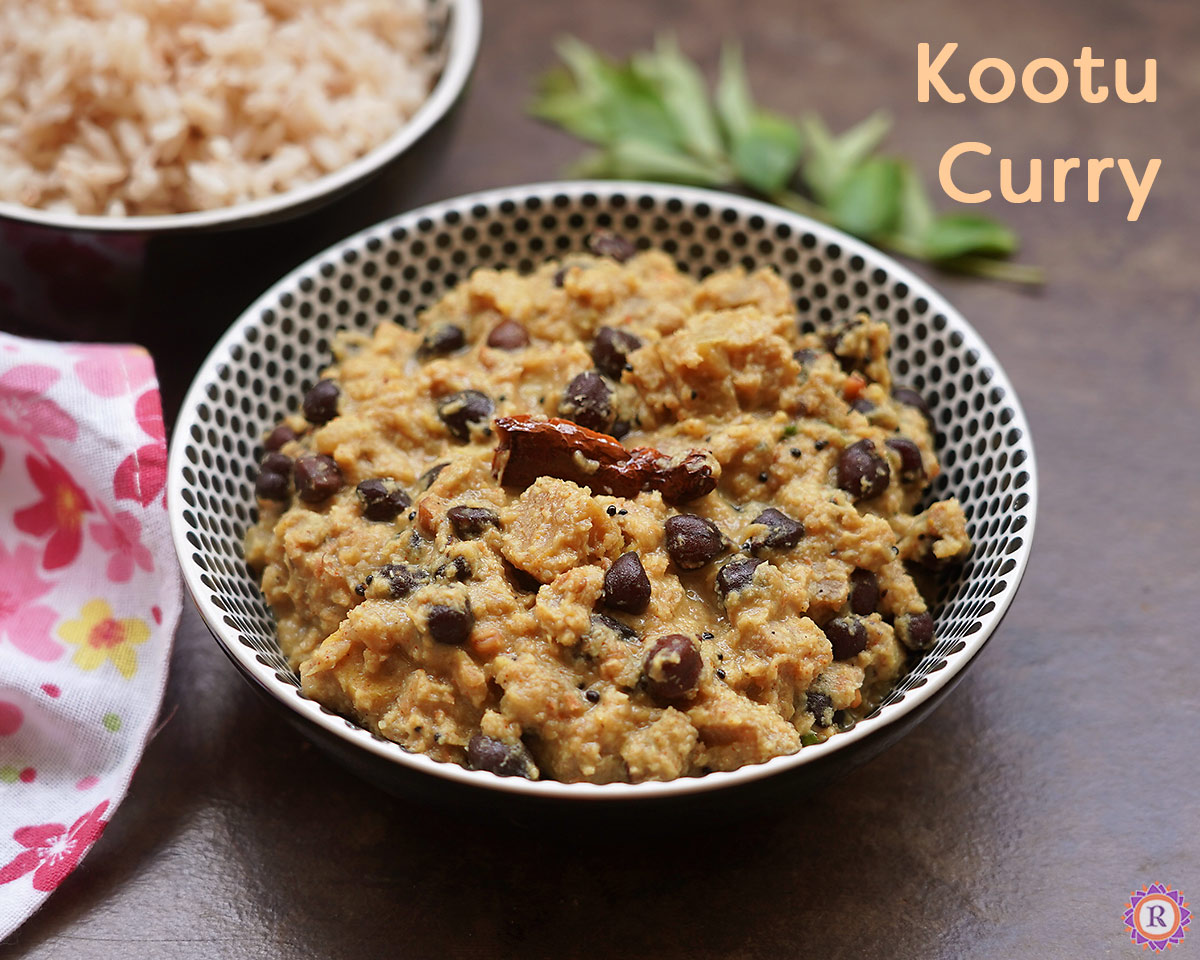
- Kootu Curry Recipe
Kootu curry or kootu kari is a Kerala side dish traditionally made for Onam Sadhya. It is a delicious combination of yam and raw banana with brown chickpeas in a coconut base.
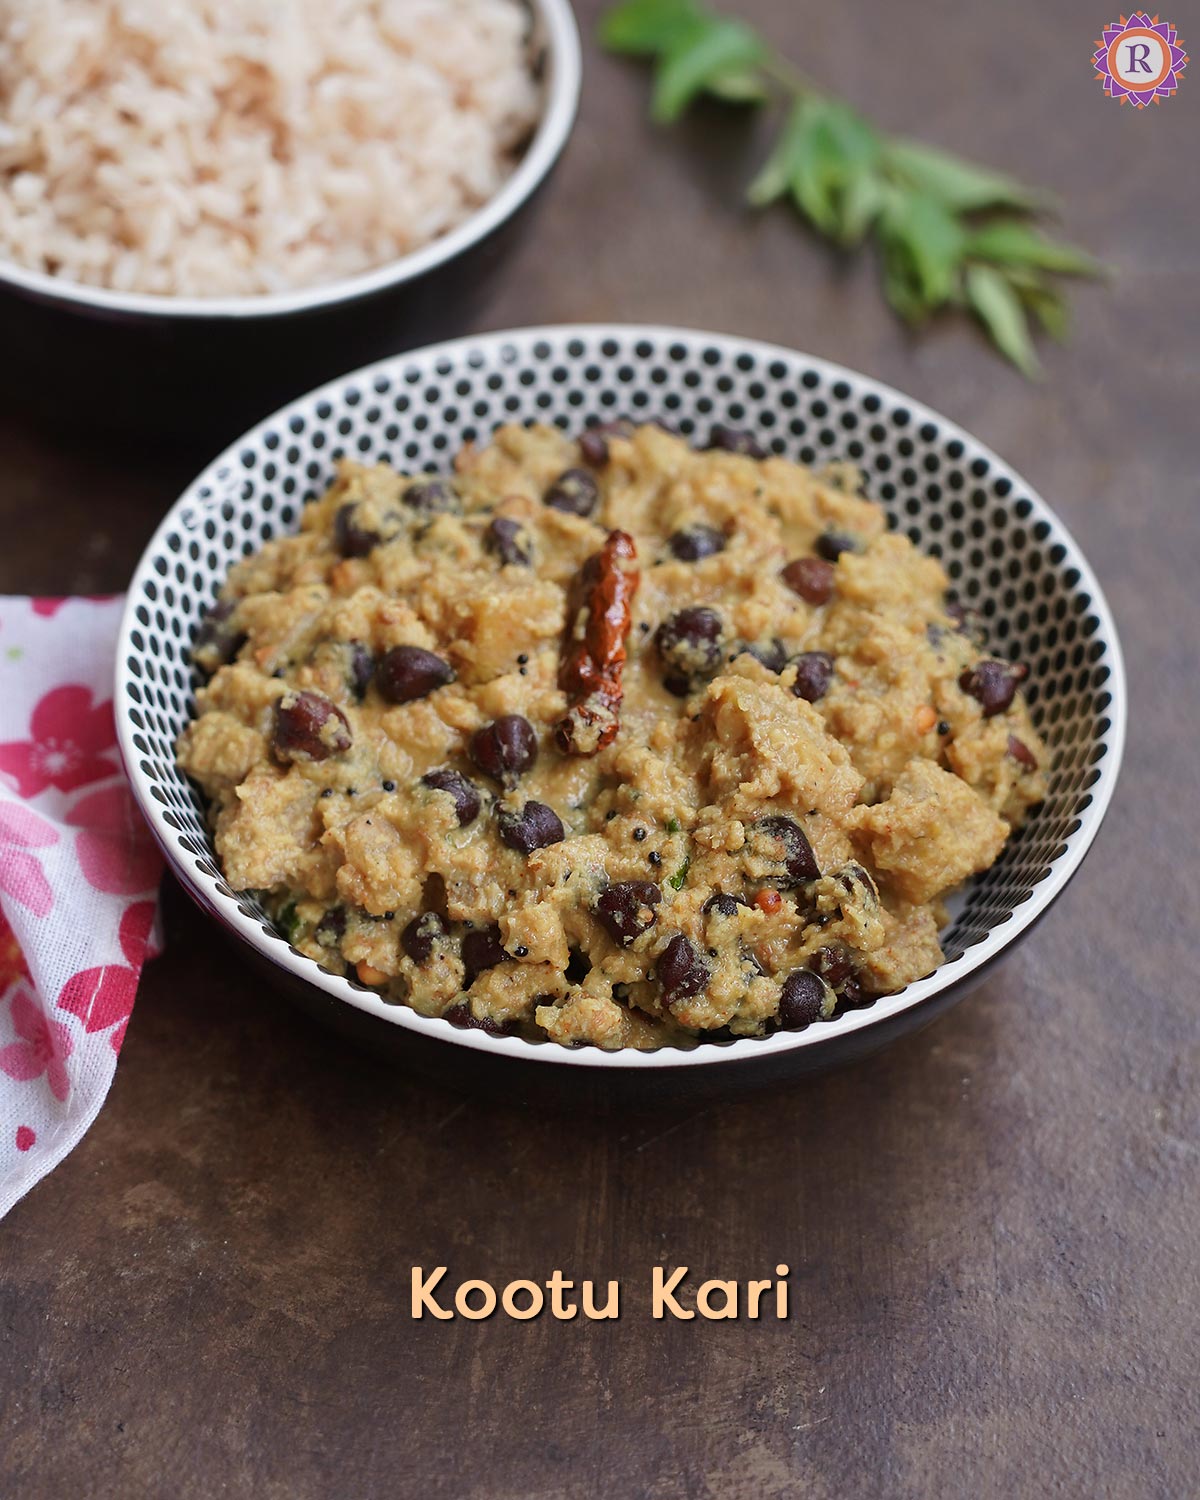
It is usually made during festival times, especially as part of Onam Sadya. We can make it on regular days too, as yam, raw banana and chickpeas has lot of fibre as well as they are nutritious.
Check out my other Onam Sadhya recipes and this pulikuthi kuzhambu recipe in this website.
[feast_advanced_jump_to]Ingredients
Here are the simple ingredients needed to make Kootu curry.
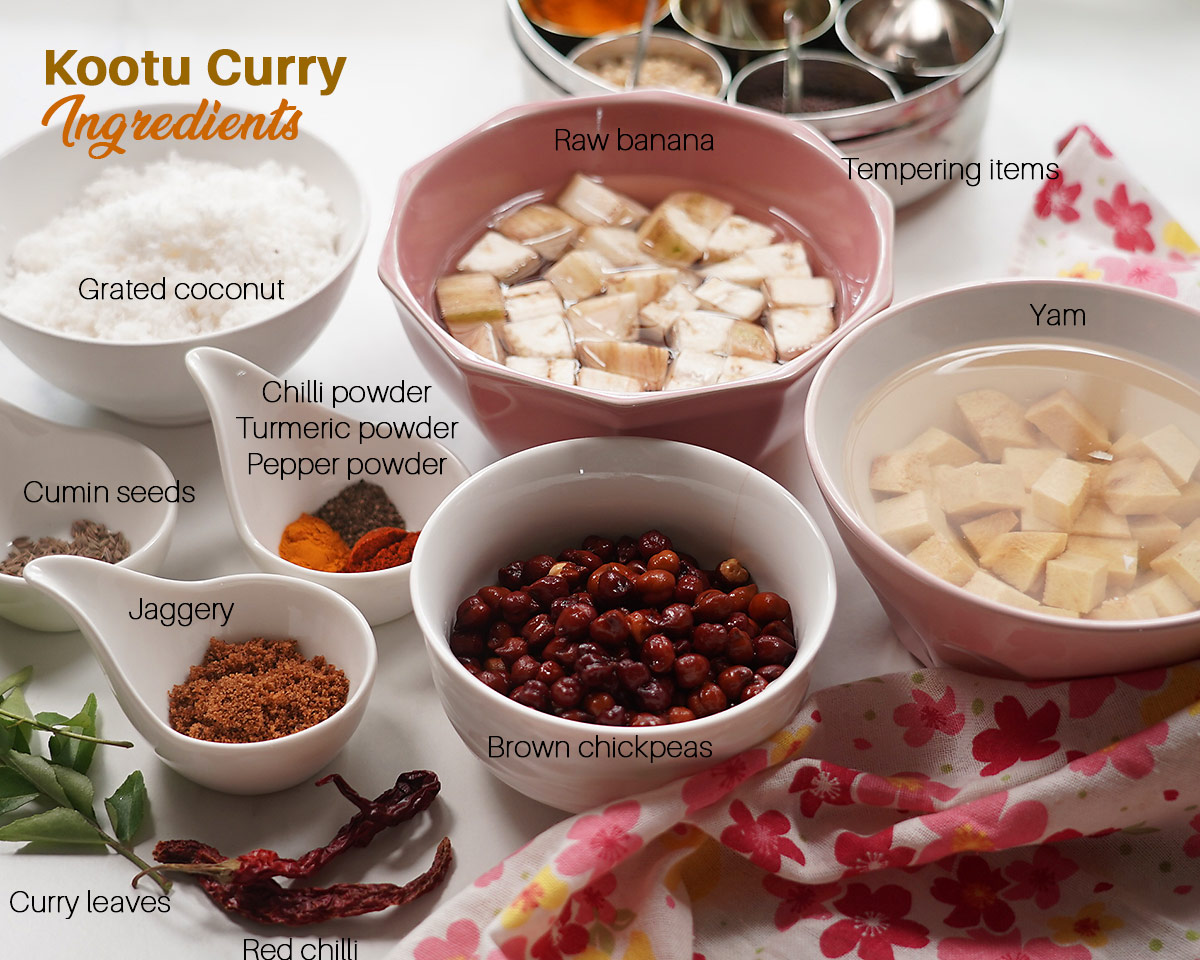
- Yam - Elephant yam - Chena - cut into cubes. Choose the yellowish ones (old) not the young reddish yam.
- Raw banana - Vazhakka - I cut these to larger cubes to balance the cooking time of Yam and this.
- Brown chickpeas - Kadala - Gives a nice texture, added protein in the dish.
- Coconut - Fresh grated coconut works best as it's base and garnish.
- Cumin seeds - Adds flavour as well as helps to balance the gastric natures of the ingredients used in this dish.
- Red chilli - Use both red chilli powder as well as dry red chilli in this recipe for spice and flavour.
- Black pepper powder - It adds a nice mild flavour though you won't sense it distinctly.
- Turmeric powder- As always used in most of the Indian dishes, for it's colour and goodness.
- Jaggery - Just a little for balance of taste.
- Coconut oil - Use lots of good quality, cold pressed coconut oil if possible.
- Curry leaves - A main ingredient in all Kerala dishes for it's flavour.
- Mustard, urad dal - For tempering.
Check out my recipe card below for exact measurements.
Step by step images
Let's see how to make Kootu Curry.

1. Wash and then soak brown chickpeas overnight with enough water.

2. Next day, drain water, add salt, enough water to immerse (1 to 1 & ¼ cup) and pressure cook for 5 whistles in medium flame.

3. It should be cooked soft, that is if you press, the inside should be soft and easy to press.

4. Then add cubed yam, raw banana followed by red chilli powder, black pepper powder, turmeric, jaggery, required salt for the vegetables.

5. Give it a mix and then add water if needed. Do not add lots of water as this dish has to be thick/ semi-dry.

6. Pressure cook for 3 whistles in medium flame.
7. Meanwhile, take ½ cup coconut with cumin seeds and little water in a mixie jar.
8. Grind it to a paste.

9. Add to the cooked vegetables. Adjust with little water if needed.

10. Mix well and simmer furthermore for 2-3 minutes. Once thick, switch off.

11. Heat a pan with coconut oil and splutter mustard seeds, add along red chillies. Then add urad dal. Once golden, add curry leaves.

12. Lastly add the rest of the grated coconut.

13. Roast well until coconut turns golden and aromatic.

14. Finally, add it to the kootu curry and mix well to serve.
Serve as part of Onam sadhya as side dish. We had it with matta rice. Some Kerala pappadam can be more delicious to have with.
Substitutions & Variations
- You can add ash gourd in place of raw banana.
- Instead of brown chickpeas, add chana dal.
- If you like you can add 2-3 shallots (small onion) while grinding coconut as it gives a nice flavour.
Top tips
Add some raw coconut oil and few torn fresh curry leaves at the end for more flavour.
While choosing yam, go for old yam (yellowish inside) instead of the fresh ones (reddish inside) as the fresh are more itchy.
Make sure to cube the raw banana larger than yam so that the same cooking time in cooker together, doesn't affect the texture.
My notes
I used little less roasted coconut, but I suggest to use equally ½ cup for grinding and ½ cup toasted as it gives the perfect dry texture for the kootukari as well as the flavour.
Make sure to cook the brown chickpeas well. Soaking and cooking in medium heat helps. You can even skip cooking with salt first, then add salt only when you add the vegetables.
You can do the process of cooking vegetables by boiling too instead of pressure cooking. But I prefer this as it is easy and cooking yam thoroughly is a must to avoid the itchy properties of yam.
FAQs
What is the difference between Kootu curry and Erissery?Though it may seem similar, the taste is so different because of the ingredients used. Kootu curry and erissery can be interchanged. They are prepared in different regions and named different too. Kootu curry can be combination of vegetables like yam, raw banana and ash gourd. It has brown chickpeas or chana dal in it. But Erissery is always prepared with one vegetable (yellow pumpkin) and has vanpayar (brown cow peas). So the flavours are totally different.
Why the yam is itchy in the dish?You may get a itchy sensation while eating the yam in tongue and throat. This may be because you have not cooked the yam properly. Use lots of coconut, jaggery to avoid this.
Buying the right type is also important. Choose the old ones (or buy and keep ahead) rather than the fresh yam(reddish when compared to the old ones).Storage/ Shelf life
Kootu kari stays good in fridge for couple of days comfortably.

Onam Sadhya Recipes
See more Onam Sadhya Recipes →Recipe card
Kootu Curry Recipe | Kerala Kootu Kari | Onam Sadya Recipes
Kootu curry or kootu kari is a Kerala side dish traditionally made for Onam Sadhya. It is a delicious combination of yam and raw banana with brown chickpeas in a coconut base.Servings 4 peopleCup measurementsIngredients
- ¼ Elephant yam ¾ cup Chena, cubed
- ½ Raw banana ¾ cup Vazhakka, cubed a little larger than the yam
- ½ teaspoon Red chilli powder
- ¼ teaspoon Black pepper powder
- ¼ tsp Turmeric powder
- 1 teaspoon Jaggery
- Salt as needed
To grind to a paste
- ½ cup Grated coconut
- ½ tsp Cumin seeds
To temper
- 1 tablespoon Coconut oil
- ½ teaspoon Mustard Black mustard seeds
- 2 Red chilli
- 1 tsp Urad dal
- 1 sprig Curry leaves
- ½ cup Grated coconut
Prevent your screen from going darkInstructions
- Wash and then soak brown chickpeas overnight with enough water.
- Next day, drain water, add salt, enough water to immerse (1 to 1 & ¼ cup) and pressure cook for 5 whistles in medium flame.
- It should be cooked soft, that is if you press, the inside should be soft and easy to press.
- Then add cubed yam, raw banana followed by red chilli powder, black pepper powder, turmeric, jaggery, required salt for the vegetables.
- Give it a mix and then add water if needed. Do not add lots of water as this dish has to be thick/ semi-dry.
- Pressure cook for 3 whistles in medium flame.
- Meanwhile, take ½ cup coconut with cumin seeds and little water in a mixie jar.
- Grind it to a paste.
- Add to the cooked vegetables.
- Mix well and simmer furthermore for 2-3 minutes.
- Once thick, switch off.
- Heat a pan with coconut oil and splutter mustard seeds, add along red chillies. Then add urad dal. Once golden, add curry leaves, rest of the grated coconut.
- Roast well until coconut turns golden and aromatic.
- Finally, add it to the kootu curry and mix well to serve.
Video
Notes
- Make sure to cube the raw banana larger than yam so that the same cooking time in cooker together, doesn't affect the texture.
YoutubeDo you like short videos? Subscribe now!InstagramMention @rakskitchen or tag #rakskitchen if you have tried this recipe.The post Kootu Curry Recipe appeared first on Raks Kitchen.
-
View
Pub Date: 13 August 2024 | 6:07 am
- Mambazha Pulissery
Mambazha pulissery is a delicious, tangy and sweet Kerala onasadya curry prepared with cute little ripe mangoes in yogurt and coconut base. Let's see how to make this with step by step pictures and video.
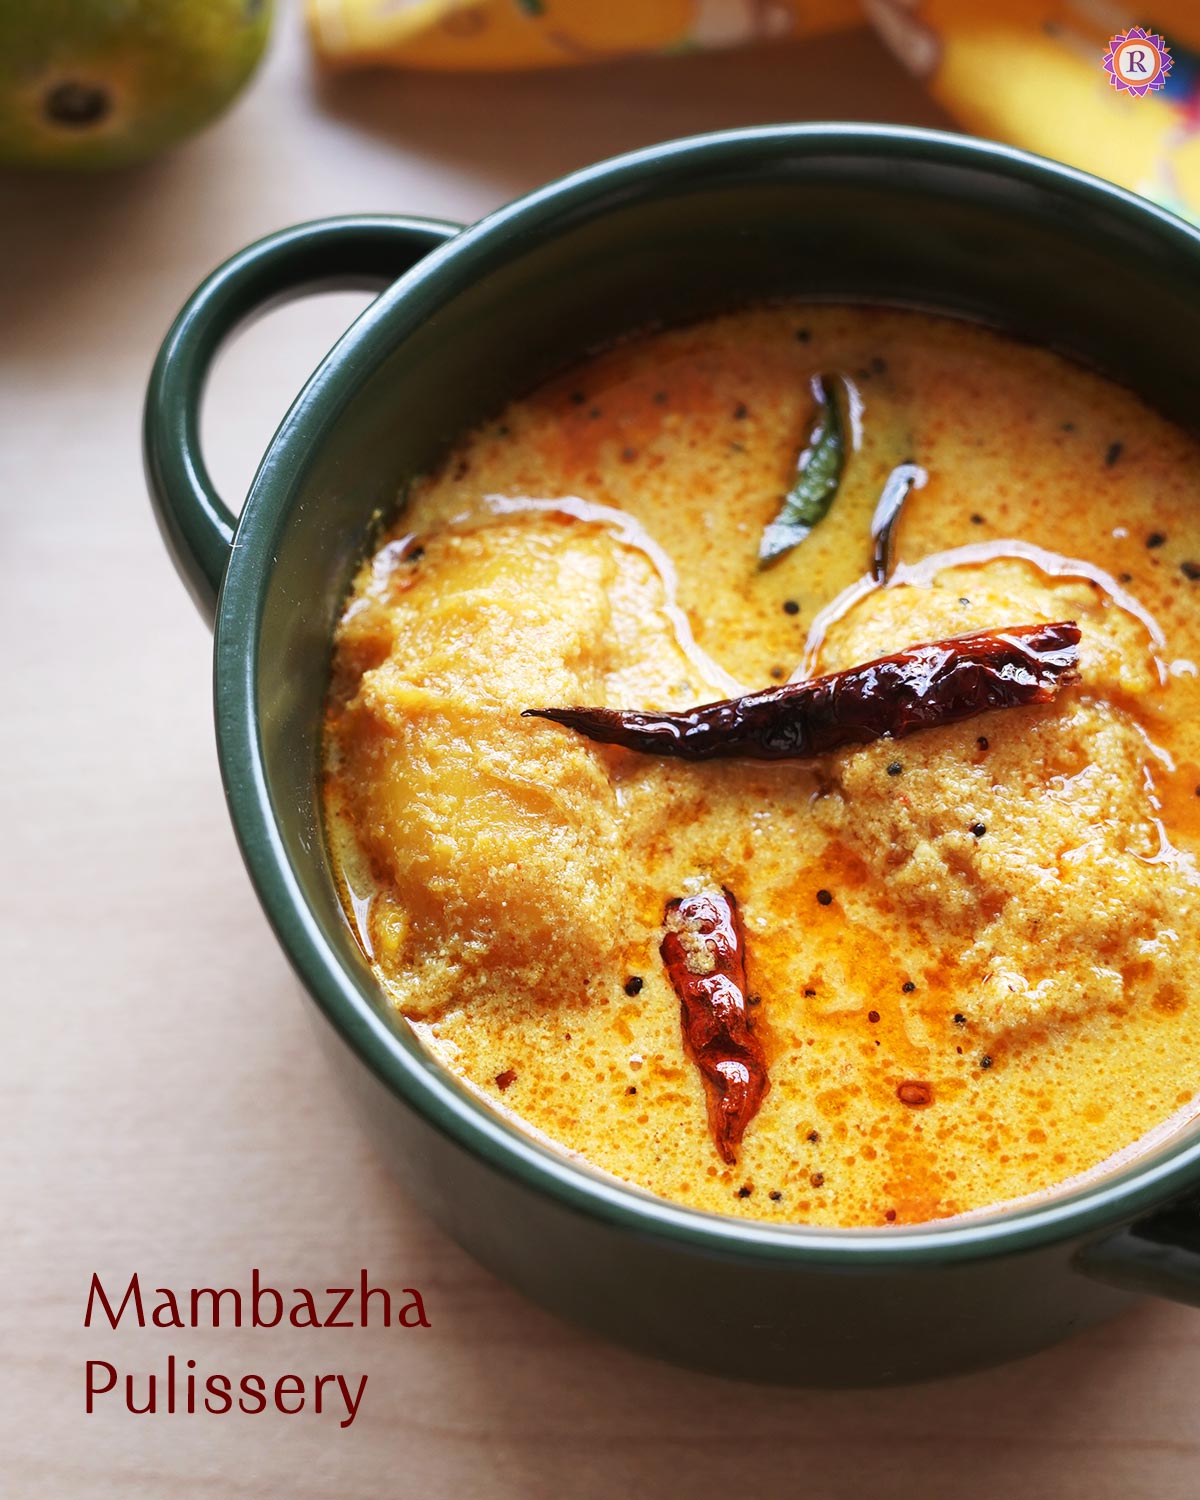
You can make this as part of your regular menu whenever you find the small nadan mangoes in season or for Onam sadhya.
Check out my ada pradhaman recipe and jackfruit payasam recipe.
[feast_advanced_jump_to]This is my second favorite Kerala dish next to Aviyal. I just can have avail as such, I love it that much. I had mambazha pulissery at Laxmi's yearly Onam Sadhya and loved it a lot. She even packed some and happily took as it was so delicious. Last year I was planning to post it but couldn't, this year I was determined to start off with some of my favorites. I made this last week but took enough time to edit and post today.
For this particular recipe, I wanted to use the Nadan mango (nattu manga) as it looks pretty in the first place and always seen amma using tiny tennis ball size mambazham for her mambazha kuzhambu or sambar. So wanted to get those for best taste and look. Am not sure if this is from Kerala but always seen this in Mustafa each year when mangoes are in season.
It was bit costlier, but I got it anyways few for pulissery and rest for kuzhambu.
Ingredients
Here are the ingredients needed for pulissery using ripe mango.
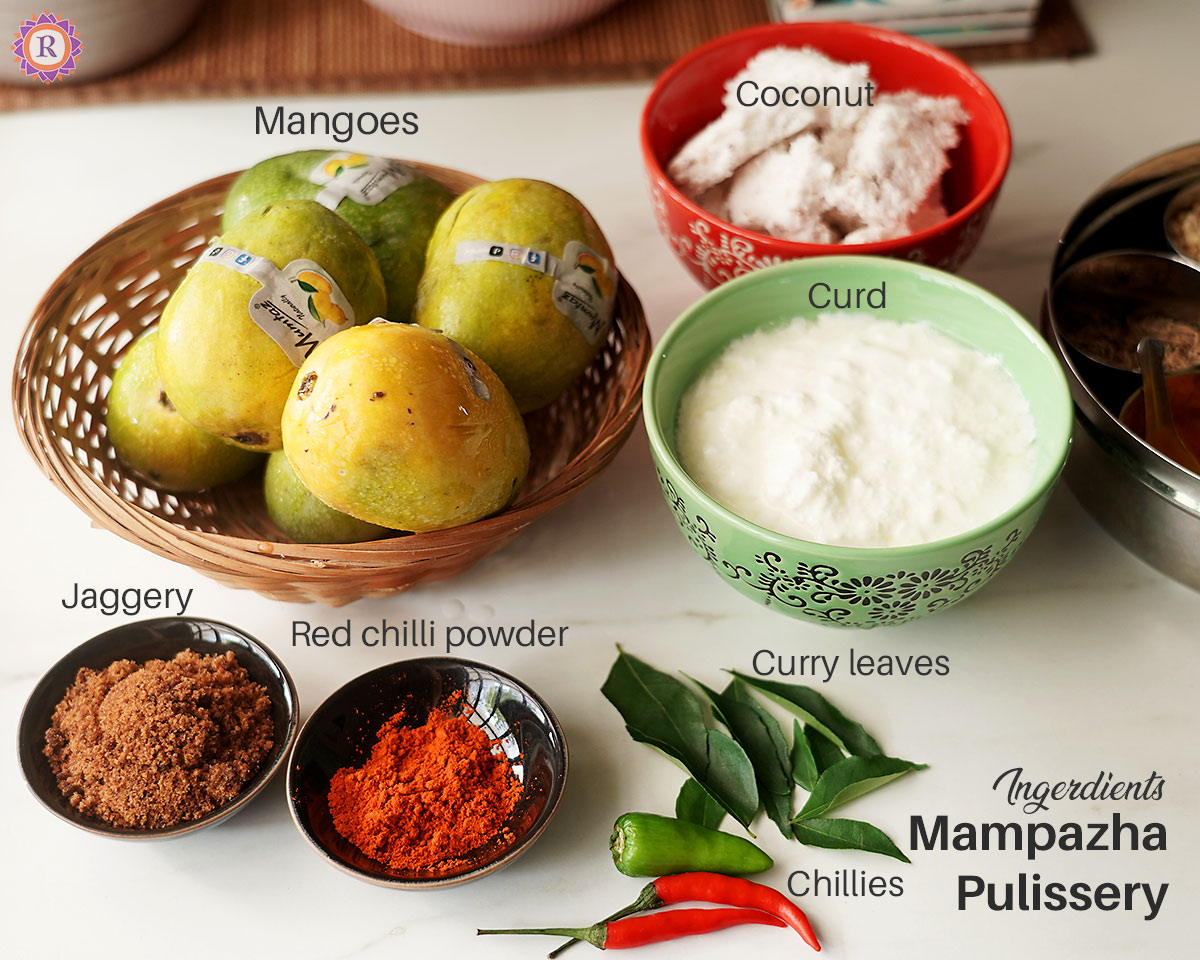
- Mango - Ripe mangoes- Nadan mango (naatu manga) use alphonso or any small variety.
- Coconut - Main ingredient in any Kerala curry.
- Yogurt - Use fresh yogurt for best results.
- Mustard seeds - For tempering.
- Cumin seeds - Lends a mild flavour.
- Red chilli powder - I add this for lovely colour and to balance the taste. You can skip too.
- Green chilli - Gives a wonderful flavour and lends spice to balance the tanginess of curd.
- Jaggery - I add a bit extra for sweeter side curry.
- Curry leaves - Gives a good flavour as in the other Kerala dishes.
Check out my recipe card below for full list and quantities.
Step by step images
Let's see how to make Mambazha pulissery.
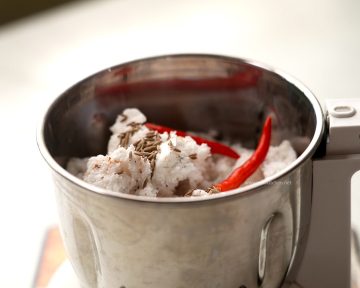
1. Take grated coconut, chilli, cumin seeds and little water (¼ cup approx) in a mixie firstly.

2. Grind smoothly like a paste. Keep aside.

3. Then, take mangoes and peel it gently. Peel from the bottom towards the stalk side as it is easier this way.

4. Be as gentle as possible without deforming it's shape.

5. Take the peeled mangoes, salt, turmeric, red chilli powder, jaggery and 1 & ¼ cups of water in a vessel.

6. Boil for 4-5 minutes or until the mangoes are soft.

7. Make sure to turn the mangoes gently to avoid it getting burnt.

8. Now, add ground coconut paste.

9. Mix well.

10. Simmer furthermore for 2-3. minutes or until the curry is thickened and homogenous in texture.

11. Meanwhile, beat curd well smoothly.

12. Then, lower the heat completely and add the beaten curd.

13. Heat furthermore just until about to boil. But take care not to boil. Switch off the flame.

14. Then, heat a pan with oil and splutter mustard, add red chilli, fenugreek seeds and curry leaves. Switch off the stove and add red chilli powder lastly. Give a quick stir.

15. Add to mambazha pulissery and mix well.
Serve mambazha pulissery with matta rice best. I always love Kerala pappadam along.

Substitutions & variations
- Instead of mangoes, you can use vegetables like raw banana, yam or fruits like ripe nendran banana, pineapple. Use you own combination like pineapple + cucumber.
- The amount of sweetness depends on your preference. But I like it on sweet side. So you can add from 2 tablespoon to ¼ cup jaggery(or sugar) in this recipe.
My notes
Though naatu manga works best, if you can't get it, use any mango like alphonso, slice and use in the recipe. I like to slice both sides along the seed and use in the recipe as such instead of cutting it into cubes or thin slices. But it's personal preference, you can prepare accordingly.
Top tips
- Sweet, ripe mangoes works best.
- Do not boil after adding curd, just heat in low flame otherwise it will curdle.
Serving suggestion
Serve as ozhichu curry with matta rice and poppadoms along with other side dishes as part of a sadhya.
Storage
You can keep refrigerated and use for two days, reheating gently.
When you find mangoes in season, you can buy it in bulk, peel and arrange in a zip lock without stacking. Then freeze it and use upto 6 months.

Recipe card
Mambazha Pulissery Recipe
Mambazha pulissery is a delicious, tangy and sweet Kerala onasadya curry prepared with cute little ripe mangoes in yogurt and coconut base.Servings 4 peopleCup measurementsIngredients
- 4 Mango ripe, small variety
- 1 cup Yoghurt
- ¼ teaspoon Turmeric powder
- ¼ teaspoon Red chilli powder
- 1 tablespoon Jaggery powder
- 4 Curry leaves
- Salt
Grind to paste
- 1 cup coconut
- 2 Green chillies
- ½ teaspoon Cumin seeds
To temper
- 1 tablespoon Coconut oil
- 1 Dry red chilli
- ½ teaspoon Mustard seeds
- ⅛ teaspoon Fenugreek seeds
- ¼ teaspoon Red chilli powder optional
- few curry leaves
Prevent your screen from going darkInstructions
- Take grated coconut, chilli, cumin seeds and little water (¼ cup approx) in a mixie firstly.
- Grind smoothly like a paste. Keep aside.
- Then, take mangoes and peel it gently. Peel from the bottom towards the stalk side as it is easier this way.
- Be as gentle as possible without deforming it's shape.
- Take the peeled mangoes, salt, turmeric, red chilli powder, jaggery and 1 & ¼ cups of water in a vessel.
- Boil for 4-5 minutes or until the mangoes are soft.
- Make sure to turn the mangoes gently to avoid it getting burnt.
- Now, add ground coconut paste and mix well.
- Simmer furthermore for 2-3. minutes or until the curry is thickened and homogenous in texture.
- Beat curd well smoothly. Lower the heat completely and add the beaten curd.
- Heat furthermore just until about to boil. But take care not to boil. Switch off the flame.
- Heat a pan with oil and splutter mustard, add red chilli, fenugreek seeds and curry leaves.
- Switch off the stove and add red chilli powder lastly. Give a quick stir.
- Add to mambazha pulissery and mix well.
Video
Notes
- Do not boil after adding curd, just heat in low flame otherwise it will curdle.
YoutubeDo you like short videos? Subscribe now!InstagramMention @rakskitchen or tag #rakskitchen if you have tried this recipe.The post Mambazha Pulissery appeared first on Raks Kitchen.
-
View
Pub Date: 3 August 2024 | 8:01 pm
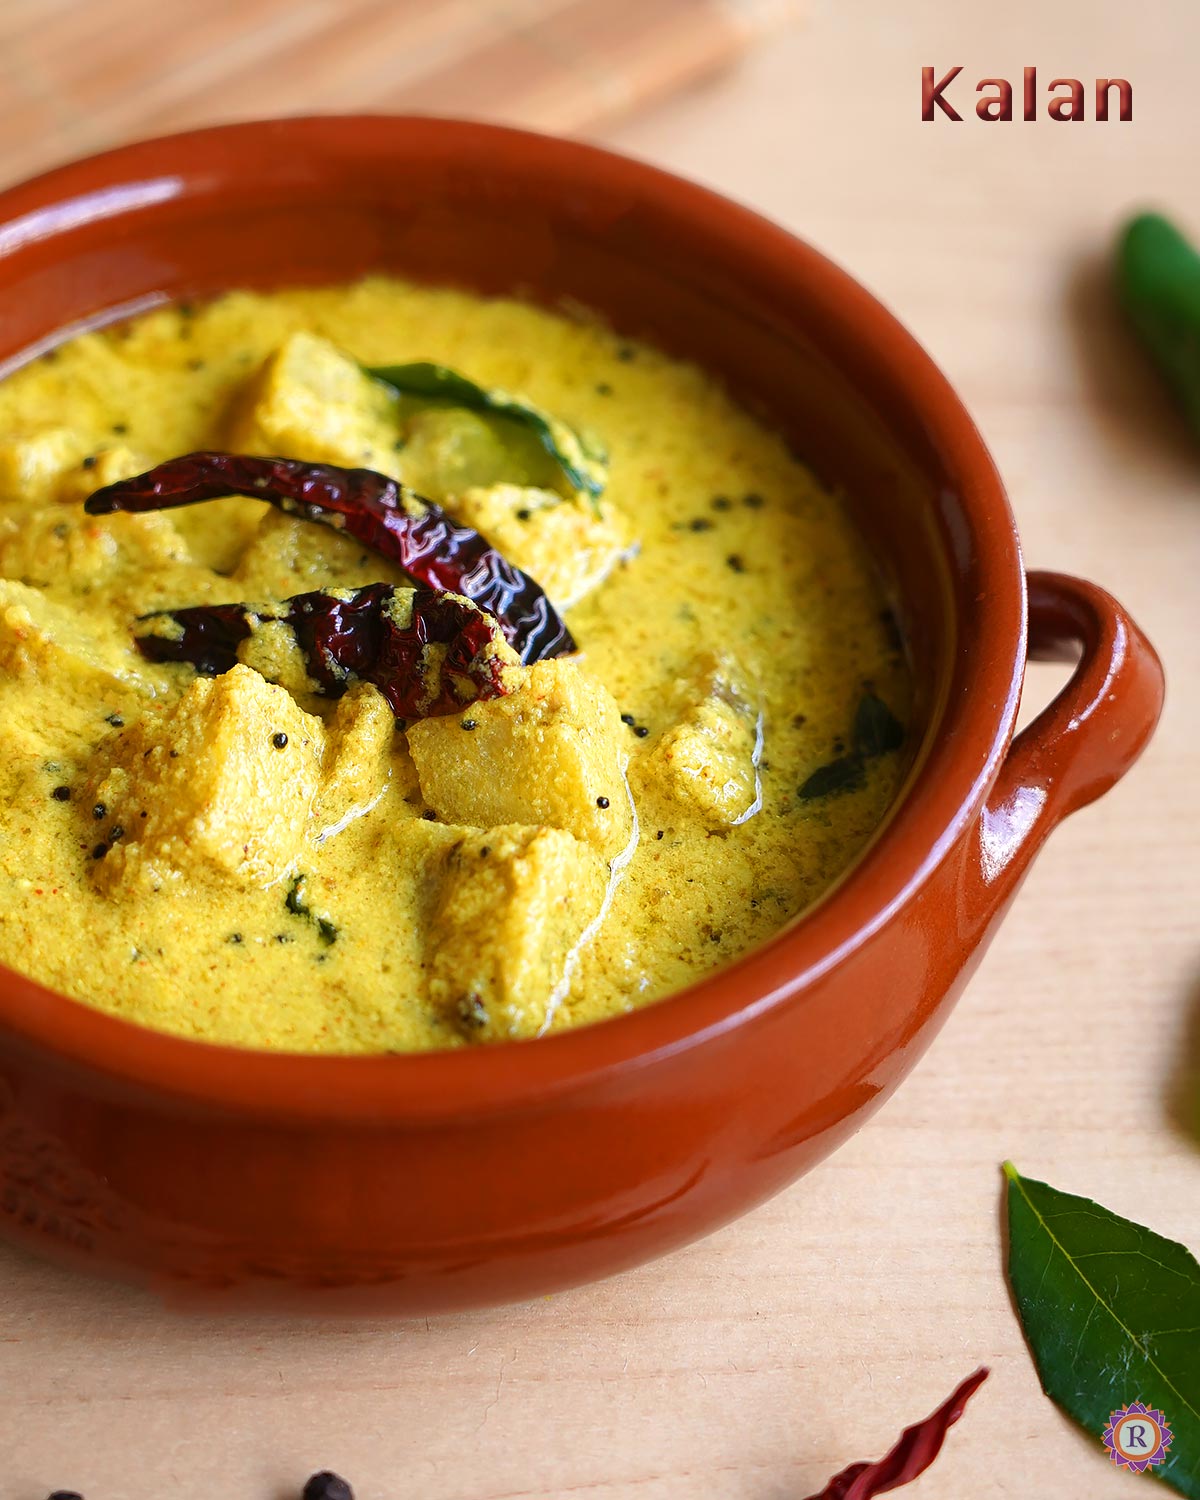
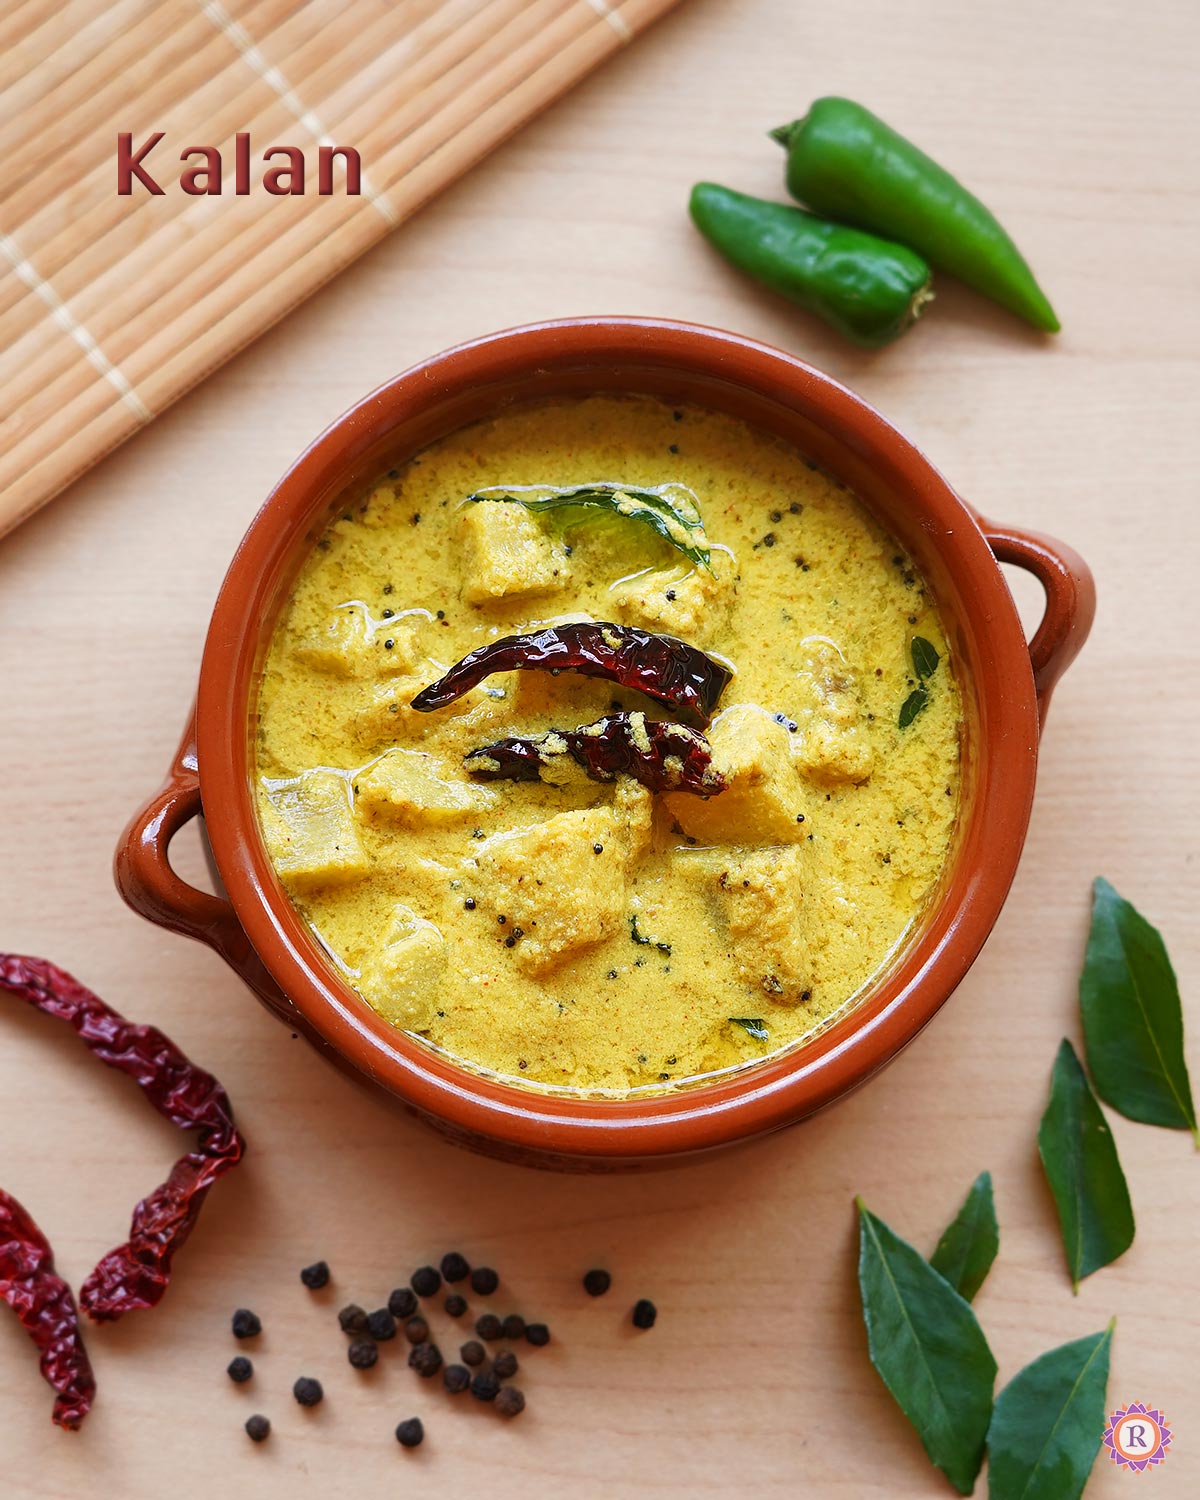
- Kalan Recipe | Onam Sadhya Recipes
Kalan is a traditional Kerala curry prepared with plantain in yogurt and coconut base. You can also use other vegetables like elephant yam (chena). Let's see how to make this super easy dish with step by step pictures and video.
This can be prepared as part of Onam sadhya or Vishu Sadhya. You can also make this on regular days to enjoy this dish.
Check out my erissery recipe and inji puli recipe in this website.
[feast_advanced_jump_to]Kalan is a curry with yoghurt as base apart from the typical coconut cumin seeds paste. This in fact is the first Kerala dish I posted when I started blogging. But I just learnt it from a recipe book and turned out to be a wrong recipe which many of the readers pointed out. So I had to take down the recipe. After that, I never turned towards Kerala cuisine.
I have few follower friends whom I can refer and post, but somehow did not felt comfortable. Last year, I had browsed may recipes and Instagram allows you to see a lot of Kerala dishes during onam via reels.
After trying this Kaalan, I wondered why I was not trying such simple recipes for long time. I understand that another version called kurukku kalan is thicker and drier.
You can make it a couple of days ahead, and it doesn't spoil. Which makes perfect sense while preparing Sadya with so many dishes. Ingredients
Here are the simple ingredients that are available in your kitchen to prepare Kalan.
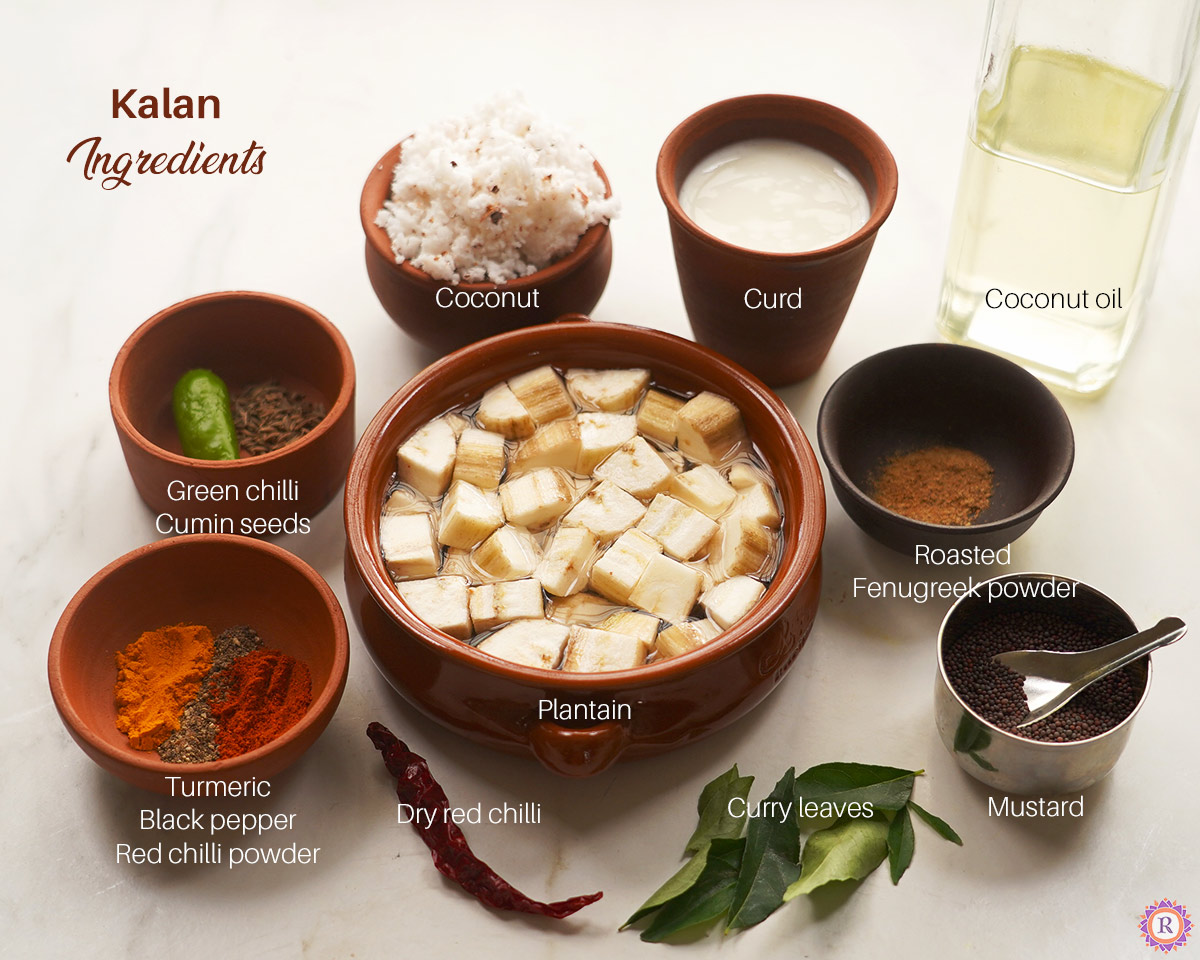
- Plantain - Unripe banana - Raw banana - Main ingredient in the recipe.
- Yogurt - Indian curd - Gives the distinct taste to the curry.
- Coconut - Main ingredient in all kerala dishes that gives thickness to the gravy.
- Cumin seeds - For flavour, added in most of the coconut base Kerala gravy.
- Chillies - Green chilli for grinding coconut and red chilli to impart the smoky flavour and heat in the tempering.
- Red chilli powder - For spice while cooking the plantain.
- Black pepper powder - for it's goodness with turmeric as well as spice.
- Turmeric powder - Adds colour.
- Mustard - For tempering.
- Coconut oil - Must for all Kerala dishes, which gives it's distinct flavour.
- Salt
Check my recipe card below for full list and exact quantities.
Step by step images
Lets see how to make Kalan.

- Boil plantain firstly in 1 & ¼ cup water with turmeric, red chilli powder, required salt and black pepper powder.
2. Cook until it gets cooked just right, not over cooked. Mine is easily cooked in 3-4 minutes usually.

3. Meanwhile, grind coconut with green chilli, cumin seeds and water.
4. Grind smoothly like this.
5. Add it to the cooked raw banana.

6. Let it simmer for 2-3 minutes.
7. Once thick and homogenous, lower the heat.
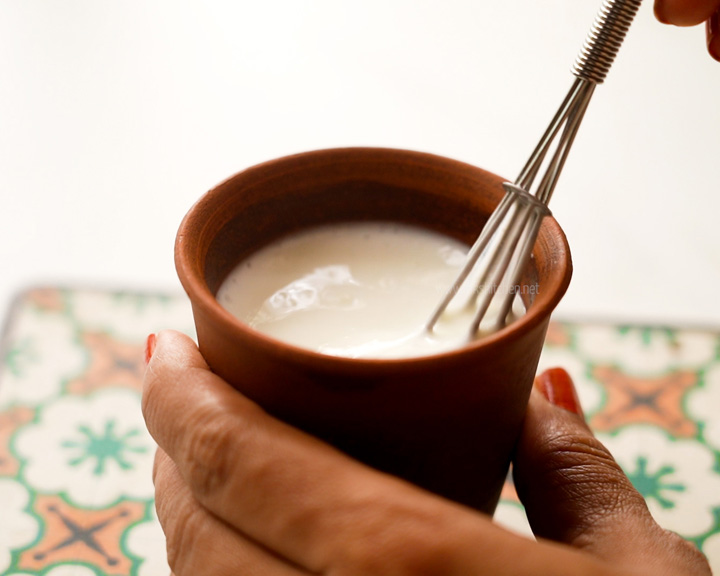
8. Beat curd smoothly.

9. Add curd to the kalan.
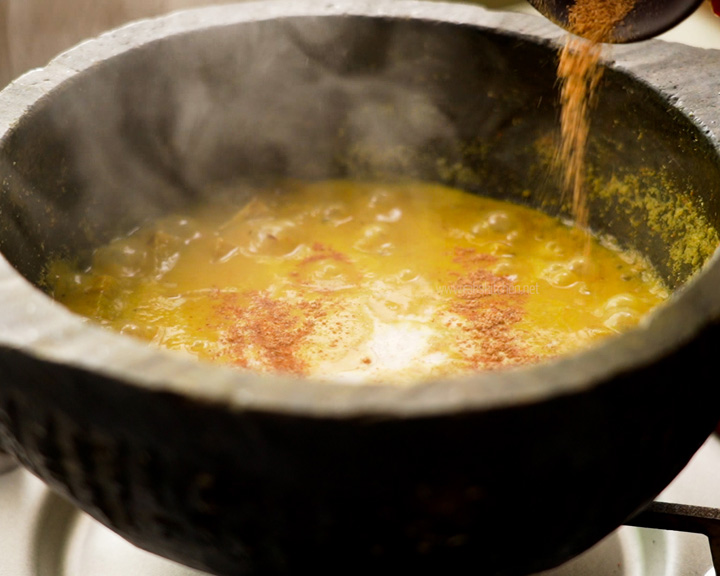
10. Then add roasted fenugreek seeds powder.

11. Mix well and simmer furthermore for 2 minutes.
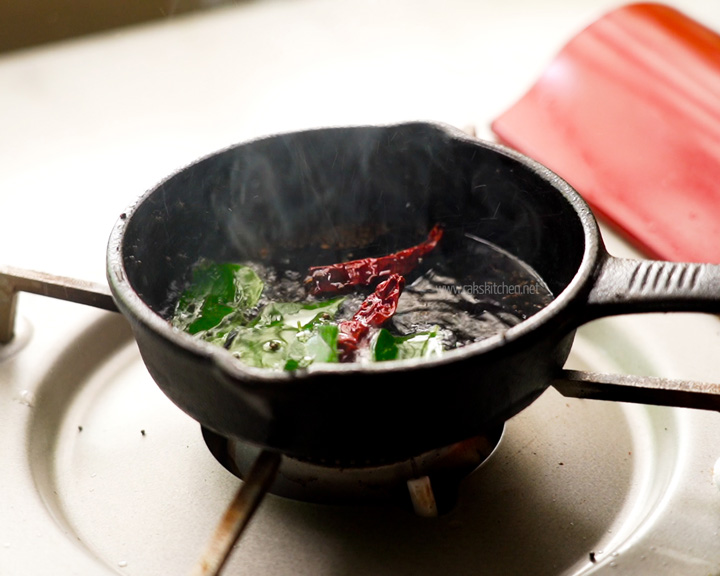
12. Then heat oil in a small pan and splutter mustard seeds, followed by red chilli and curry leaves.

13. Add to Kalan and mix well.
Serve Kerala Kalan with matta rice and pappadam, or as part of your Onam Sadya, Vishu Sadhya.

Substitutions & Variations
You can use combination of Yam and raw banana, which is how I see in many of the recipes.
You can use other vegetables like ash gourd, cucumber, yellow pumpkin.
Storage
If you boil kalan for long time until it is thick, it can stay good comfortably in room temperature for couple of days. Have not tried this on my own, but you can store in fridge easily for 4 days.
My notes
I know there's all types of spice used in this recipe like green chilli, red chilli, black pepper powder. But we add to balance the taste since we are cooking with yogurt.
Top tips
- Beat the curd smooth so that it looks homogenous in the curry. You can even blend it and add.
- Adjust spice level according to the curd's tanginess to balance the taste. Use more green chillies while grinding coconut.
- While adding curd, I suggest to lower the flame and add as you mix.
Serving suggestion
Serve kalan as part of Sadhya with matta rice and some pappadams.
Recipe card
Kalan Recipe | Kerala Kalan Curry
Kalan is a traditional Kerala curry prepared with plantain in yogurt and coconut base. You can also use other vegetables like elephant yam (chena).Servings 3 peopleCup measurementsIngredients
- 1 Raw banana
- ¼ cup Curd
- ¼ teaspoon Turmeric
- ¼ teaspoon Pepper powder
- ½ teaspoon Red chilli powder
- ⅛ teaspoon Fenugreek seeds
- powder Roasted
- Salt
To grind to a paste
- ½ cup Coconut
- ½ teaspoon Cumin seeds
- 1 Green chilli
Prevent your screen from going darkInstructions
- Boil plantain firstly in 1 & ¼ cup water with turmeric, red chilli powder, required salt and black pepper powder.
- Cook until it gets cooked just right, not over cooked. Mine is easily cooked in 3-4 minutes usually.
- Meanwhile, grind coconut with green chilli, cumin seeds and water.
- Grind smoothly like this.
- Add it to the cooked raw banana.
- Let it simmer for 2-3 minutes.
- Once thick and homogenous, lower the heat.
- Beat curd smoothly.
- Add curd to the kalan.
- Then add roasted fenugreek seeds powder.
- Mix well and simmer furthermore for 2 minutes.
- Then heat oil in a small pan and splutter mustard seeds, followed by red chilli and curry leaves.
- Add to Kalan and mix well.
Video
Notes
- You can use combination of Yam and raw banana, which is how I see in many of the recipes.
- You can also use other vegetables like ash gourd, cucumber, yellow pumpkin.
- Beat the curd smooth so that it looks homogenous in the curry. You can even blend it and add.
- While adding curd, I suggest to lower the flame and add as you mix.
YoutubeDo you like short videos? Subscribe now!InstagramMention @rakskitchen or tag #rakskitchen if you have tried this recipe.The post Kalan Recipe | Onam Sadhya Recipes appeared first on Raks Kitchen.
-
View
Pub Date: 26 July 2024 | 7:48 pm
Rak's Kitchen